Learn all about what you can paint with an Angled Brush!
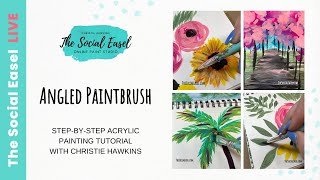
Christie Renee Hawkins shows what you can paint with an angled brush: leaves, grass, flowers, trees, landscapes, and tropical palms. She covers brush loading, paint thickness, pressure control, and the trick of not blending to keep strokes sharp and distinct.
Chapters
Hey everyone, we are going to do a quick technique lesson today. Um, I haven't taught on this in a while, so we thought we would do a refresher course on the different types of things that you can do with an angled brush. So I've got two different sizes Um, that I'm gonna show you today. I've got my bigger one and my smaller angled brush from my set that we're gonna play with. So just a few things, um, that I like to do with them. I do flowers, I do leaves and greenery. You can use them for grass blades. And then, um, I think I don't think I have an example here, um, but I also use them to do kind of a fun abstract type of tree. So we're gonna do a couple different things today, and I'm just gonna grab, um, some green and maybe a couple spring colors to do some flowers and petals and stuff into. So that's Desert Cactus Green, which is just a really nice subtle green. This is Cactus Flower. Um, what other color do we want? Maybe we'll just grab a little yellow, another pink. Hey Randy and Sally and Sam, you are welcome. How many of you guys use an angled brush on a regular occasion? Or maybe you're just not sure what you should be using it for. Um, so first thing I'm going to do is just load my brush up. So you want to have plenty of paint in there. Okay, and we're just going to start super simple, um, just using the brush and the shape of it to make the brush strokes that we want. So a lot of times I just do simple little strokes like this just to get them really pretty leaves that we can use in greenery. So you could have a stem attached to that, or you could just start filling in. And all I'm doing is just touching my brush down, just quick Perfect little leaves. How simple is that? Then you could also use it if you want to do, um, like grass blades. I usually start with the pointed tip down, just quick little— we kind of did some of this flicking motion last week. I was showing you guys when we did the peacock feather. But you can do some quick little grass blades with it, and then you can do some bigger leaves too. I just like the shape of it. It's because it's pointed and angled like that, it's just really good for just a quick and easy way to do some very simple leaf shapes. So I'm going to rinse that, grab my paper towel really quick. Hey Dawn and Patricia and Debbie, welcome! So I'm going to rinse that out. I usually just use craft acrylic paint. You can also use thicker body paint, but same technique for any type of paint that you use. And then I like to do some just super easy abstract flowers, just kind of going around in a circular shape. And you can do this with an angled brush, you can do it with a round, but again, I just kind of like the strokes that the angled brush gives. We don't want it to be, you know, a perfect circle, but circular-like, so they kind of look like little rosettes. So these are all just very easy and simple techniques that I'm teaching today, and then I also use them for for— let me see if I can— I'm just gonna grab a painting to show you. I'll grab— so this is my Jar Full of Sunshine. You guys have probably seen this before. Um, if you haven't, you can actually still sign up for this class. Um, we have this one available all the time for $15. Um, but I love doing sunflower petals with an angled brush as well. So we'll do a quick little sunflower, not going to be as in-depth as this, but you kind of get the idea. Um, but I just wanted to show you kind of a different different thing that I use them for as well. Lynn, if you can grab that link for the Jar Full of Sunshine and throw that in the comments, just in case some people haven't taken it and they want to. Um, that looks like maybe that's just the offer page. Hang on just a second. Oops. So Lynn, if you grab the link right above that, it'll say opt-in page. I think you grabbed the checkout page. Let me put it in there. There we go. So there's the link for Jar Full of Sunshine, just in case you haven't done that and you want to. And then we'll do a couple little sunflower petals to show you that technique. Um, Becky said hi from Arkansas. Hello! Do you like a stiffer brush or a softer brush? So I use synthetic bristles. They're not super stiff, but you don't want it— I mean, they're semi-firm. You don't want it super flimsy. So I'm gonna do a little color mixing. It's hard for me not to. But if you looked at these sunflowers, you can see I've got some darker colors in there. So since I already have pink here, I'm just going to take a little bit of my hot pink and my orange— not and my orange, we're going to make orange— and my yellow, and we're going to make an orange. So I've got just a kind of a mixture of those in there. We'll come back and add our center in. So you're just kind of going around in a circle using that point and just kind of pulling down. So I like to put a little bit of my warmer colors on first and then come back, kind of like we did the Gerber daisy a few weeks ago. And then let's grab— where is my brown? And I'm just going to use the same brush for everything today. Let's get a little black and add that in there. So these are just super simple— where is my black?— techniques for some flowers. How in the world am I missing black paint? Bear with me now. Don't know where my regular black paint is, but we'll use this thicker-bodied one. It'll work all the same. A filbert brush, um, someone was mentioning that they love is a— let me see if I can grab mine over here. A filbert has more of a— oops— curved, so it's almost like an arch shape. Which is another one that I love for doing different types of petals, but the pointy petals are great with the angled one. So I'm just going to come in and just dab my sunflower center here. Good, Jackie. I am glad you are liking it. I'm gonna get a little bit lighter. This is not white, white. It can be, but I just was grabbing what was handy next to me to make a little bit lighter yellow. I'm using a bigger angled brush now, but you can see either one is fine. Just pulled a little bit of brown in there. That's okay. So if you do something like that and you pull some of your other color in here and you didn't, you didn't mean to, don't let that stress you out. One, sometimes it just kind of looks good to have a little bit of that dark in there. But if you don't want it, all you need to do is let that dry. And then you'll be able to come back over top of it. So you've got a very simple little sunflower shape. You could do kind of like— if you wanted to do petals that came down, and you know, the more you push, the fatter that's going to be. So you're just kind of playing with your pressure there. So you could do a flower like that with the stem kind of coming out the bottom. And then I'm going to have to flip to another page to show you some of my other techniques that I use when I'm doing, um, like trees. This is going to stick, but that's okay. It's just a practice page. So you may have seen this technique in some of my, um, paintings. It's in my bonus tutorial at the end of my 4-day video series. It's Autumn Road, where I have all these colorful trees. It's in my painting for the Fall Chapel. I did a spring path that we're gonna kind of, um, do a small version of today, super fast. So I'm just gonna make myself a little path here. And we're going to line a couple trees along it. This feels very Bob Ross to me right now. So I just took some burnt umber, a little bit of like a cream color— it's actually called sugared peach, I believe— we're just going to make ourselves a little path here, and then I'm going to throw some trees up alongside it. So the angled brush can be used for this too, just quick blending. I've used the same brush for everything I've done so far. So we could, if we wanted to, come over here. We're just gonna go make a quick little scene because I think it'll look better than me just showing you one little tree. So we'll do a couple different ones. So kind of looks like a hot mess right now, but just wait. Lindsay said, is there a pack of acrylics you recommend? I don't have a pack that I recommend. I do usually use DecoArt as my favorite. We have a DecoArt link where you're going to get the best colors from their website because they don't always have them in the store. Lynn, if you are still here, if you can grab our DecoArt link and throw that up for her. That's what I would recommend, and I love all their colors, so I usually go on their site and see what's new and then just grab a bunch of my favorites. So I'm just going to come along and we're just going to make a couple little trees, so just some quick vertical lines that are going to kind of act as our tree trunks. Let's throw a couple more, and then I'm gonna start— we're gonna do some pink trees today. I'm gonna start with this dark pink that I have, and I'm just gonna start throwing down these brush strokes. So you may have heard me, like, say the phrase, like, the art of not blending. This is kind of what I mean by that. So what I'm doing is coming in and laying down these brush strokes So they're kind of like just angled quick pulls. Okay. And that you're stacking them on top of each other. What you don't want to do is stay connected and then continue doing this because then it just blends into one big blob. So we're kind of creating a little bit of separation there. I should have done a little bit of sky. Let's switch brushes and do a little bit of sky. I didn't get any blue. We're going backwards. I was so excited about the trees, I did the ground and then didn't do the sky. So any blue you want, and I'm gonna grab some of that peachy color. It's not really peach, it's like a cream, just to kind of lighten that up. I'm not gonna fully mix those colors together, so I just grabbed some of that cream, a little bit of this blue. We can pull those trunks back over that if we want to. But I do use the same technique for the sky and just kind of lay those brush strokes down. Can even add some more back here. We have a little blue peeking through. So I usually do this with probably 4 or 5 different colors in the trees. So I'm just going to wipe off the excess there, grab some of the lighter pink. So it's just a fun little abstract look to trees, and the main thing you want to do is just not over-blend. So you're just kind of laying those brushstrokes down. They can overlap. And they can blend where they overlap, but you don't want to stay connected to the canvas and continue, if that makes sense. And then I like to do maybe a few of the leaves just kind of falling. Do I want any other colors in there? I'm trying to decide. Maybe even a little bit lighter pink. And you can do all kinds of shapes with this, like all kinds of shapes of trees. I've done some— I can kind of paint on here and show you too, where it's just one trunk and kind of more of like an almond-shaped tree. Let's pull these back over. Maybe some little skinny ones back there. And then I like to just throw in a couple little dark lines up here too, to kind of act as branches. And then I'm going to let that dry and we'll over— overlap those. So we want the idea of branches, but we don't want them on top, right? Like, we want the leaves. On top, but we want those kind of peeking through. So I'm just gonna cover them up slightly. You can still see them, but not all the way. Kind of pushes them, pushes them back a little. I'm gonna grab my skinny little liner. Pull these trees down just a little bit more. So we've got our little spring forest of trees here. You could come in and When I do the full painting, I take some of these colors and I throw them down in the greenery below. So you could keep going with this and make it a complete painting, but I just want to kind of show you some of the different techniques that I use the angled brush for. So you can use it for lots of things. You can use it in landscapes to do blending like I'm doing now. Obviously all the leaves and the different petals that I showed you. What else? I'm trying to think what else we can do with an angled brush. There's a lot of things you can do with it. It's similar to, you know, what you can do with a flat. It's just having that point just really helps you do some of those different shapes super easy. What I love about it is you're really just letting the brush do the work for you. So once you learn the different techniques you can do with it, it's very simple, and these are some easy things you can start practicing in your mixed media pad as well. Okay, does anyone have any questions for me before we jump off? I will not be here live next week because my husband and I are going to Jamaica. Oh, that's what I was going to show you. Speaking of Jamaica, I was going to show you palms. Um, let's do a couple palms. Palm branches with the angled brush. I do palms in a lot of different ways. But yeah, we're gonna be in Jamaica next week, so I won't be here teaching live. But I do have something fun coming this summer. I want to do this on a white page so you can see it. A little better. Let me see if I have another blank page in here. This mixed media pad is just about used up. So this was from one of— this was one of my sketches from when we went to Belize. Um, but I love taking, um, my mixed media pad with me when I travel so I can do quick little scenes like that. So obviously we will have our trunk here, but you can make palms with lots of different brushes, but we'll just show you today with an angled brush. I need some fun, more lime green. This one is matcha green. Maybe even a little teal just for fun. Maybe I'll do both these colors together. So the beginning of a palm tree is kind of like making fireworks. That's how I like to have you think of it, just kind of exploding from that base. And then we can just use our angled brush to start throwing in some of the leaves. And there are so many different types of palms. You have your thick, kind of more bushy palms, and you have your really skinny ones. But this is really easy to do with an angled brush. This one looks a little wonky. Let's fix it. I'm gonna come back in and add Aren't those colors pretty together? That is teal, mint, and matcha green. How many of you love the tropics? Painting things tropical, I love it. So I got some ideas coming up for some tropical paintings. And then just for fun, let's throw in some crazy colors, maybe a little accent of pink. Yes, I definitely— um, Laura said she likes this versus the fan brush. I definitely like this one better. Um, you can also— wrong color— you can also use, um, rounds. And if you wanted this to be more, um, so like I just did kind of a different brush stroke there, more feathery looking, so I was using it like skinny like this, you know, but you could also do more feathered looking. Here, let's show— this color might show up better. So you could do wide palms that are more feathered out to kind of a softer look. Like this. We'll make another little one over here. So it's got more of like a feathered soft look to it. Which one do you guys like the most? Um, coconuts, just do a couple little ovals up there if you wanted those. Let's see how much paint I have left and I'll see if I can do a couple here. You guys like the first one? I prefer that, but this is kind of fun too. Just do a couple little oval shapes here, add some little coconuts in. So there you go, there's some Several different things that you can do with an angled brush. So we did some palms. Let me flip back through here. I don't remember which direction I went. I think it was this way. All right. So we did our palms. We did some flower, some super simple leaves and greenery, um, a little bit of grass, and then our little abstract trees, our little forest of spring trees. All right, so I hope you guys enjoyed that. And I'll be back, um, the beginning of May, that first Wednesday in May. I'll be back for another Facebook Live with you guys. All right, stay tuned. Um, the next big thing that we have coming up next month is, um, doors opening again to Tribe. So if you are not already a Tribe sister or part of my membership, we will be opening doors um, in May for that. Um, so make sure you're on our email list, our text list, so you get all the updates of all the new fun stuff that we have coming. And, um, I will see y'all when I get back from Jamaica. Okay, bye!










