Learn how to paint Clouds with Christie
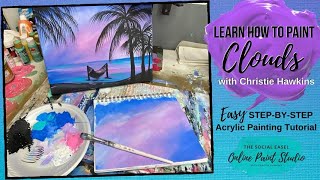
In this impromptu Facebook Live session, artist Christie Renee Hawkins demonstrates a mixed‑media pad technique for painting clouds in a beach landscape she calls “Paradise Beach.” She walks viewers through brushstroke motions, color mixing (cool vs. warm palettes), layering, and feathering to create depth and variation in clouds. Christie shares practical tips such as using a filbert or flat brush, keeping the brush in contact with the canvas, and avoiding color wheel opposites that produce muddy tones. She also shows how to fix common acrylic mistakes—like a black dot or accidental paint spills—by letting paint dry and painting over it. Throughout, she emphasizes a relaxed, non‑perfectionist mindset, encouraging viewers to experiment, practice on mixed‑media pads, and view errors as learning opportunities. Christie promotes her paid “Inner Tribe” membership (doors opening March 9) and a free Facebook group where over 10,000 women share work, receive tutorials, and support each other. The video concludes with reminders to join the community, watch the tutorial again, and stay tuned for future live sessions.
Chapters
Hey everyone! So we've got another little impromptu Facebook Live for you today. I just got done teaching this painting inside my Inner Tribe. So we're doing landscapes this month, and today we did— this is what I call Paradise Beach. This was from a photo that I took on an anniversary trip that Cory and I took to Cozumel. A few years ago. So they got the full painting in our inner tribe today, but again, I have leftover paint, so usually that means a little bonus for you guys. I'm going to show you guys how I do this type of cloud. So I love doing clouds, especially this type. I've done it in several of my paintings, but it's a fun technique for you to practice, and I'm going to show you in my mixed media pad. So I'll post the link if you're not sure what a mixed media pad is. I'll post the link to my Amazon store after so you can see all the supplies that I use. And you can do this with any color combination you want to. So I'm showing you like cool sunset today, but you could do this with blues and whites and just have a daytime sky, or you could do some yellows and corals and, you know, more of like a warmer sunset. So whatever you want. That is what we did in my tribe today, and then I'm gonna show you guys just how fun this kind of background is. So this is going to be a short and sweet video, but hopefully help you out and give you something else to practice on. So, um, if you want to learn more about painting with me and learning full tutorials from start to finish, that is what my Inner Tribe membership is all about, and we open doors again March 9th. So I only open doors twice a year to the public to be a part of the tribe, and it's coming up. So mark your calendars for March 9th. The link is in the description above if you want to read more about it and get on the waitlist. So when you click that link, it'll give you a description of what my tribe is and what all it includes. So we're gonna do some fun clouds today. These are just some cool colors that I have. I've got some bright blue and white. I'm using a filbert brush today. You can also use just a flat brush. Either one works. And we're just going to start super simple, okay? And I'm just kind of going back and forth, crazy brush strokes, nothing too streamlined. Or exact, just kind of back and forth. My bristles are staying connected to my canvas while I'm working on it. So what I mean by that is I'm not like picking up and touching down and picking up and touching down. It's staying connected. And think of like an X or like a figure 8, like I just am moving kind of back and forth. And we're going to start with Need a little bit more blue. So I'm starting darker towards the top. There's no right or wrong how to do this. And again, just kind of back and forth. So start with plenty of paint on my brush, and then I just keep blending, just back and forth blending. I'm gonna grab some of this like lavender color here. And the thing I love about skies like this is any sky you look at, they're all completely different. Sometimes you have the big huge clouds that are floating in the sky. Sometimes you have little ones. So there's really no right or wrong to this or what it looks like. You can just play with it, but this is just an easy way to start experimenting. And I was even telling the girls in my group this morning before they start on their canvas to do a couple pages in their mixed media pad practicing clouds and just kind of getting used to it. So for those of you just starting out, maybe you're new to painting— painting takes practice just like everything. So the more you play with it and the more you give yourself the freedom to play and not be so serious, right? Not be a perfectionist, because art is not about perfection. It's about creating. And having fun and relaxing. And just doing these brush strokes is going to do that for you. So can you guys already see how this is starting to come together and looking like clouds? And I'm doing just a super basic brush stroke, and you're just not constantly— like, you want some areas where it feathers out a little bit, and you want some different variations in color, so darker and then lighter. We've got some purples and pinks and blues. So variation is good. You don't want it to just be one big solid color, right? We want some variation in there. I have a free Facebook group too. So the free Facebook group is for you to take these lessons that I do weekly on my, um, on my Facebook page. So I come on here weekly, sometimes biweekly if my schedule allows, and I do some quick little tutorials with you, and then I share them into the free Facebook group so they stay there and they're easy to go find. And the free Facebook group is for you to practice what you've learned from me and then share it inside that group. So you have a place to share your artwork, and there's other women doing the same thing in there. So you're around like-minded women who are all learning the same things that you're learning. So it's a super fun group, it's completely free, you can join that. To share from the tutorials that I do on my Facebook page. We have over 10,000 women in there right now, so that's just amazing. So I wanna add— so if you look at this one, I started kind of blues and light blues and lavenders, and then I got more pink in the middle. So I'm just gonna keep on— I'm not rinsing my brush. The reason I don't have to is because I'm using all cool colors. All of these colors can be mixed together and it's all going to turn out pretty no matter what you mix together. Now, if I was to pull an orange or a yellow into this and I mixed it with the lavender or the blue, then that would not be good because they're opposites on the color wheel and you're going to get an ugly neutral tone. So if you're working with all cools, get a color wheel if you don't have one, pull an image up online All cools can always be mixed together and they're nice and pretty. So I'm going to grab some pink and a little bit of white. So see how much paint I get on there? So plenty of paint to start with, and then we just keep blending it out. And you can kind of change the shape. Like, let's say you know you want a cloud kind of curving up over here. So just soften those edges. Maybe grab a little bit more white. Now there are tons of ways to do clouds, and if you look it up online, you're gonna find all kinds of different ways different teachers teach it. This is one of my favorite ways to do it, and I like it because it's simple and easy. Sometimes things look a lot more intimidating than they are. You just have to try them out. So look, I've kind of got like these layers of clouds that are shifting up this way. So I want to add a little bit of darkness over here. Look how that's starting to make that look like a cloud. Kind of overlap those edges. Have some overlapping clouds here. Now pull in some white. So it's all about this feathering out that I'm doing. So if you were to touch my canvas right now, this would not be very thick. Like, most of this is already dry. That's how quick acrylic paint dries, and I'm doing such thin layers of paint that it's drying quickly and it's allowing me to do this feathering out motion that's giving you that effect. Maybe add a little more dark under here. I could paint clouds all day long. So does that help you guys kind of get an idea of some ways that you can do clouds? Hopefully. I'm just gonna keep— I'm just gonna fill this in all the way. I don't know what the clouds are gonna look like. We're just gonna have fun with it and see. Maybe a little bit more pink down here. See how we leave those little layers of dark in between? Then when we come back and add some white You've got a little bit more contrast there, and not everything has to be perfectly blended. Let's say I want some brighter white along some of these parts of the clouds. Just lightly blend it in, leave like that white cap, and then just soften it in to the clouds underneath. Could do the same thing up here, a little brighter on that edge. So you're just kind of layering and playing with it. You guys like it so far? Are you ready to try it out? Make you want to go grab a mixed media pad and start playing around and making some clouds today? And I love these little quick lessons for you guys too, because these are quick wins. I want— like, if you're new to painting— how many of you are new to painting? Let me know in the comments. Are you new or you've been doing it for a while? Maybe you are a crafter but you want to learn more about painting and techniques. So let me know where you're at. But these are fun, quick little lessons because here's the thing— if you are new, and I know a lot of the women who ended up joining my tribe, they're like, oh, I've always wanted to paint, never thought I could, and now they are painting like crazy and they're beautiful. For most of us, we just need to get started and we're scared. We're scared to get started. We're scared we're gonna mess up because that's like just been built into us as grown-ups. We're not allowed to fail anymore. When we're kids, we tell our kids to try new stuff all the time, right? Don't be scared, just have fun. Well, it's the same thing with us. Don't be scared. This is literally— I want you to think about this too. This is a mixed media pad. If I did this and I hated it, This also kind of looks like mountains, by the way. If I did this and I hated it, so what? Rip the page out, toss it in the trash if you don't want to look at it anymore, and then move on to the next page. You don't have to commit to a canvas and feeling like it's gonna be perfect. Think of this as like a sketchpad for painting. This is for you to play in and practice and have fun, and you're gonna learn. You know, one of my favorite sayings is to fail forward. You can't grow. You can't continue to become a better artist if you don't hit some hiccups along the way. Alright, so embrace them and know that every time you do that, you're one step closer to nailing it. So that's how I look at it. And let me ask you guys this. If you're a Tribe Sister on here, #TribeSister, don't tell them where it is, but I want to ask you guys, can you tell in this painting that I just did. Can you tell where? I'll give you a hint, it's in the sky. I messed up in the sky and I had to go back and fix it. So I'm going to give you guys just a second, and if you point it out, then yay, you figured it out. But I'm asking you this to make a point, because I messed up in the middle of this painting and I got a black dot right in the middle of my sky. And then I had to figure out how I was going to fix it. And this is what I love about acrylic paint, and this is what I was telling my tribe sisters, is acrylic paint is so forgiving because all you have to do is let it dry and you can paint on top of it. So it's one of our favorite phrases inside my group is just let it dry. If you get messed up, if you get frustrated, let it dry, walk away. Blow dry it, come back. You know, you can fix anything in acrylic. You can paint right over top of it and you'll never know it's there. So there was a black dot in the middle of my sky. I tried to get it with a wet paper towel and that messed up even more. So that was a bad idea. And then I was like, alright, it's fine. I'm gonna add a little paint. I'm gonna let it dry. We're gonna move on to another part of the painting. And then I came back to it and I fixed it. So my question to you is, can you tell where? And then I'm gonna tell you where it was and how I fixed it. And my goal in sharing that with you is for you to realize that there's no such thing as being perfect. I've been painting my entire life. Everyone's gonna— they're happy little accidents, just like Bob Ross says. And it turned out that accident turned into being one of my favorite parts of the painting. So trust the process, keep moving forward. I'm gonna give you guys a chance to point out if, if you see anything, and I'm gonna read some of your comments really quick. So I'm gonna, I'm gonna show you where it was right here. If I pull it really close, you might be able to see there was a little black dot right there that happened when I was doing my palms. It flicked and it landed right there. So first thing I did was added white paint to it because white is your best friend. Think of it like whiteout. So I added some white to it and I let it dry. And I came down here and I did the hammock and the other part of the painting. And then I came back after it was dry and I just did what I just showed you guys and I just blended again and played with the sky. Now I made my clouds— see, you can see how different these are, these from this. I blended a lot more in this painting. So again, no right or wrong, just play with it and have fun. Um, but so I went back and I blended again, and I wanted a little bit more pink in my sky, so I did pink and white and blended it. But in order to fix it, here's what I want you to realize: I already had my palms on there. So to fix that painting, I had to do my background again, and I had to overlap. I had to paint over top of some of my black palms, or else it would be very obvious. You'd be able to see where I started and stopped my paint, and then it would look like a mistake being covered up. So instead, I kept blending until I got that pretty variation in there. And then once that was done, I came back with my palms and just painted my palms right back over top of it again, and I fixed my mistake. And if you guys missed it last week, um, I, uh, I was teaching the Spring Chapel inside of our group, and I'd never had this happen in 6 years. I keep my paint cup here filled with dirty water right next to me, and I was pulling a canvas over to show them something and I spilled my paint water all over my canvas. And we were almost done. I was almost done teaching the lesson, and paint went over the entire thing. And, uh, I kept the live going. I didn't cut it off. I showed them how I fixed it, and then we finished the painting. And now you can't even tell. But the reason I share those mistakes with you guys is so that you know you can keep going and to not get frustrated and stop. I want you to keep going and keep playing. So I'm gonna change this while I'm talking to you guys. I just want to go back over it again. I like mine a little bit more blended. I'm gonna make it look more like my beach sky below, but this is what I mean. This is already dry. So now I can just go back over top of it and play with it some more. And maybe you don't even see separation in the clouds. Maybe it just jumps from one color to the other. But the thing is, and I tell, I tell my group this too constantly, when you're working on this stuff, don't be so hard on yourself of what it looks like close up when you're like right in front of it too. Take pictures of your work while you're painting. Step away from it. Look at it from across the room because it's really hard for us to judge what the finished piece is going to be like when we stay 8 inches away from our canvas because that's in reality, that is not what it's going to look like when it's hanging on the wall or in a frame somewhere. And that's the other thing I love about mixed media pads, by the way, is these have perforated edges you can tear them off and you can frame them. Just get like a glass frame and then you can frame your artwork as well. So if you do something in your mixed media pad that you love, it doesn't just have to stay in there. You can tear it out and frame it. So we did— if you missed the lesson from, I think it was last— no, maybe 2 weeks ago, I did a lesson on blending and blending like sunset skies. So this is still blending, just a little bit different. So you've got 2 lessons on blending this month that you can go back and play with and practice and hopefully learn something new. Denise, you can sign up, um, just to join the free Facebook group. I believe Gretchen's posted the link. If she hasn't, I'll post it in the comments when I get off of here. And then if you guys want to learn more about painting with me, full paintings, step by step from start to finish, that is my inner tribe. It's called Christie's Inner Tribe, and it's my membership, and I only open the doors a couple times a year, and I'm opening March 9th. And the link to join the waitlist for that is in the description, so you can sign up there. So I hope you guys had fun. I hope, um, it was a learning lesson for you. And something you can practice and play with. So yeah, you can go back and watch this video on my Facebook page under videos, or you can join the free Facebook group. It will be shared in there, and you can share your progress. Kathy said, great to know they don't stretch out with water. I think you were talking about the mixed media pads. These don't. So some people ask me, like, they will— like, this is another piece I did in my mixed media pad, and I can just tear this edge off here and then I can frame it. So if you get really heavy with your paint, it will— like, you can see how this is like warped a little bit while it's wet. All I have to do to flatten this out is put like a big heavy book on it for like a day or so. And then it's flattened out. And if it's completely dry and ready, if you put this in a frame with a glass and a back, it's going to flatten out inside the frame anyways. So that, that was from my mixed media pad also. So you can kind of see how, how that works. All right, maybe I'll pop on later this week with another lesson. I can't tell you for sure yet. If you want to be notified when I go live, you can go to notifications at the top of my Facebook page, and I think it's like select all, and Facebook will say The Social Easel is live and let you know when I go live. Alright, hope you had fun. Let me know in the comments and join the Facebook group if you want to share your work. Bye!










