Learn to make Roses in Different Styles with Christie
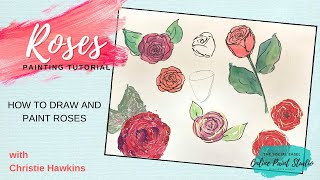
In this live‑to‑painting tutorial, Christie Renee Hawkins of The Social Easel walks viewers through multiple quick and easy ways to draw and paint roses, timed for Valentine’s Day. She demonstrates two main versions of rose sketches that are part of her paid "Lovebirds Challenge" and then shows a variety of media approaches: brush‑pen sketching, pencil outlines, free‑form ink lines, watercolor (or watered‑down acrylic) washes, palette‑knife textured paint with gel medium, and paint‑pen detailing. Throughout she names specific supplies (Sharpie waterproof pens, Faber‑Castell brush pens, paint pens, gel medium, acrylics, watercolors) and shares practical tips such as thinning acrylics, letting paint dry before using paint pens, and shaking paint‑pen bottles. Christie promotes her $27 Lovebirds Challenge (two‑day, two‑style painting course) and directs viewers to free and paid Facebook groups, a text‑alert number, and an upcoming live session on Michaels’ page (Thursday, Jan 21 at 7 PM CST). The video ends with encouragement to share work, join the community, and a reminder of the limited‑time sign‑up window.
Chapters
Hey everybody, it's Christie with The Social Easel, and we are just doing a straight, straight-to-painting day today. So you don't get to see me, but you're gonna get to see me show you some fun little roses. So I thought this would be a fun flower to do with you guys because Valentine's Day is just around the corner and roses are one of those flowers that a lot of people ask to know how to paint. So I'm gonna teach you kind of how to paint and draw them. And what you're looking at right now is the lovebirds that you have probably seen me talk about. I'm gonna show you both the versions, and we've used some of these roses in this painting as well. So I'm going to show you a quick, easy way to make this style. But this is one version I'm going to be teaching in the Lovebirds Challenge, and this is the second version. So I know— I think I need to raise that up just a little so you guys can see the whole thing. So let me know if you like those, if you're excited about doing them. If you are a Tribe Sister and you are watching, you get the Lovebirds Challenge for free. So you do not need to sign up. I've already put a link to the Facebook group inside our Inner Tribe group. So again, if you're a Tribe Sister, go there to get access to that as well. Obviously, I'm not going to show you the whole painting today, but I am going to show you how to do these fun little flowers because they're super easy and fun, and it's a fun way to do a rose. And then I was just kind of playing around and sketching some other ones. Again, you know, I'm using a waterproof pen for that, but I'm just going to show you a few versions of roses today. So you can text text alerts to this phone number. It's 417-217-7044. So if you want text alerts when I go live on my Facebook page, just text that number and I send out texts prior to going live. What color of roses do you guys want to paint today? This is on the public page. That link is for everyone else to sign up. It's $27 for the Lovebirds Challenge. And you are learning two versions of the painting with me over the span of two days. So we're doing it inside a private Lovebirds Facebook group, and yeah, you get two versions, two versions of the painting. We're gonna do a pen and ink kind of watercolor/watered-down acrylics, whatever you choose, and then we're gonna do an acrylics version. If you can't make it to it when I go live inside the group, that's not a problem at all because you can go back and watch the replays whenever you want to. We're gonna use a couple different things today. You can use a Sharpie. So when I say waterproof pen or marker, Sharpie's waterproof. You can draw with this and then paint over top of it. I like these Faber-Castell. There's a set in my Amazon store. This one is the B. It's kind of a brush tip, and then there's also— where's my jar of pins? Oh, it's hiding behind here. There's also more of like the fine point ones, super skinny lines, so you can kind of decide what you want as far as that. And then I've got paint pens in black and white that I'm going to show you how to use on some of the roses. So roses can be super fun and easy. They're probably easier than what you think, but we're going to start with a little drawing first. And I think I'm going to use that brush pen that I like. So I'm going to start with the, um, the brush pen. Again, this is waterproof. And let's start over here, and we're just going to start with kind of like little curves around. Okay, so kind of like the inside of a rose kind of swirls, right? And then after you get those, you're just gonna keep going around and make little sections. So these are kind of just freeform little lines. Maybe if you want it opened up a little bit more on the outside, you can make these outer lines a little bit bigger, and that's it. And then you've got a rose right there. Another way you could do it— so this is like an open-faced one. Maybe you have, you know, some greenery coming out around it. I'm gonna fill these in with, with paint to show you guys too. To. Um, maybe we want one that's like on a, on a stem. So kind of get your shape down here. Now I, I have mine where it is kind of sketchy. I'm not worried about having perfect lines or anything. If you don't want it to look like that, you could do this with like a pencil first, kind of give yourself an idea of like the shape that you're wanting that rosebud to be. So we know that's kind of like the shape we want. And then, you know, like a stem right here. I'll use this as an example. So you could, you could do this and just kind of freehand it if you wanted, or I could kind of use this shape here. And again, kind of start on the inside. And start building your way out. But this one's not going to open up all the way. And then in the front, we want a petal to kind of come down across and over. And then just kind of pull the stem down. Maybe have a big old leaf coming off each side. So those are two different styles. And then you could just do like a fun whimsical kind of rose. Yeah, the pencil wasn't for you to see. It was basically just to give you like a— the pencil— I can draw it darker— was basically for you to see the shape, and then you're kind of like, you know, that's the shape that you want that to be. So you're kind of doing that for yourself as an outline, and then you're doing the pen over top of it. So that's what the pencil was. But like a fun whimsical one Let's start with a circle and kind of work backwards, maybe add a couple lines around there. So these are just some quick little designs for you, and then you can fill these in with— someone said pink earlier. I'm gonna use my watercolors, just kind of water this down. We'll do a couple different colors, and then you can just go right over top and your pen. And then if you want to make that black line come back on top, you could sketch back over it. And that's just a real basic color. Then if I wanted— that one's pretty watered down, pretty light, but I could come in and have some more pigment on some of those petals to kind of pull them out. Maybe even take— I'm gonna take a little bit of blue with my red, and what do we get? We get like a purple rose kind of color. You could come in and add It's kind of like a burgundy-ish color if you wanted to add a little coloring and shading in there. And you could keep layering with that, with watercolor. Now again, I'm using watercolor. You can also just water down acrylic paint. I'm just gonna get like a dot I might be able to come a little closer with the camera. Hang on. Is that better? So this just— this is a dry palette, and I'm just watering down acrylic paint, and you can change it to get the different consistency that you want. And I can do the same thing with acrylic paint. So how easy is that? You don't have to go out and buy new supplies if you don't want to. Just water down your acrylic and treat it like watercolor. Pretty easy peasy, right? Then let's get some green, and I even mix the two. You can go back and forth in the same painting. You're not going to be able to tell a difference. This is just a real fun, loose style, and I've started playing with watercolors a little bit more just because I like how free and loose it is, and that it doesn't— it's not supposed to be perfect. You want it to kind of take on its own form. It doesn't have to stay stay in the lines. Kind of make it however, however you want. Maybe I want to add a little bit of brighter color. What do you guys think so far? Do you like these first two? Which one do you like more, the open one or the rosebud? And just play with different greens. It doesn't all have to stay the, the same color there. Make sure you guys are sprinkling this video with your friends. Let them know what you're watching. Learn how to paint some flowers with you. And we will have a— if you're not already in my free Facebook group, if you paint these and you want to show me what you did, we're going to be putting a post in our free Facebook group for you to post your work that you worked on. And if you weren't with me last week, we did some Valentine's cards ideas that you can go back in my videos on this Facebook page and go check those out. And we're putting a post in the free group for you to share your work last week as well. I'm gonna do this, this last kind of watercolor one. Like, this one's not as realistic, you know, just a light circular shape with the spirals inside. And then I'm gonna show you a palette knife version, and then I'm gonna show you a messy version with acrylic and then put the fun squiggly lines over top of it. Let's do some lime green on these. Maybe a little bit more dark here and there. You could just keep playing. And you could also change the way that you do it. This is kind of how we're going to do it with acrylic, but I can show you with the watercolor too. You could just come and make these little blobs And then once that's dry, we can come and draw the lines over top of our circle or our blob instead of drawing the lines first. So you can do it either way. So similar style to like the roses that I did in our Lovebirds painting, which don't forget you can sign up for. It's only $27. So if you want to learn that whole painting and the pen and ink watercolor version, make sure you sign up for that. It starts January 25th. 4th, 25th, 25th. It's that Monday. Um, but I'm going to show you how we do that version, and this is with acrylic paint. So we're going to use this kind of hot pink color that I used as watercolor, but I'm gonna make it just acrylic paint now. Get the water out of my brush. I don't want water in my brush with my acrylic when I'm using it this way. And same thing, we're just gonna kind of make these little blobs. I'm gonna let those dry. This one's almost dry. While I'm letting that dry, I'm gonna grab a palette knife and I'm gonna add some gel medium to my acrylic paint, and I'm gonna show you what that does. Here's some medium right here. Is this already open? No, let me grab one that's open. So if you are not familiar with what gel medium is, it's something that you can add to your paints to thicken them up. So craft paint is really thin, so if we want it thicker for when we're doing like palette knife painting You add medium to it and it doesn't change the color. It doesn't do anything like that. All it does is thicken the paint. So I'm just going to mix this in and I'm going to grab a little maybe red and white on here just so we have some different colors. Okay, so this palette knife version— how many of you painted with a palette knife before, or does it scare you? They're really fun once you get used to them. So we're just gonna just kind of go in this circular motion here. And these are messy, messy, messy. Grab a little red, just kind of pulling it around. Again, we don't want like a perfect circle. Pick up a little bit of white in there, and I'm just kind of moving the paint around. And I'm not gonna put like heavy black lines with it. I'm just gonna kind of keep layering and playing with it. Kind of doing— you can dig your knife in if you want some of those lines in there. You can dig through your paint to give it more texture. Or if you don't like that, you can smooth it back out. So the thicker the paint is, it kind of gives you some more freedom with that. Now if I keep doing too much, then it's just going to blend all those colors together. So I want to have a little bit more contrast in there. Let me get some more red. Kind of use those different sections of color to break it up a little bit. And For our leaf, I'm just gonna grab a little of the green. Now, you don't— I didn't put any medium in this. You don't always have to add medium to your paint if you don't want to. It just makes it easier when you're working with palette knife. It makes it thicker. So it might be something you want to try. Maybe have another one coming out over here. So, and this may not be your favorite style. It may be too loose and, and wild for you and not realistic enough, but it's fun to try out the different ways you can do it. And maybe even, like, I'm just thinking I maybe want to add like a little wine color in there. I love doing these types of flowers, and I just keep playing with the color. Look how pretty that one is. So some palette knife roses. So we did this, remember that I told you you could come back and Start in the middle. See how my lines are not matching up? They're overlapping and going in between. So you can do opposite. Do it that way. And then for this, these are just a little bit wet still. Let me try to blow dry it super fast. You want to make sure when you're using paint pens with your paint that your paint is dry, because if it's not, your paint pen is going to drag through and, um, and you're going to get paint all over your paint pen. It's not going to work. Okay, so I've got these— let's shake this up a little bit. This one's black, and we're gonna do really, really similar to what we did with watercolor. It's just gonna look a little bit different with this and a little bit messier and crazier. So I'm shaking that up, and then if you haven't used paint pens, you got to hold it down and prep it. Always shake it up with the lid on so you don't splatter paint everywhere. Let's see if it's gonna work for us. So we're gonna do like a squiggly little mess here in the middle and then kind of the same little thing, a little looser. Coming out around the sides. I'm trying to avoid some wet paint on there that I see. And then I think it's fun to go in and add a little bit of white in there too. And they don't have to match up. This is about being messy and free and loose. It's just a fun style, and incorporating paint pens in with your paint, just something new. And you guys know I love gold. Maybe we want to add a little gold around our flower. Just some squiggly fun little lines. And that's it. Taught you guys some different ways you can do some roses. So hopefully you can practice those, maybe make some cute Valentine's cards for someone, or a little Valentine's painting that you could send someone. Um, but yeah, you've got the messy, loose, crazy. These are what I call the Christie style down here. This is the more contained. Um, you know, it's still a little bit messy, but, um, you know more solid lines. I just like the loose and the crazy and the messy. So hopefully you guys enjoyed that. If you came in late, just jump back to the beginning and you can watch all the, all the different rose techniques that I taught you. And don't forget, there's only a few weeks to sign up for this for $27. You get to learn this version and the pen and ink/watercolor version. It comes with a complete supply list. You'll have a template. For the, the birds, the birdhouses, not the flowers. You kind of saw how I do the flowers. We're gonna do loose and freeform for that, but I'm gonna show you step by step how to do this entire painting and the watercolor version that I showed you in the beginning of the video. So I hope you guys enjoyed that. I hope you have time to paint today or tomorrow or this weekend. And if you're not already in the free group, just find that. You can just go to my page and go to groups. You'll see it there. Request to join the free group. We make approvals once a week, and that'll be a place where you can come and share your artwork when you are done. So that's all I got for you today, and I'll be back next week painting something different with you. Oh, you know what else is next week? Michaels. Next Thursday night, mark your calendars. Thursday night, the 21st. 7 PM Central Standard Time. I will be live on Michaels page, and then we'll stream it over to the Social Easel also. I'll send text alerts out. And we're gonna be painting palette knife flowers in a vase with Michaels. So I get to be a guest artist on their page again. I'm super excited about it. So that's something you can plan on next week is Thursday the 21st at 7 PM Central Standard Time. So if you missed— if you want to sign up for the link, they're going to have a sign-up for it, but they're also going to stream it to their Facebook. That's pinned at the top of my Facebook page on here as well. So I will see you next week. Bye.










