Love Bird Painting Craft Tutorial || The Social Easel
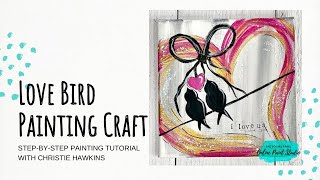
Christie Renee Hawkins paints love birds on a small canvas using dry-brushed pink, metallic gold, and black details. She walks through the whole thing on a 7x7 canvas, shares tips on dry-brushing and masking, and recommends specific DecoArt products and brushes from her Amazon store.
Chapters
Hey everybody, we are gonna do a quick and fun little Valentine's painting today. So this is the— this is going to be so quick and easy, you're going to love this. You can do this yourself, do this for a gift for your loved ones, or do this with your kids or grandkids. But I just did this big loose abstract heart on here, and then at the very bottom I stamped the words "I love us." So you could make that whatever you wanted. You could put names on here, initials, that would be cute too. And I'll show you the stamp set that I'm going to use today. So this is from a few years ago when I taught local classes, and I did this as— these make great custom orders too. So if you're wanting to sell some artwork, you have my permission to take this design and sell the ones that you make. I did this as custom orders too to customize them for couples and do as gifts. But I saw it's in mine and Cory's closet, and I was like, I need to do a Facebook Live with that because this is a super fun, quick and easy thing you can do for Valentine's Day this year. And we've got some more ideas coming up too, so I'm gonna scoot this over to the side a little bit. Today I am just gonna do it a super small version This is a 7 by 7 canvas. So we're going to mimic this, take this big version and shrink it down to something small. So you can do this on anything you want to. This was a wood pallet board Corey built for me. You could do canvases, you could do a piece of raw wood, make it your own, do whatever, maybe even like on a cute frame. So the first thing I'm going to do is just sketch real loosely. I can always erase this if I don't get it exactly the way that I want. I'm going to sketch real loosely a quick little heart here, and it's going off the page, right? So the whole thing doesn't have to fit on there. So I'm just going to do a quick loose heart on here. I kind of have mine tail off into the corner. Yeah, I think that's about how I want it. So I'm going to do a quick background on here. This is just a dry canvas. I haven't added anything to it yet. I'm just going to grab a flat This is out of my brush set in the Amazon store. If you need a new set of brushes, this is a great set to start with. And if you want the link to my Amazon store, you can just text the word Amazon to 417-217- 7044, and we'll have a team member put that in the comments for you. And when you text the word Amazon to my text number, you'll get an automatic reply with the link to my store, so you're not having to go search for it. So I'm just doing white. It has a little bit of gray in it too. It's actually also picking up some of my graphite from the pencil, which is fine. It's just kind of giving me this grayish white background. Awesome. Amy said, I bought both brush sets and detail brushes for Christmas and I love them. Yeah, I love them too. They're good. We're working on getting some Social Easel brushes, so I'm excited about that. I'll be letting you know as soon as they're available. Okay, so that's just a quick background. How about I lower you guys down some so I can get you a little bit closer? Okay, so that's just quick background. I'm gonna do a little bit darker, like just mixing myself a gray here. And I'm just going to do some quick kind of streaks. This is almost like dry brushing. It's wet in some areas, not in all. So you're just kind of getting a different— very little bit of paint. And I'm just doing some vertical brush strokes. Just to add a little bit more to that background. Um, Nancy, the larger original size is an 18 by 18, and we do have a blog post about building palette boards and a link to, um, where you could buy the plans to build your own palette boards the way that my husband built them for me. See if Allison can maybe throw that up in the comments, or you can just go to— this is a pretty— this is a new color. Sorry, I'm distracted. This one's called Joyful Pink from DecoArt. Um, you can also just go to my blog post on thesocial easel.com and scroll back through, or even type in the word palette board in our search and it'll pull it up. Okay, so I just want to put this somewhere on my palette that is not wet. Again, this color I used is Joyful Pink. Obviously any hot pink you want to use is perfectly fine. If you want DecoArt colors and you want the DecoArt paints, like the newest colors that they have, and you're worried your store is not going to have them, I'm going to have Allison post my DecoArt link. It's my affiliate link with DecoArt, and you can go on there and buy all these 2-ounce colors that you want, or bigger bottles. All the glitter paints that I use with them, all the things. Um, so it's a great like one-stop shop for all my favorite paint colors. So I'm just going to grab my round here. Let's see, I think I'm going to start with a 5. Now you can use any round brush you want, depends on the size of canvas that you're doing too and how big you want your brush strokes. I think this is the gold I'm going to use. This is also from DecoArt. This one is Vintage Brass, and it comes in a big 8-ounce jar. This will last you forever, but it's a really, really bright metallic gold, and I love it. Okay, so I'm loading up my brush here. Lots of pink. We're just gonna start wispy lines. I'm not worried about these being solid or connecting, really. Just want that basic loose whimsical shape of a heart on here. And then we're just going to go back with some more brush strokes. And you could continue this around the side if you wanted. That would look pretty cute for this one. You could go back and add the grayish color background on there. So separate little brush strokes. I love this color of pink. This might be my new favorite hot pink. Now I'm going to switch to gold. If you ever have one sealed on there like that, just give it a quick little bang on your desk. I'll be able to pop it open. I'm just going to take the paint right off the lid here, which is what I usually do. And we're going to add some fun little gold in here. And this all comes down to preference, how much you want. I'm using the same brush. Isn't that gold pretty? Let me know, do you guys have any ideas for some more cute little Valentine ideas we can do that you want me to do before Valentine's Day? Pretty gold. And now we're gonna pull— we're gonna go into our black, and I'm gonna grab one of my small liner brushes. You guys let me know your ideas in the comments. I am gonna do— we're gonna do a cute little Valentine's frame. So I know that's one idea that I have. I was thinking about doing like a little abstract love, L-O-V-E, would be fun in different colors. Okay, so I'm gonna have my little line that the birds are sitting on kind of come across here because I think my birds— I left a bigger open part on this one for the birds. I may switch the position. Because I made it a little bit smaller. So I think I'm going to move my birds over here. In the original, they were up here, but it doesn't really matter. We're just going to pull this line. So this is a fine liner brush. Again, these detail brushes are in my store. And I'm just going to drag it across here. It doesn't have to be perfect, just lightly drag it across. And then we're going to do our little birds. So these are fun and simple little cuties. We're going to start like you're doing a parenthesis, okay? Just like that. Maybe you want one a little bigger than the other. Now this one kind of had like swallows' tails, so it's going to kind of fan out. Think of like making an X. And then just make it thicker at the top and taper down. Okay, now we're going to add the heads on. So I like to make my circle in part of the body. Okay, so I'm gonna come around here. See how it comes in? It's not sitting all the way on top of— easy enough, right? We're just breaking down these little bird shapes into simple little steps that anyone can do. And then we're just going to fill it in. I'm just load that same brush up, fill it up with black. You don't want your paint super thick and gloppy, but you want enough on there that it glides easily for you. You shouldn't have to worry about filling in those grooves of the canvas. Thank you, Jan. Jan just sent 200 stars. I appreciate it. Now I also have these little birds looking up. So we're gonna do a little peak up in the middle, just like a little point, like their little beaks are just looking up. You guys, I just got back from Atlanta. I went to market there to get ideas, to see what's on trend for 2022. So many ideas. I've come home with a sketchbook brain and camera full of inspiration and ideas. So I can't wait to see what we come up with for this year. And we are gonna— I'll just give you a little heads up, there is going to be an event coming up, an online event in February. Thank you, Twyla, for the stars. Um, and we are going to be doing a fundraiser The money raised is going to go towards our missions trip to Honduras with Rice Bowls, and we are going to be raising money that is going to allow— I'm bringing obviously myself, my husband, our kids, my mother-in-law, and then we are bringing— I think we have about 9 women between myself and my friend Casey Hope. Our memberships, and we are taking these women to Honduras. And this has been a dream of mine forever. I wrote it in my journal years ago that someday I would get to do this. We are taking a whole team to Honduras to go love on these kids, these orphans, and create and play with them and bring them art that otherwise they would not have. So I'm super, super excited about it. And I nail down that painting that I'm doing for that. So if you want to be the first to know about that, just text alerts to my phone number, 417-217-7044. I'm gonna pull this ribbon down, and we will text you as soon as we have all the details. For that event coming in February. Karina is helping me. Karina's on here. She is, um, helping organize this, uh, this venture that we're taking to Honduras. So I'm very excited. I have never been there before. My friend Casey has, and that is kind of how this whole thing came about. I called Casey after a church service one day and I just told her, I said, I really feel like God is leading me to you know, bringing this to children. I just have so many ideas and I can see it, you know, I could see it in my head. And, um, it was like the same thing was on her heart. And I said, do you think— she's been with Rice Bowls before— and I said, do you think they would, you know, help us make this happen? And she called Johnny, and sure enough, he said yes. And, and here we are, and it's almost time. We leave at the end of March to go, so I'm very, very, very excited about that, to say the least. Okay, so we've got our little bow tied on here. I talked all the way through it, but you're just making a loop, making a loop. May add like a little more circular shape here, like we've got those tied in a knot there. So I want that to dry a little bit. I'm going to do a quick blow dry. Let me know if you guys have any questions while I'm blow drying. I think we want to add some of this glitter. All the products I'm using today are from DecoArt. So I've used the Joyful Pink. This was Vintage Brass, and this is their Galaxy Glitter. This one's Clear Ice Comet. They have lots of fun glitters. I honestly would recommend all of them, um, but this is the one I'm going to use today. Since I am doing a 7x7 little canvas today, I got this for a dollar at, um, Target, but I think they even have these small canvases at the dollar store. So this is a super cheap little craft. All right, let's get some glitter. I love this. This is— it says heavily loaded glitter acrylic, and it is. Can you see all the sparkles in there? We got to add a little sparkle, right? Let me get my brush rinsed really well, load it up here, and I'll try to hold this up in the light here in a little bit so you can see how pretty it looks. And you don't have to keep it all just in the heart. You could add— looks really pretty on the white kind of coming out the sides too. Isn't that so cute? So we need to add the little heart up here. I made that black line come down a little too far. I'm gonna put white over top of this first just so it makes it easier to cover with pink. We're just going to have a little heart hanging in between them. While that's drying, I'm gonna grab some white and we're just gonna put a quick Little accent mark on the birds. Now, if that makes you nervous to do it with a fine brush, you can also use a paint pen. I'm going to grab some of our pink. See, putting that white down first on my heart just helps cover up where that black was a little bit more. White is always good to do that. I'm gonna do— get a little more white, just do a little accent mark there. So pretty simple and easy. Now if you wanted to, you could— these are some Posca pens if you want to do some fine detailing. I was talking about paint pens earlier. I love the Posca pens, they come in all kinds of colors. But if we wanted to add just a quick little line, just kind of pulling out the shape of that heart a little bit. Sometimes I like to do little accent marks, and the paint pens make it super easy. To do that without getting too heavy-handed. You can add as little or as many as you want to. And then they also have white ones, so if you wanted to do the accent marks inside of the birds with white, you could. So that's it. Super fast, super easy. Oh, I said I was going to show you the stamps. Hang on. So I think for this one— this is just black ink, um, these alphabet stamps are also in my Amazon store— I think I'm just going to put it right here. None of my letters are in order, so I got to find everything. I tend to like lowercase. Now I don't worry about this being super perfect, so I'm just going to put my little eye right there. Now I kind of like the look of even letting some of that stamp show. If you want to clean it up a little bit, you could always put white over top of that. I just kind of like the more rustic look of it. I should have scooted that S over just a little bit, but we'll leave it. So there you go. You can really start to see that glitter show up now that it's a little bit drier. So hopefully you guys had fun with that project. I'll be back doing some more, and then we'll have some spring crafts coming after that as well. So, um, yeah, let me know if you guys have any questions. Make sure you share it, sprinkle it with your friends, give them a fun little project to do for themselves or for their kids or grandkids. And I will see y'all soon. Don't forget to text the word ALERT to 417-217-7044 if you want live text alerts whenever I do go live so you don't miss them. And of course, replays are always available. So I will talk to you guys soon. Bye.










