Making a Mix Media Owl Christie
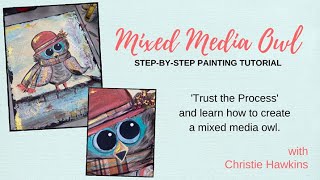
In this live mixed‑media tutorial, Christie Renee Hawkins, owner of The Social Easel, creates an owl on an 11 × 14 canvas board using a blend of acrylic paint, Decoupage (Mod Podge), scrapbook and tissue paper, stencils, stamps, and palette‑knife techniques. She walks viewers through choosing a solid surface (canvas board vs. stretched canvas or wood), preparing the background with decoupage, mixing muted teal‑gray, robin‑egg blue, cream, and coral tones, and applying texture with a palette knife. Throughout the session she demonstrates how to incorporate cut‑out scrapbook elements (fall words, gold polka‑dot tissue, paisley wings, leaves, acorns, berries), add decorative edging, antiquing, and 24‑karat gold highlights. Christie emphasizes a “trust the process” mindset, encouraging improvisation, messy experimentation, and personal comfort (e.g., wearing pajama pants during a Zoom call with a supplier). She also shares practical tips on brush care after using glue, sourcing supplies from Hobby Lobby, Michaels, or Walmart, and pricing artwork, noting that personal attachment influences price. The tutorial ends with an invitation for viewers to share their own owl creations via text or Facebook, reinforcing the community aspect of her membership program.
Chapters
Hey guys, my name is Christie Hawkins. I am the owner of The Social Easel. So we've done a couple different owls this week. I'm going to show them to you. I did these this afternoon. So we did kind of using our acrylics like watercolor on one. We did our palette knife version on this little guy. Let me get these out of the way. And I have 2 more to show you. We did this guy last night. This was our Halloween version where we did some more shading, and you have access to go back and watch all of these. So if you missed any of them, they're here on my Facebook page under videos. And then this was the very first one we did. So we did a very basic version, just filling in color. Um, we added in some shading and highlights and color mixing in this guy. I taught you how to treat your acrylics like watercolor here, and then this one we did palette knife. So tonight we are going to do something completely different, and we are going to use— this is an 11 by 14 canvas board. So you can get 11 by 14 canvas. Canvas board just means simply that it is just a board. There's no give to it like a regular canvas. Um, this one is 11 by 14, so I'm just going to trace him on here one last time. It's been a busy day of Facebook Lives plus some tech problems that always make things last just a little bit longer. All right, so we've got them drawn on here, and then I'm going to go over with a Sharpie. Yes, um, mixed media, and all that means is I'm going to kind of show you guys, um, this too. You can do it on paper, wood, canvas, whatever you want. I like doing it on canvas board because it's a nice solid surface, so, um, it allows the, uh, scrapbook paper and different things that you put on there to adhere a little bit easier because there's no give to it. It does work really well on wood also, anything that's like a harder surface. I still do it on canvas too. You just have to, um, apply a little bit more to get it to stick and that kind of stuff. So I like doing it on the boards the most. And then if I love them like I did this one— this is— let me show you this real quick. I do a lot of chapels. This one is included in the membership, but this is our mixed media chapel. This was done on the same board that I'm using tonight, and you can see the scrapbook paper and the tissue paper that I used in the background, some stencils and stamps, and then we used paint with it as well. And I'm putting these lines down, but it doesn't necessarily mean I'll stick with them. I may end up covering them up with, um, scrapbook paper, so we'll just have to kind of wait and see what I decide to do here. So let me show you some of the, um, products that we're gonna use. So we're gonna use some DecoPodge. Um, this is a gloss finish. You can use whatever kind of finish you want to. And then I just want to show you some of the different things that I got when I went to Hobby Lobby and, um, Michaels. Yeah, I got, I got some of these from both. So this is just some random scrap of paper that I had that I pulled out because I thought I might want to use. This is some tissue paper. This is, um, another thing. I love gold. You guys know I love gold and I love polka dots. So I had to get some of this gold polka dot tissue paper. So all this stuff that I'm pulling out right now, I'm just going to go ahead and tear a little bit of this off. All of this can be used in mixed media pieces. It's kind of like when, um, you were younger and you had to do like a— what do they call that? Did they just call that decoupage? When you were little and you had to do that kind of board, or if you've ever done like a dream board or anything like that where you just kind of collage, basically I guess is all it's called, and you glue and paint and do all kinds of stuff. So these are just some of the things I'm probably going to use tonight. This is one of those where you get to kind of see what I create as I go. I don't have a definite plan. I haven't created this yet. I have these that I got also, and I thought it might be cute to cut out the, um, the word fall. So cut out the different circles. I've got the F-A-L-L here, or maybe I could even do Happy Fall, y'all, if there's enough of that. Um, so I always like to have tissue papers. You can even use napkins, um, in mixed media products, uh, projects. And then the other thing you can use is stencils. So this is the one that I used in that Spring Chapel that I just showed you. It's one of my favorite ones. You can see a bunch of gold on it. This is also a really good one. I think I got this— yeah, this is from Hobby Lobby. Um, but I like it for the little polka dots on there. Again, you know, I like my polka dots. It's got a little star, so different kind of patterns that don't go across the entire painting. It just kind of goes wherever you want to add some. And then I've got some different ink pads I haven't even used yet. And this is an entirely new kind of stamp. So those are stencils, and then you can also do these stamps. And I just thought these were really pretty designs. I love the medallion shape. So you can see those different ones, and then you put them on here. So I'm kind of excited to use this stuff. I haven't done it myself yet, so you guys will get to see me test it out. You get these acrylic— um, sorry for the noise, all that plastic. I'll just set that over here. You get the acrylic block set. And then let's do— I like this big one here. And then you stick this to it just like that. And then you're going to apply that to your ink pad and then stamp it on your project. So we're probably going to try that out with some of this gold ink that I haven't opened yet. So let's just see what this looks like. I'm just going to push it down on here. Hopefully it really does what I want it to do. Gotta get a lot of ink on there. I'm going to test it on the back of this paper here. Let's see. Can you guys see that? So it's subtle little things like that. That kind of add to the background of the painting. So just fun little elements. And then you can even do stuff like, if you put this on another piece of paper, I could even cut that out and like make part of his beak out of it or make part of his wing out of it, whatever I want to use that for. So I usually start with my background first. Oh, I forgot there was one more thing I was going to show you. I got this scrapbook pad. This is what I used for my scarecrow that you guys You may have seen it. I taught in September in my group. Super cute scarecrow, and we used a sunflower for his hat on here. This awesome plaid paper. We've got all these fun fall words. I might use some of that in tonight's painting. But look at all this, this fall pad. I got this at Hobby Lobby too. All these different fun scrapbook pages that you can cut out and use in your art. Like, actually, I'm going to tear this page out. I think I kind of want to use that maybe for his wings. So we're just going to play and see what we come up with, but I start with the background first. Just kind of decide where I want things. I like torn paper a lot better than I like just straight edges. Maybe thinking about So this is a really messy project too, so if you like getting messy, you might like this. I was thinking I might want to put this down at the bottom, kind of have this kind of rough rustic bottom here, maybe like he's standing on some wood. Yeah, I think I like that. So I'm just going to start with my decoupage here. Hey, there's that pencil I couldn't find. It was underneath my, um, paper towels. So I'm just going to start by putting Mod Podge, Decoupage, whatever you want to call it, in here. Just putting that down, laying my paper down where I want it, going back over top. So I told you it was messy. Now I'm going to use my fingers. Sorry, the Social Easel is covering that up a little bit. I don't think I can take that off. You guys should see Oh my gosh, what a mess this table is right now. So I'm just going to kind of smooth it out, and I don't really care if there's some bumps or creases in this because it's just going to add to the texture of the painting. I did a really fun American flag back— I think that was Memorial Day that I did that, or maybe it was, maybe it was Fourth of July. I think it was Fourth of July. I think I did a bunch of Fourth of July things. and it's one of my favorite pieces that I've ever done. We made an American flag mixed media style on an old wood board that I had out in the garage, and it turned out so cute. All right, so this is going to kind of be my base. I think I'll pull some paint down here too, but But I know I'm going to want some more texture up here. And here's the thing, you're not going to see all this when you're doing this type of style. I say there's no rules, I mean there's really not, but you don't want to just see chunks of paper pasted on there. You want it to peek through here and there a little bit so you're not seeing the entire thing. These are just little accents that are going to pop through the painting. What else was I thinking? I might cut out some of those fall words. I'm not, I'm not sure yet if I want to or not. Oh, you know what I just thought that's in this pad that would be pretty is there's some of this blue fall sky back here. These pumpkins would be cute. You guys, look at this page. I could cut some of those pumpkins out and put them around the owl at his feet. Here's some bigger ones too. We'll have to decide which one I'm going to use. I'm finding all these awesome fall sheets, but what I'm thinking is, see these different sheets that I'm tearing out? I can cut some of those leaves and acorns and different things and incorporate them into the painting. This is probably one of my favorite scrapbook pads I've actually gotten. Then I thought this— I just saw this when I was in there. I thought this was cool. Let's put a little tree up the side. Maybe have it going out here. It's okay if you cover things up, you change your mind, you want something in a different spot. So I kind of want this one with that orangier color on it. That's already down there pretty good. I'll probably leave that. I think I may have this kind of come off the side here. All right, we'll see what we think. We're going to get some paint involved here in a second, and then things are going to start to change. You can also just paint the back if you don't want to go straight on the canvas.
I think I want this to go a little bit higher up.
We have it really tall. Let's do that. Okay, I think I'm liking that so far. No, I'm not necessarily done with that, but I'm gonna put it up for now. See if any of these paints are gonna work. Some of these paints are still wet from this afternoon when I used them because they're those thick ones, so we may use some more. I really like this soft muted blue down here, so I may use something similar to that, maybe even a little gray and blue. Let's see what we come up with here. So the goal in this is to get you out of your comfort zone And just creating with careless abandon. You're not sure how it's going to turn out, and that's okay. Let's mix this together and kind of make a muted kind of a grayish teal here. Perfect.
Look, perfect.
Can you see that? That's exactly the color I wanted it to be. That was just luck. So a little gray and a light teal gave me this really pretty muted color. We're going to grab a little bit of white in there too, and we're also going to grab a little bit of brown, kind of rough it up a little. You guys like that muted tone down there? And then if I feel like I got too much paint, I can just go back. I can rub a little extra off here, decide how much I want to show through, come in with my palette knife. Maybe I want a little bit more or more texture. I love the palette knife with it too. Moving all over the place here. So this is just going to kind of be our base that our bird, that our owl is sitting on. So it's nice and rustic looking. So I'm combining all kinds of styles. This is why we saved this one for the last night, because it kind of throws everything I teach you all together into one painting. And Deb, these are different scrapbook pads that I have. So go to Hobby Lobby or Michaels or even Walmart A lot of times you can find them on clearance too. Now for the sky, trying to decide what color I want because I don't want it to be too close to this teal. I'm peeling all the DecoPodge off my fingers if you guys are wondering what I'm doing right now while I'm debating on what I want that background to look like. I think I want to do maybe a little like cream color and a little blue mixed in, but I need a soft— I need a soft blue. See, guys, like my outfit tonight? We got the camo on top and the plaid on the bottom. So this is, uh, just kind of a lighter blue. It's robin's egg blue. I love this color. It's in a lot of my paintings. And I think I'm gonna play with these two colors for this guy, and we'll see if I'm liking it. You'll think this is funny too. Okay, so When we did our first mastermind, this is a meeting, this is like a HighLevel business coach meeting, and Damon Oates is our coach, and we all were in North Carolina together, and they're telling me casual, like it's totally fine, pajama pants fine, come to the meeting like that, it's fine. So I do, because you guys know I like to be comfortable, and I show up and I'm the only one like that. And Sarah has a picture of me, first mastermind meeting, me in my pajamas. So here's the even funnier part of that. Yesterday I had a call with Michaels, again a Zoom call, um, with the Michaels, right, where I get all my stuff from. And we are in the very beginning talks of a lot of exciting things, and he wanted to see some of my artwork. Well, I had to get up and show him, right? Well, guess what I was wearing? Pajama pants. Yep, that's what I wore when I was on a Zoom call with Michael. Michael's pajama pants. It was kind of like an impromptu meeting, so you didn't really know what was going to happen. I wasn't prepared, totally forgot I had them on, and then I had to get up and get my art, and I was like, oh. So I just turned around and laughed and said, don't mind my working outfit, this is what I work home in. So that was fun. What do you guys think of the color so far? We liking it? Maybe add a little bit more cream in. I'm not sure. We may pull the palette knife back into this too. I kind of like that, that cream color up there. Uh, what are you gonna do? It's who I am. What do you guys think of this buttermilk color I'm using? I like it. It looks like a really pale yellow, but it's actually a cream. I really like the way it looks around the owl. I'm going to water this down a little bit over my polka dots so maybe they can shine through a little bit, maybe even leave some completely free so you get that shimmer. I think I'm liking it so far. We even have finger painting in the group. We did— which is that the starfish? It was one in the, um, sea life series that we did. I think it was the starfish was the very first one, and we did the entire background in finger painting. So let's decide down here. Do I think that's enough of a difference, or do I want to change it? I kind of don't mind it. I actually usually stand when I'm painting, and this week I wanted to try this, uh, you know, something a little different so I could talk to you guys and paint at the same time. But I am not used to sitting quite this much. So I'm still just sticking with those two colors and just kind of going back and forth. I don't really have a rhyme or reason where I'm putting things quite yet. But I think I'm liking it. I think I'm gonna go a little bit lighter with some more really pale blue over here. And then if I want to take a little off, I'm actually going to just dip this in my water. I told you guys this was messy, right? Let that shine through a little bit more. This was some scrapbook paper, and then I added some palette knife painting and some different things to it. I'm going to do the same thing with the background up here. So when I'm using the palette knife, I'm just holding it flat on here, just kind of dragging it over. I'm going to let this dry all the way, but I'm probably going to come around the edges make it dark everywhere around here. Most likely we'll be adding some gold to it. All right, so I think I'm gonna go ahead— what do we want to do next? I think I'm gonna fill in some color on our little buddy here. I think I'm going to keep this one a little more toned down. Let's do this like khaki color, maybe a little bit of brown. And just because I'm painting them now doesn't mean that's going to stay that way. I may change my mind. We're going to start with this and then see what we decide. I really liked the toned-down colors of this so far though, the muted tones. You guys know I'm usually really like loud and bright with my colors, but sometimes I like these muted tones too. And I have to get his eyes filled in too. I don't like them being empty. I'm just going to cover that up. I don't know what I want to do with that nose yet, but I like this color. Maybe a little bit of this in the middle. Maybe give him some little fluffy feathers out here. Maybe I'll make him a little fluffier tonight. It looks so funny right now, but it's gonna come together. I promise. This is where I would say trust the process. If you're looking at it thinking it's a hot mess right now, it's gonna be cute. All right, I'm gonna go ahead— I have to fill in his eyes because I don't like them when they're looking at me like that. Where's my black paint that I have been using all week? There it is. And when you're working with a mixed media piece Like I said, you can decide how much of it you want to be that way. It doesn't all have to be scrapbook paper mixed in. I could just leave the background with scrapbook paper and then come back and do the rest with paint if I wanted to. I won't. I'll end up coming in and doing some other stuff here, but again, you can kind of decide what you want to do with that. I do think I want to go ahead and cut out his wings with some scrapbook paper. Oh, these would be— look on here, these almost look like little angel wings. I think I might cut that paisley out and use those as the wings. Let's see how this is gonna fit. It might be perfect. I might even leave it like that. I kind of like it, you guys. It's kind of different. Is it too much? I kind of like it, like he's fancy. I don't know what I'm gonna do on top of here, but I kind of think that's cute. And so here's another thing you can do with— what? Oh no, I haven't used that one yet. Okay. You can kind of like give your edges of your paper like a tarnished look just by dragging some black paint around the edges. Let's get a little bit more on there. So all these little touches that you do in mixed media just kind of add to the dimension and give your painting so much character. See how that stands out just a little bit more with the black edging on it? I'm going to zoom in a little bit for you guys because we're not working on that bottom part. So maybe we'll tuck them up underneath this scarf that's going to be there a little bit, and I can come back over here and cover this up. I don't have to worry about that being there. So I think what I want to do is go ahead and come up here, and then I'll use probably a different piece of scrapbook paper for his scarf. And just a quick reminder, when you're using Decoupage with your brushes, if you're not using like an old brush or something, um make sure that you wash your brushes that night, because this is like glue. You don't want that sitting in your brushes for a long time and damaging them. Comes up a little on the edges. Just come in here, slide it underneath a little bit. All right, what do you guys think of those cute little wings? Yes, the scarf is going to come above, um, or on top of the wings. I'm just loving the colors in this one so far. He's so cute. I need to give him some legs though. He's just kind of floating in the air right now. This is actually really handy. These paints are still wet from earlier today. I'm going to take this really bright orange and tone it down. So I'm just adding some cream to it. You guys can see that, right? So it's actually making almost like a really pretty coral color. And if I wanted to tone it down even a little bit more, maybe make it not so bright, add a little bit of brown. I love that color. This is why I love color mixing, you guys, because you never know what color you're going to come up with. This is such a pretty coral that I just made. I'm going to have to use that somewhere else, maybe add a little paint on these wings. Don't you love that color? So cute. Let's go in with his eyes here. I've made a mess of his eyes up here earlier. So I don't know if I'm— how I'm going to leave those. I know they're not even right now. I think I want those circles bigger. We're gonna leave him for now. Okay, let me look at some different things here. Is the plaid gonna be too much? We might do what we did. I could make him match my scarecrow. That I already painted. That might be cute if I did a little plaid with that and maybe just let a little bit of it peek through. Let's see what, what we decide to do here. All right, we got that side here. Just curve these in a little bit. I think it's cute. I think I'm going to give him a plaid one. And then listen, we're going to add paint to this, so it's not just going to look like that stuck on there. So this is not paint, this is the decoupage I'm putting down. I kind of like how it's covering up the top of his face. Okay, let's see. Let's cut a couple more to be hanging down here. So I don't want there to be that too straight of an edge on this one, so I'm just going to kind of make it curve a little bit here, maybe something like that. I think we'll tuck this one up underneath here. Maybe we'll add a little fringe to it like we did on our other one from earlier today. I think I'm gonna— I think I'm gonna stick with this, maybe add a little dark paint around the edges to kind of pull it together a little bit. Let's do this one first. Yeah, I'm thinking maybe we'll do a little fringe. Paint at the bottom there. And I kind of like all the busyness. I like the busy patterns of mixed media. That's one of the things I actually love about it, is like your eye just keeps moving around and looking at all the different textures and patterns. So I'm just putting some more of the decoupage on top of it. And so I'm just going in with a little blackish brown here. Just lightly going around that edge there, maybe a couple lines kind of pulled in like that fabric is bunching up. I think that already makes it a little bit cuter. I think I'm gonna soften this up a little. Maybe just instead of it being such big, um, black strokes, maybe just kind of blending them in a little bit. Again, it kind of gives that tarnished, um, old-fashioned kind of look to it. I'm liking it so far. I think pull a little bit more black. Around this edge here. That black just makes such a difference. I'm really liking the way this one's coming together so far. You guys can't see the bottom, can you? But when you see it all together, all those colors together, I think it's going to be Super cute.
Did I already say—
I think this is the color I want to make the hat. I'm going to make it a little bit more toned down. So I already had some black brownish color in my brush, so I'm just mixing that in. It's toning this down just a little bit. Then I'm going to grab some cream. Mix that in until I get the coral color that I like. Let's try this and see. Maybe a little bit more. I'm liking that color of hat. Now normally I do not add water to my paint. This is really thick paint that I was using earlier today, so I am adding a little bit of water just to get it a little bit thinner for our project tonight. I love it, and it's such good contrast to everything else we have going on. She would be cute with glasses too. I don't know if I can do that though. It would be cute. What do you guys think? I'm absolutely loving how this one's coming along. I need there to be a little bit of color over here. Shall we get some more plaid for the hat? I'm eyeballing this. We'll see if I got it close. Pretty close. Look how cute that is! I get so excited when I'm doing these and things start coming together because I don't have a plan. Mm, I don't know if I like that I did that. Blend that back in. Maybe a little bit lighter there is fine, but that was too much. Yes, a flower would be cute. I'm trying to decide. Do I want a flower or maybe like a little stem with berries or something? All right, I'm still trying to decide what to do with these eyes now. Do I want to use scrapbook paper on them? I don't think I do. Let's add a little bit of black around our edges here while I'm thinking about that. Yeah, I use a variety of things. Um, mostly like to get started in Tribe, you don't need all this. This is just very, um, extra. This is not something you have to have to get started in our group by any means. Most of our paintings are done with just craft acrylics, so these little bottles that you can get from 50 cents to like $1.30 depending on the brand that you get. Yellow eyes or orange? Big eyelashes? Bears? Yeah, it's so many choices. I don't know, let me look at some of my scrapbook paper here. Well, I wish there was a whole green leaf on there. I kind of like— it may be this one. Of course, it's right in the middle of my paper. That's okay, we're just going to try this out and see what we think. There's also a couple acorns I might want here. So what I was thinking is this little piece of greenery here. Yeah, I've got the— so I'm thinking like this little piece of greenery, and then I've got those cute little acorns. So now it's just deciding, do we want I don't know if the acorns are gonna look— I think the acorns are too much. They're like too close to the same size as the leaves. Maybe we'll put the acorns down here somewhere. I don't know. I don't like that those are connected and leaving that white there. I also got these pumpkins to add in. Yeah, I just like the greenery too. It's just a tiny little bit. So what I think I might do is, since I don't have berries that I really like on my paper that I'm going to cut out, I may paint some berries on here. And right now that's just the decoupage I'm putting back over top of it to seal it down. A little water there. So let's add some berries on there. I want like a deep dark color here. Let's try this out and see what we think. I don't think I like it down on here on the hat. I think I'm gonna take that off. But I like the berries mixed in with the leaves. You guys see those? Couple little stem of berries coming off there. I think that looks pretty cute. All right, I think I'm liking that. Gotta finish up with this, um, the eyes and the beak. This one needs to be completely reshaped. We're going to ignore where that black dot is right now. I think I want this like blue color in the middle, and then I think I'm going to have an accent color like on the outer ring. And we can kind of put the nose The little beak right there in the middle. I wasn't sure if I wanted to use a pattern or not, but the eyes are getting on my nerves. Come on. There we go. So here's what I'm gonna do. We're gonna make sure they're the same size. Let's see, just so I can get about, about the size that I think I need. So I'm just going to cut the circles out of this pattern, and then they'll be the exact same size, and we won't have that problem anymore. Let me scoot them down. I'm thinking like that. Maybe still do the accent around the edges with that darker blue and then the black in the middle. I think I'm gonna like that little extra pattern there. All right, what are you guys thinking? This is where I would say trust the process because it looks like crazy right now, but I think it's going to be cute once we get it all done.
Let's see.
I'm just kind of playing with my colors here. So we're still going to go on the inside of that. I'm going to do like a just tiny little bit of like a whitewash over it. I don't want to cover that pattern up completely. So you can still see it through there. Now let me see if the bottom of this is the size. Nope, that's too big. The cap, maybe the cap will be the size that I need. Let's go with that. I'm just going to use this pencil I have here. Now we've got a little bit of an idea of where our eye needs to go so I can get them closer to the right size. It looks like big googly eye glasses. Yes, I think so too, Linda. This is definitely the most in-depth, and I didn't really plan on it being that way, but It's really just a fun one to play with. You guys like the eyes so far? You can still see that pattern a little bit. I don't know if you guys can tell that it's there. I'm gonna see if I can water it down just a tiny bit, if I can see a little bit more. Dang it. I had to go and mess with it, didn't I? We're just gonna go with it. I'm gonna add a little black around there. See, I actually think I like that better with a little bit of black on it. I think it's looking— I think I like it. Now let's add our little beak on there. Man, you guys, I could keep painting this for like another hour. There's so many things I could add to it, right? Let me go ahead and add my little feet on. I think a yellow beak. Let's paint it first and then see what we think. I've got a little yellow here I can use with this cream. That's, that's a really big nose. I think she's so cute. She's a little crazy. I like the extra fluff. On her face this time. I didn't do that on any of the other ones. So the other— the only other thing I was thinking about adding was like, I don't know, I may not even want to— do I want to add any little pumpkins on there? Or maybe at the bottom? Try to get this whole thing in so you can see. Or should I leave her be and just let her be the star of the painting? I think I need to add a little bit more palette knife in the sky. Oh, I know what else I said I was going to do. I was going to kind of antique the edges a little bit. I also didn't do any stencils, but I don't know that if I want to— yeah, fringe. I was going to add fringe. Thank you. Let me know what else. I don't think I want to add the pumpkins either. But I did want to add the fringe. Yeah, I can't decide. I'm kind of thinking I don't want to add anything at the bottom. I had the acorn set out, but I almost like the simplicity of it. So we're going to do some antiquing around the edges. I'm going to show you what I mean by that, and then we're going to decide if we want to add gold. That is one thing I haven't added, and you guys, if you've painted with me any length of time at all, you know I love gold and it's in almost all of my paintings, and she should definitely have some gold. So we're going to go around the edges, and then I think that will also help us figure out if we want to add anything different. So I take my palette knife on the edge. I'm sure you guys can see that. I also didn't add any lettering. I could add lettering. I do think maybe the words fall with those little circles might be cute. See how that kind of finishes the edge off? I'm not sure if you can see. I think I need more black paint over here. Marilyn said, how much would I charge for this? I have no idea. Honestly, I, I would not sell her, um, because I like her too much. Um, It really— charging for your artwork is like a very personal thing. It's— there's not an exact science or formula for it, unfortunately, because sometimes your attachment to a piece really makes you determine the price of it. If you really deep down don't want to sell it, you're going to put a higher price on it that you don't think someone's gonna, um, gonna pay. But I don't know, but I, I'd like her too much to sell her. What do you guys think of the edging? You see how that kind of starts finishing it off? I'm going to raise this back up so you can see the whole thing together. Maybe add a little black on the top of this edge here too. I'm liking her, I'm liking her. Okay, I still, you guys, I have to add just a little bit of gold. Just a tiny bit. And yes, someone mentioned the leaves blowing around. That would be cute too. So you can probably see the possibilities are just endless with this type of painting. This is my 24-karat gold that I love. Any metallic gold you can find in the stores right now is awesome. A little bit of gold here and there. Yeah, metallic bronze is also really pretty. Maybe gold highlights on the berry, she said. Let's try.
It's pretty cute.
All right, you guys want to see a little close-up? We'll get this camera figured out one day. So look how messy she is up close. But it all comes together when you get a little bit further away. So, so many fun things you could do. I hope that that kind of showed you what mixed media is and how much fun you can have with it. And I mean, like I said, you could just keep playing with this. You could keep adding to it, um, making it whatever you want. So I can't wait to see y'all's. If you do the owl, you can text it to me at 417-217-7044, and that is posted in the comments also. So thank you guys again, and, um, yeah, we look forward to having you, and I will see you guys soon. And don't forget, you can go back and view all of these on my Facebook page. They're not going anywhere. So if you want to come back and watch this owl later, or any of the owls that we did, they're still going to be up on my Social Easel main page. Thank you guys so much. It's been a fun week painting with you, and I will talk to you soon. Bye.










