Mother’s Day flowers in vase
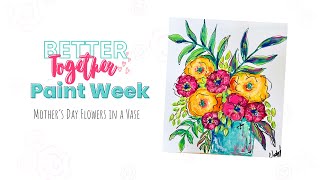
In this 1‑hour live YouTube session, Christie Renee Hawkins demonstrates how to create a Mother’s Day floral arrangement in a vase using craft acrylic paints thinned to behave like watercolor. She walks viewers through her studio setup, palette selection (Bright Salmon, Cadmium Yellow, Electric Pink, Joyful Pink, Perfect Peri, Ultra Blue Deep, Blue Raspberry, Bluegrass Green, Sour Apple, white, and a fluorescent pink from Liquitex), brush choices (round #4, #5, liner #1‑2), and mixing process on a ceramic palette with separate wells. The workflow emphasizes painting the flowers first (wet‑on‑wet, layered blooms) and adding the vase later to avoid unwanted overlap. Mixed‑media details are added with acrylic paint pens (Posca, waterproof pens) and optional black/white ink outlines. Throughout the tutorial Christie engages with live chat, answers questions about materials (gesso, canvas vs paper, gouache, baby’s breath), and shares creative‑mindset insights from a prior mindset session about overcoming fear of approval. The latter part of the video shifts to a promotional overview of her “Tribe” membership, detailing the bonus bundle (12 lessons, color‑wheel masterclass, acrylic basics series, community Facebook group, monthly critiques, devotionals, vault of 200+ videos, contests, and pricing options). She encourages viewers to join before a midnight deadline, offers a 14‑day money‑back guarantee, and invites further questions via email or the Tribe Facebook group.
Chapters
Hey everybody, okay, let's test audio. Let me know if you can hear and see me okay. I do not have the little mic in tonight, so I want to make sure we're still good. Okay, thank you, thank you. How is everyone doing tonight? I thought I'd switch gears and come to another little spot in my studio. Where I can— I like to sit when I'm doing like watercolor style. I don't want to stand because we're doing something smaller. So in case you missed it, this is the one we're doing tonight. So tonight I'm going to teach you how another way you can use acrylic paint, basically. And I started this, gosh, probably about 5 or 6 years ago. Just playing around because I didn't have watercolor. And so I watered down some acrylic and started testing it, and I was like, oh, you can totally use this like watercolor. So tonight we are going to treat our craft acrylic. So I'm using my DecoArt colors on your color list tonight, and we're going to be doing some color mixing. We're going to water them down. I'm going to show you how I do that, and then We are also going to be adding— this is technically also called like a mixed media piece because not only did I use paint, but I also used some paint markers as well. Um, so we're using a couple different mediums in this, and I love adding those extra little detail lines at the end. So we'll be doing that with some of my paint pens. If you don't have these, I have some in the store. You can buy Posca brand. There's lots of different paint pens out there, but you want like actually acrylic paint, like acrylic paint pens is what I'm using. You can also use, um, like a waterproof pen set. I have one of those as well. It's like a variety of waterproof pen sizes. Um, and then you can use a Sharpie, but it's not what I recommend because it leaves kind of like a coppery finish when you're adding in those details. So those are my recommendations for That, and this is our last night of painting. So last chance for you to pick my brain, ask me questions, anything that you're still curious about with Tribe. We have another big bonus going on in case you missed that yesterday. I brought some of them up here from downstairs. So part of the bonus I don't have— it's 12 lessons total. I don't have them all up here, but I wanted to show you some of them in case you missed it. You get this dragonfly. This is still one of my favorite ones that I did a couple summers ago. This is a series, so this is the Summer Vibes series that I'm showing you. These palm trees and the tropical florals, you get all three of those. And then if you missed our latest spring workshops, those are included as well. So if you missed the Bold Blooms, you still have an opportunity to get these. They're included when you sign up for Tribe. This is original version, and then the reimagined pink version. And then I also grabbed the Among the Wildflowers. So this is just part of the huge bonus bundle that you get when you sign up to become a Tribe Sister. So those are some perks added on, um, and I am going to switch gears now and pull you and give you an overhead. I may have to adjust the camera here in just a second. Okay, how does that view look? I have to be careful with this camera holder because it's newer and a little stiffer than my other one, and I don't want it to— I think that's pretty good. What do you guys think? Sorry, I'm chomping ice. Um, okay, so I'm going to go over the colors with you that we're going to use tonight out of the set. We are going to use the Bright Salmon, the Cadmium Yellow. We're going to do Electric Pink, Joyful Pink. I'm just going to set these aside. And then our cool colors are the Perfect Peri, the Ultra Blue Deep, Blue Raspberry, Bluegrass Green, and Sour Apple. And then of course white. Now I may pull in— when I was doing the original, you can see this really kind of vibrant hot pink over here, so I'm going to use— they don't make a fluorescent one like this. In DecoArt. So I'm going to use a little bit of my fluorescent pink from Liquitex to add some, some brightness to your flowers. But you guys, again, as always, use whatever colors you want. Experiment, play. You can always, you know, I highly recommend if you're not sure what colors you want to use in like a floral composition like this and you're playing with color choices, to use a page in your mixed media pad and literally just make color swatches. That way you know exactly what they're going to look like before you take them to your painting. Um, let me see, did I forget one? No. Okay, I got them all. Okay, so for this, I'm gonna scoot all this over just a little here. I'm going to be using mostly round brushes tonight. I've got both size of my rounds out of the set, the number 4 and number 5, and then my liner, my 2, and I have so much paint on this I can't see. I think this is my 1. We're gonna say it's my 1. Anyways, just some liner brushes for details. And whatever kind of plate you want to use for watercolor is fine. I got this ceramic dish off Amazon and I love it because It has the different wells for you to mix in instead of just one big plate, so you can separate your warms and cools from each other if you want to. But you can honestly use like any plate out of your kitchen. You just want it to— I, for this, I wouldn't use the tearaway palette. You want something that has edges to it since we're using water in this. So I'm going to set that right there so you guys can see me. Do the color mixing as well. Um, Ingrid, it's all the colors on the color list. So if you printed your supply list, it's those colors listed right here. I have every single one of them, and that's what we're using in tonight's painting. Okay, so I'm going to jump in and get started. This is— I'm not even going to really sketch on first. I'm just going to start. I started with like my orangey yellow blooms first and then started kind of building around it, and we actually finish off with the vase. And I know that probably seems backwards to some people, but the reason I'm doing that is because we're treating this more like watercolor instead of acrylic, which you can layer and you can cover on top of. Technically, we can do that because this is acrylic, but that way we don't have to worry about our flowers overlap— overlapping a vase of a different color and then some of that showing through. So we're actually going to put all our flowers on first and then come back and add our vase on at the bottom. And so that also gives you an opportunity to, like, once you get your flowers on there, to think about what you want your vase to look like. You may not want yours to look like this. You may decide you don't even want a vase and you just want to have some free-flowing flowers, kind of like we did on night 2. So again, don't, don't be afraid to make this your own and just kind of experiment and play with it a little. So I'm going to go ahead and you're not going to need very much paint for these. So I'm just going to start with my cadmium yellow and my bright salmon for right now to start with our first blooms. Oh, awesome. Lisa said Walmart has a plate just like this. She picked one up a couple weeks ago. Good to know. Crystal said, do you suggest using gesso on watercolor paper for this style of painting or go without? I don't use— I don't ever use gesso. The only time I ever use gesso is if I'm painting over a painting that I feel like some of those colors would show through when I'm painting over something. You don't need to. You can paint directly in a mixed media pad or on watercolor paper. The list— M. Pulver— the list is on the hub page right at the top. You can download the supply list. And for those of you that were with me this morning, we had a Fantastic session this morning. If you did not join me for the mindset session, I highly, highly recommend you go back to the hub page and watch that this morning because it was very powerful. We, we all got to talk a lot about like what some of our fears are, what, what makes us afraid to make mistakes. And I think it was comforting for so many of the women who were on that call because when I asked them what, what fears were holding them back, like what was, what was stopping them from stretching themselves creatively or trying something new. And it was an overwhelming response of the same answer. And the answer was worrying about other people's approval. And just something that I just did not expect it. And it gave us a moment to like really talk about that and really talk about why, why we're painting, why we're being creative, and we're not doing it for the approval of others. We're doing it for ourselves, but we had a lot of kind of journal prompts, and I had a PDF made that I said I would share later, and that is also on that hub page. So it's up at the top where the supply list is. You can download those journal prompts of what we talked about during today's mindset session. So really, really good. Really recommend you going back and watching it. If you have time. I would say make time. How about I rephrase that? I would say make time for it. Okay, so I'm gonna— this is obviously clean water. I'm getting a bunch of water here, and I'm going to start pulling my yellow into that, and then I'm going to take just a touch of my Bright Salmon. So this is Cadmium Yellow, Bright Salmon. So see, I'm kind of getting this like yellowy-orange mixture here. Um, Betty said, can you paint on canvas? It's not gonna really work the same because it's so watered down. So watercolor is meant to be done on paper. So I would say for this one, I would do it on paper. All right. So, um, now basically I'm just— we're going to break this down into shapes again. Okay. So I'm going to come in and start making these roundish shapes. They're not going to be perfect circles. Some are going to be bigger, some are going to be more oval shape, and I'll show you what I mean by that. But we're going to start kind of placing these down and then start figuring out our configuration of the rest of our bouquet from there. So I know this one's going to be somewhere around here. And if you want it more vibrant, like I'm like, that's kind of like dull. Just add a little bit more of your paint color in there. Because remember, it's all an experiment. Totally okay if it doesn't give you the exact color you want the first time, and we can come back and add more. Okay, so this is all wet right now. I could come in with a little bit more of my coral if I want to, still keeping it nice and watery. And I can come in and kind of add these quick sections of some of that orange color in there. Do you guys want me to turn this light overhead light off to reduce the glare? I don't know if that's messing up what I'm showing you. I think it'll dry pretty quick Yes, I believe this, Susan. I believe this is on my Amazon store. And yeah, if you have watercolors, absolutely use them. I just like to show people another way that they can use acrylics. So yeah, do what— do whatever you would like. All right, I'm just getting And we're back. All right, you guys good? All right, I put do not disturb on my phone, so hopefully that will not happen again. A phone call came in and knocked it knocked it off. Usually the video pops back up, but for some reason it did. Okay, continuing on, we're going to start with our second bloom. I'm gonna get back into some more of my yellow over here, and I want this one more over this way. But I want— what I want you to see is kind of how, like, I'm working with these layers while this is still wet. I'm going to come in and add these little sections of some of the more coral color in there if you want it, if you want it to be more orangey. And let's come over here. These are almost touching. Again, you want to kind of pay attention to your size. We don't want them to be too similar in size. We want some variety in our blooms. Pick up some of my orange, and just that little variation in color starts adding some of that dimension. Okay, everyone good? I think we are good. We're back. I'm just coming in with a little extra coral in some sections. What do you guys think of the yellow and orange? I think it's so pretty. Okay, now I'm gonna kind of switch gears. I told you, you really didn't need a lot of paint, so like really like a dot of each color is probably going to do you pretty good. Now again, I'm comfortable putting my pinks on here because if they mix with the oranges, you know, they're, they're all warms, so we're still going to get pretty colors. I think I want to use— let's see. We'll use a little bit of this Electric Pink, but I think I may have used more of the Fluorescent than the Electric. Hold on, I might have to grab my other bottle. All this dried paint is stuck on this lid. I don't know if I can get any out. All right, hang tight, I'm gonna grab my other bottle. I'm gonna get just a little dot of this guy, and I'm actually going to grab some of the Blue Raspberry. I'm going to put that down here though. I want to— I don't know if you can see in these pink flowers, but some almost have like a purplish undertone to them. So I'm going to use some of the Blue Raspberry to just change that color ever so slightly, but I don't want the blue mixing with my oranges. Good, Sally, I'm glad you are enjoying it. Patricia, these were wet on wet. That's how you kind of get that watery look where they kind of mix together on their own, which is one of the things I love about watercolor. I do like— I will say this, like, I'm using acrylic tonight If you have a choice and you have watercolor, I would recommend watercolor. It just is a little bit— it's just a little bit different to work with, but this is still really fun to play with and do these things. But if you want to explore watercolor more, definitely get a watercolor set. But I like to show people all the ways they can use acrylic too, without you having to go out and buy additional art supplies. Okay, so I'm gonna grab some of my Joyful Pink here, and we're going to kind of do the same thing. I'm just going to start with this color first, start laying in where I want some of these blooms at. Now for this, I feel like it's okay for these to overlap a little bit because that orangey color could be an undertone. But this one's going to kind of be like an oval, more this shape, because I'm going to have it facing out a little bit. Same with the one I'm getting ready to put over here. So you see what I mean by like circular-like shapes but not perfect circles, right? Just kind of misshapen little blobs we're filling in with. And we got this little guy down here, but I know I can cover that little bit of orange up where that is. I'm going to try to move a little quicker just so this doesn't dry too fast on me. So this is obviously my Joyful Pink. I'm going to pull just a touch of this Blue Raspberry. Into it down here. See how it's created more of like a purplish pink now? And we're going to start kind of just laying some of that in. The thing with this is you don't have to be very specific with your brush strokes at all. You're literally just kind of coming over and dropping some of this color in here. And then when we add in the centers and we add in some of the different elements and the, and the pen lines and all this good stuff, they just start slowly turning into flowers. It's kind of like a fun little transition to watch. And I'm not worried about keeping like the same ratio. Did I put the same amount of blue in this one as I did the other ones? We're just kind of laying some variations of color in here. I'm gonna rinse. I'm gonna grab some of my Electric Pink and Joyful Pink for a different color. This is what I find so relaxing about watercolor or acrylic treated like watercolor. Is I think it's a fast and fun way to just sit down and do something creative. Even if you don't have a ton of time, you can come and play with watercolors or watered-down acrylics and just do a quick little design. Let's try— I think I might come back with this later and let it kind of be on top, but I'm just gonna do a couple little I've still got some water in this neon pink, but you can see how much more vibrant that is. And right now they just look like I'm making a bunch of blobs on paper, and that's okay. Awesome, Donna. She said this is her favorite colors and techniques of all the lessons so far. They are fun. Okay, so we've kind of got our flowers situated. We know where those are going to be. Now we want to start building in our greenery, so I'm going to get some of my cool colors over here. Just a touch of each color. A little goes a long way. I love these colors together. Bluegrass Green, Sour Apple, a little of the Ultra Blue Deep. And I know I've got my Blue Raspberry right here I can pull over as well. And for this, I'm going to switch to my number 2, which is like my long skinny one. I really like doing this when I do leaves. You can go ahead and mix them together, you can leave them separate. I just like to have a variety of greens. Maybe some more lime. I'll even pull some yellow over here to make a completely different green. So I'm going to kind of start with— I'm just realizing I wondered why this was not feeling like it was fitting the paper the same. I did this one sideways, and I'm doing this one this way, horizontal. Just that little bit of like half an inch. I'm like, this is not fitting the same. So the composition is going to be a little bit different, and that's okay. So I'm just going to start kind of pulling down where I think I want some of this greenery to come out. So again, I'm using my liner brush, whatever greens you want, it really doesn't matter. The first thing I'm doing is just kind of pulling the stems out, and then I'm going to come back and put the leaves on. All right, so let's start with this one up here. Just make some fun little leaf shapes. These are all different sizes and kinds. I kind of like to start here on the stem, kind of pull it out so they have a little bit— oops— they have a little bit more curve to them. So let's start here, and I'm going to water this down a little bit more. We're going to put another one in here. It is important when you're working with watercolor or this that— I know my oranges are dry right now, so I don't have to worry about that green interfering with that. You don't ever want your, your wet colors to mix, especially I mean, sometimes you do, but not different colors like this that you want to avoid them touching while they're both wet. So I'm going to get a little excess water in here because I want these leaves to be nice and wet with this color on the inside. You're going to see me do the Bluegrass Green first. Okay, I may even just grab a little bit of water and put it directly on here. And then I'm going to show you what I think is so cool about this. Let's water down some blue over here. And we'll start just kind of laying it into that really wet paint. And it kind of does— excuse me— it kind of does the magic for you if it's wet enough. Like, these colors are just going to start kind of blending together and you get your own unique color combination. So I'm coming in with the darker blue and then I can kind of pull it around with my brush. Just pull that out a little so that leaves just gonna come out more. But we can also come in with— let's do some of this lime green, maybe even pull a little bit of yellow into it to make it even brighter. Look at all these pretty colors we got over here. And I can come and add that in. So we've got all these fun different colors inside of our leaves, and you can come back and do layers if you lose too much of the color that you like. You can just kind of tap some back in there. So it's really, it's really about preference. I think you'll be able to see that better when it dries just a little bit. I know, isn't it pretty? And it's fun. Okay, let's do some more over here. I'm gonna, I'm gonna make a different green. I pulled in some of that blue into that limey green color and created a whole new color. So all the leaves on in my arrangement here, they're all slightly different. Can make your leaf shapes different. And you really don't need to worry too much about, like, don't try to, you know, get the leaves exactly perfect. It's really not going to matter. We want these to be organic feeling. So I'm going to do the same thing I did with that other one here. Maybe pick up a little bit of yellow. Let's drop some of that in. Yes, Maria said she has gouache paints. I love gouache. It's super fun to work with. It's almost like a cross between acrylic and watercolor. But that will be perfect to do with this project. So my original idea was the— was for you guys to possibly make these as like a Mother's Day card or a gift for someone. But keep in mind, if you are thinking about Tribe and you're wanting to be a part of it, that would make a great Mother's Day gift for you too. You can tell your family what you want, easy peasy for them. and exciting for you. All right, so I'm just coming in with some of that extra color now, just kind of building in my layers. I think I'm going to come in with a little bit more yellow up here. And then maybe kind of mimic what I did on the original. It has a little bit of blue in the middle there. Maybe I'll use some of this Blue Raspberry and Dark Blue. If you're wanting— Tanya's asking if she wanted to add baby's breath. It's going to be kind of hard on a white background to add that in, so you would want some kind of undertone underneath that, like a blue or purple, and then maybe you do white paint pen on top of it to create kind of like the look of baby's breath. And notice how I'm holding the brush too. I'm not always holding it straight up and down. Kind of like further back and kind of loose, so you're not putting a lot of pressure down. That's how you can get those like finer points, is very little pressure on your leaves. I'm liking the way those leaves are looking though. Thank you, Kate. Um, asking about my nails— no, I go to a nail salon and get them done. I quit doing my own a long time ago because it takes too long. I can never make them as pretty as I want, so I just go and get them done now, and they can do all the magic. But I think this is just so relaxing because you can kind of just keep looking and playing and can always come back and add more color in where you want. I love how different it looks when it starts drying too. You can start kind of seeing the variety of these colors a little bit more. Okay, so then, um, let's See, I think I may want to add my vase on before I add any more greenery down here. I'm going to jump over to this guy. I think I'm going to do these more of like a lime green, maybe some daintier leaves over here. And if you're not sure what kind of leaves you want to do, look for inspiration. I use Pinterest. You can go to— you can follow the Social Easel on Pinterest. We have so many boards, so many inspiration ideas for you. You don't have to— I think a common misconception when it comes to painting is that you just have to have all this in your head and you just have to know what these shapes look like. and that's not at all true. There's inspiration everywhere around us. So find, you know, flowers in your own garden or inspiration from Pinterest or still lives, wherever you may want to seek that, and then look at those to get ideas of what you could put in your bouquet of flowers if you're wanting to do something different. This one for me turned into like, really, it reminded me of like when we go to Honduras, like the flowers that are there, they're very tropical. Tropical bright blooms. I love them, they're super fun. I think I'm going to come in and add maybe a little bit more yellow down into these two. It's really just fun to kind of watch the paints mix together and do their own thing also. Okay, I'm going to take a break from my leaves for just a second, and I am going to, um, do my vase. So for that, I'm going to get a little bit of white. I'm just actually going to drop it right in here in my teals because these are all the colors that I used to make that teal. And white is going to really help, um, like the paint feel more opaque. So you can see immediately this looks not as transparent as, um, I forgot to put a sheet under that this time. Oh well, that's fine. Um, not as transparent as the other colors that we're using, and that's because we've added a little bit of white to it. So I can just kind of push my brush right up next to these flowers without getting in them. And then inside of here, I can come in, do— water it down a little bit again, come in and do these different colors, different variations. I added a little dark blue on the sides, maybe up here closer, tucked into the flowers. Maybe a little bit of random green over here, and then I'm going to let that dry and probably come back and add some more to that after it's dry. Okay, now that I've got my base on there, I can come back, decide where I want these other leaves. I know I want some kind of coming over here. Off the side. Let's go a little darker blue on these. And remember, it doesn't even have to be realistic. I'm going to do some dark blue, maybe even a little bit of pink in these. I think it's really relaxing to watch and to do. I agree. Gonna get a little of this Bluegrass Green in there, and then I'm going to jump back up here to my pink again. It's so fun to add these extra little colors in, unexpected colors. What do you guys think so far? It's coming together. Okay, well, thanks for letting me know, Melanie. I am gonna go in and we're gonna start adding in these fun little like lime green colors. Let's see, I'm trying to decide if I need to make a new little section, or if I can add enough yellow to this to get it the color I want. So I'm just going to go ahead and mix all this green back up. A little bit more yellow in here, and then I think I'm going to add some white. There we go, brighten it up even a little bit more. Um, Tanya said, why didn't you center the vase? You actually don't ever want to just put something right in the center of your composition. It's better to have things off-centered a little bit. It makes it more interesting for the eye to look at. So what I'm doing right now is I'm using my big brush, my number 5, and for these little green leaves, I'm letting the brush do the work for me. Okay, I'm just literally pushing down, and that's the shape of my leaves. These are really fun to add in. We'll have to layer here. These that are going on top of the vase, they'll need a second coat, which we can do because we are working with acrylic. We can actually build up this color a little bit, which you can't do as much with straight watercolor. Let's fill in. I'm gonna get some different greens here and just kind of fill in some of that negative space inside of our vase, add in some little variation here. I love just how soft it is. I think I am going to come back and add a darker couple leaves down here. That's too blue. I'm going to cover these up. I may add some more back in, but I think I want these longer leaves over here. Maybe pull in some little lines just to kind of tie everything together. I'm really liking how full this is looking right now. Oh, awesome! Welcome, Angela. She said, I live in Florida, and I joined, um, Tribe yesterday, and my final decision to join was to see how many tropical paintings you do and have. Right up my alley. Yeah, even though I live in the middle of the United States, I love the tropics and wish I lived next to a beach. So that's probably why I paint it so much. I am just really liking how this looks. Okay, so I think I'm going to come back. I'm trying to decide. I think I'm going to come over here on my palette and try to get a little bit cleaner area. I'm going to start with the white and then just add a touch of green to it, maybe a little bit more. I feel like these greens got darker than what I want them to be for those little leaves. Need to add a little yellow. Okay, so this is not as watery. I let this be more like acrylic than like super watered down because I want these, um, leaves to stick out a little bit more. This is one of the benefits again to doing it with acrylic, is you can come back and get that extra coverage if you want to. I'm liking that. And then I came in— I'll just grab my little skinny guy here— some of my neon pink. I just came in and added kind of watered-down little accents of color there in the vase, anywhere you want really. Now that this is dry a little bit, we can come back and start building in these more vibrant accent colors. I love adding pink to leaves. I love pink and green together. And you don't have to water it down if you don't want to. If you want it to be really bright and vibrant, you can just use it just like acrylic paint. That's the fun thing is you can mix mix your styles. You can mix having some, you know, heavier acrylic, and I just mean like opacity, just like where it's more opaque, and then you can have like the see-through of the watercolor. We could even add— maybe I want to add like a little bit of this orangey color into some of the leaves. Let's add a little splashes of that coral in here. So anywhere you want to come back, now that your base layers are dry, you can come back in and add accents. You can decide, maybe I want something a little darker. In here. It's very buildable. Let's add— go ahead and add our centers in. So for the centers, I use this Ultra Blue Deep here, maybe just a touch of white to that. And I'm just going to kind of push down. Now here's how, like, if you want your flowers to not all look like they're facing forward you can come off-centered a little bit and kind of push down, and then that's going to kind of give the illusion of that one kind of aiming down that way. But this is one of my favorite things. Watch just this transformation of me adding the centers in makes such a big difference in how the flowers look. And we want these messy, right? We don't want perfect circles inside those centers. I love that blue and pink together. For the centers of my orangey flowers, I'm going to use more of like this Bluegrass Green. I think we'll test it out and see. I think I may have mixed these too much. I want it more like it is out of the bottle. They are yummy colors, Crystal. I think so too. And they don't even have to— like, I'm literally coming in and just kind of pushing my brush around there, right? And then I'm going to come back with— let's do some of this Electric Pink. Some of this fluorescent pink, create a little mixture here, and we're just going to kind of dot around that teal. Anywhere else you want any extra bright in your pink flowers, you can come back and add some extra color in there. All right, looking pretty. It's really pretty and soft. So I'm going to let this dry for just a minute because I don't want to do any paint pen or anything on there while my paint is still wet. So I can get away with kind of outlining on some of the areas that I know are dry. Um, just keep in mind, if you're using paint pen, it is paint. So once it's on there, if you get water on it again, it will bleed. Okay, now if you're using waterproof pens, you don't have to worry about that as much, but I was using paint pens on this one, so that was my final step. Okay, and you may like it like this. I always struggle with— I love watercolor so much, like the look of it, but I get to this point and I just, I can't help myself. It's like I always want to add black lines on there. I think because I come from a graphic design background and it's just more of a graphic look to have the black lines, but side by side, I mean, they're beautiful either way. This is just so like soft and romantic looking without the lines on it, but I am gonna add the lines on even though I'm questioning it right now for this one, just to kind of show you guys how to do it. We want to do it like quick, light brush strokes— hand brush strokes, I should say. I'm gonna zoom in a little bit, hopefully, if I can get this to bend appropriately. I'm just loving it. Eileen, I love that. This is so awesome. She said, I visited my sister in Florida and she convinced me to join Tribe. After she gave me my birthday present of all the supplies. So generous. I never painted before, and I'm looking forward to letting my inner artist out. That makes me so happy. I love it. Love, love, love. Welcome. You are going to have so much fun in there, and you're going to be so glad you said yes. So we can't wait to have you. Okay, so I am going to start with my white paint pen. I have already primed these. If you've never used a paint pen before, you need to shake them up. and then you need to prime them. And what that means is, like, on any kind of surface, you need to push down and, and let the paint fill that little tip at the end, and then they're ready to go. So I know it's very faint in this one, but you see these little white scribble lines that I have in there? I love doing scribbles, and it just adds— like, when you're, like, looking at art, you want to see a variety of different line sizes, right? So it adds more interest to the painting. Your eye may catch it and then it starts traveling around and looking for other ones. That's what you want your art to do. You want it to keep the eye moving. So I'm just going to quickly come in and just scribble away, trying to avoid any of my wet paint areas. And you can come back and do this after the black too. I'm going to do a little bit now and then I may come back and add more in. This is where you really have to trust me. I know some of you are like, oh no, she just ruined it. It'll all come together. And guess what? If we don't like it, then that's okay too. The goal is to not really care too much what your squiggly lines look like right now. Just do it, have fun, keep going. Don't overanalyze it, because once you start adding in the black also, it's going to kind of pull it all together here. Now I have two different sizes of black. I have the same size that I used for the white, and I have a super skinny one. I honestly can't remember what I used in the first one, so I'm going to start with my skinny one and see if that's what I like, but I may move on. To the, um, the bigger one. So the idea for the black is you want it— you want them to be outlines, but I don't want them to be perfect outlines. See how they're not exactly on the edge of these leaf edges, the flower edges? Some lines go out into the white, some are on the inside. Excuse me. So again, we just— we want variety. We're not trying to like— it's not like outlining when you were like in kindergarten. They say, okay, outline your shape, and you make like a hard, harsh outline. That is not what we're, what we're going for. We're going for very whimsical, loose lines. All right, so I like to start at the top, so I'm hopefully not dragging my hand across anything. So kind of going in with the basic shape of these leaves, but again, not staying super attached to worrying about it. And then I— you can still naturally— I think I just always scribble a little bit as I'm doing these lines. I just love the movement. That the lines make. And then for these little shapes, I'm not outlining the whole thing, just kind of coming around the curves of them a little bit. And you could even start with the skinny pen, and then you could go back in if you want some thicker black lines in some areas, then you have even more variation. In your lines that way too. So for my pink ones, I decided to come in and actually make like petals for them. So this is what you can do, even though these are just all blobs of colors right now, right? We can change that with our pin work and actually kind of create what looks like petals inside of here with our pin. Now I did this on the pink ones so that they kind of looked like a different flower than the orange ones. If you feel like your, your pen's running out a little bit, you can jump over, prime it again. And then for, like I said, the orange ones, I just kind of did more around the outlines, maybe a couple inside. On your edges of your vase. And then I'm going to come back in, in the center here. Actually, I think I'm going to get my little bit bigger black one, and I'm just gonna add some little dots inside of here. I feel like the color is not showing up on camera as good as what it looks like. In person. These leaves look really dark on the camera, but they're really not that dark. Maybe my screen is too, too dark. Okay, then, like, I mean, at this point you can decide. Now I've kind of drawn those in, maybe I want to accentuate inside these little petals a little bit more. You could also decide— again, just keeping in mind that these will blend— but I came back at the end if I wanted like more pink inside one of those petals, can come in between where you put your paint pen down at and still come back in and add some of that accent color if you want. Think about all the different versions of this that you could make. Different color blooms, different arrangement. Like, it's just such a fun way to play with color and watch colors mix together. Okay, let's do our little side by side. You guys let me know what's your favorite. You can tell this one was just— this is a slightly taller. I had it turned the other way in my book. It was this way, so one is going to appear more vertical, one's going to be more horizontal, but so fun. Loose and happy little painting you can get done in about an hour. So hopefully you guys had fun painting with me this week. Let me know, what was your, what was your favorite painting that we did this week? Did you like learning all the different techniques and learning all the different ways that you can work with acrylics? I know, I really can't decide either. Oh, I wanted to add— I forgot I wanted to add a little lime green dots in the middle of my hot pink flowers because I love my, my green and pink together. So I need a little bit more lime green over here. Awesome. Okay, any last-minute questions about Tribe? So again, this is our last painting this week. You guys will have replays through Sunday. We did extend the deadline for you, so you have through Sunday night to access these replays and get the paintings done unless you join Tribe. If you join Tribe, you have continued access. Tribe sisters, we will be adding these to your vault. I'm going to add them up in the, up in the section at the beginning, like our, like, start here section. We will add these so you can go back to them whenever you want to. And like I said, replays are available through Sunday. The big bonus for Tribe, that is going to end end tomorrow night at midnight. So you have just about a day left to get signed up for Tribe before we close doors. And I'm going to show you these bonuses again in case you missed them or weren't with us on another lesson. See if I can zoom in. Zoom in for you guys too. Okay, so I showed you some of them here. In person tonight. So the 3 summer vibes, we have the spring truck. This is just a little cutie one, our Among the Wildflowers, the Spread Love Like Wildflowers, our 2 Bold Blooms. And then it also includes our 2 essential mini courses. So if you are unfamiliar with the color wheel and how to mix colors and what goes together and what doesn't, this Mastering the Color Wheel lesson is excellent for you and is going to teach you so much about everything having to do with the color wheel. And then we also included the Basics in Acrylic Painting series. This is a 4-part video series and includes a bonus lesson inside of that. So altogether it's 12 different lessons and it's a $300 value. So this is your bonus when you join Tribe before midnight tomorrow night and You have two different options. When you become a Tribe Sister, you can do $47 a month and you can cancel at any time. No commitment. We have a 14-day money-back guarantee. So even if you're not sure, jump in, take the leap, take the chance, see what you think about it. And then you can— I always get this question. So a lot of people say, well, what if I do the $47 a month and then I change my mind and I love it so much I want to switch to a year? You can easily do that. So if you want the deeper discount, but you're unsure whether you want to sign up for the 1-year annual contract, you can always switch to annual later to get, to get that little bit of a deeper discount for you as well. And then as far as what you get inside of TRIBE, making sure this is all fitting on the screen here, you get 2 new lessons with me each month. We have our TRIBE Sister Facebook community. That you will get as well. This is very similar to like what you're experiencing here in the comments and all that kind of stuff, except we have our own Facebook group where the Tribe Sisters get to share what they're working on. We get to pray for each other. We get to build our friendships there. I do monthly critiques. This is your opportunity if you really are striving to make your art better and you're not sure what to do next and you need my advice. This is your chance to have me as your personal art instructor, and you get to continue to, you know, I'll come in in the comments and let you know if you ask. And then, of course, you can always submit it, and I'll do an on-video critique for you as well. I do monthly devotionals each month, and you have access to all past devotionals. We do monthly Zoom paint parties where you can hang out, see your tribe sisters' faces, get to know them better. And of course, the vault, which is besides the community, I would say Tribe Sisters will say the vault is their favorite thing. This is what we call jokingly our Netflix for painting. On here it says 195 plus. We're over 200 plus videos now in the vault, as well as technique sessions and all that kind of good stuff. Every category of painting you can think of, and you can actually scroll down and go down to— I'm not going to go through the whole thing here. But when you go down on this page, this is going to give you a whole inside look to the vault and how it's laid out, how you access it. And then if you just want to see what kind of paintings you're going to get inside of TRIBE, you can scroll down and click on this lookbook and literally flip these digital pages to see all the different styles that we do inside of TRIBE. And that's, that's always changing. I'm always working on new things and new ideas to do with you guys. And then we do super fun contests and bonuses. We're getting ready to start a summer contest. We're wrapping up a spring one. Bonuses include discounts on things I do outside of Tribe, early access, freebies. Tribe sisters get workshops for free. So it really is the VIP membership. With the Social Easel. This is where you're going to get all the things, right? If you don't want to miss out on anything, if you don't want FOMO, then you want to be a part of TRIBE because the TRIBE sisters get it all. Yes, Melissa said, if we joined early, do we get access to the second bonuses as well? Yes, all current TRIBE sisters, whether you joined this week or whether you've been a TRIBE sister for a while, You all get those bonuses as well. Awesome. Holly said, I just switched over to a year. That's awesome. Okay. All right. Well, I am going to jump off here. I'll say bye really quick. So thank you guys so much for painting with me this week. It was so much fun. I hope you had fun. Um, don't forget to share your work with us. Um, if you have any questions about Tribe, if you're still unsure, come back and join me again tomorrow. Even though I'm not painting tomorrow, we have 2 more sessions tomorrow. So I'll be doing a final session in the morning, and then at 1 PM I am going to come back and I'm going to do a full behind-the-scenes look. So I'm going to go live with you. Inside the Tribe Sister Facebook group, inside the vault, inside the library, and I'm really going to show you exactly what you get when you become a member. So if you still have questions, jot them down now, bring them tomorrow, or you can always email our customer service team. Let me throw that up really quick, or reply back to any of our emails. So it's the same email address. You can reply back to emails we send you, or you can email in directly, and my team will be happy to help you as well. So thank you guys so much, and I will see you tomorrow. Bye.










