Paint a Funky Flower picture frame with Christie
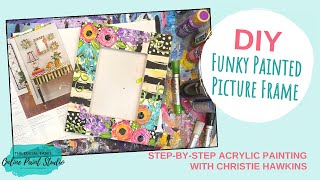
In this YouTube DIY tutorial, Christie Renee Hawkins transforms a plain wooden picture frame from Target into a vibrant, McKenzie‑Childs‑inspired piece for Mother’s Day. She begins by explaining her inspiration from the whimsical patterns of designer McKenzie‑Childs, then walks viewers through the entire painting process: applying a white base coat, adding black‑and‑white stripes, incorporating 24‑karat gold accents, and layering hand‑painted “funky” flowers using a palette of acrylic paints and paint pens. Christie shares practical tips on acrylic drying times, color mixing, brush selection, and how to correct imperfections. She also mentions the specific DecoArt products she uses (paints, gold paint pen, high‑gloss DuraClear varnish) and provides affiliate links for viewers to purchase them. Throughout the session she encourages a relaxed, imperfect aesthetic, offers troubleshooting advice, and suggests finishing options (gloss vs. matte). The video concludes with a glossy‑finished frame ready to hold a photo, and Christie invites viewers to apply the techniques to other objects like watering cans or vases.
Chapters
Hello everybody, we are gonna do a little fun Mother's Day project today. So I got this frame the other day at Target on clearance, and it's just a wood frame with a glass insert, and I was waiting to find something fun to do with it. And I was looking at my McKenzie Childs magazine that I got the other day. If you don't know who this is, I'll show you some of her stuff. But, um, I love her stuff. It's a lot of the black and the white and the flowers. And so I was looking at all this and thinking, oh, I need to do something cute like this for this frame. So instead of the little squares like that, I think we're going to do some big stripes today. So this is what this frame is going to be inspired by, just to kind of show you some of her fun and funky stuff in here. I just love all her patterns. So people ask me all the time where I get inspiration from, um, everywhere, and this is one of the places. So, um, just wanted to share that with you guys today. And if the stripes aren't necessarily your style, you can always, um, just do the flowers that I'm going to show you. So the first thing we're going to do is paint the entire frame white, but I'm going to take this out first. All the products that I'm using today, um, you can get in two different places. So, um, you can find some of the DecoArt in my Amazon store, but there's not a huge selection on Amazon right now. So in the description is my DecoArt affiliate link, so you can go to that and that's where you're going to find your biggest selection of DecoArt. Paints. So that is up in the, um, in the description, so you can access that whenever you want. And then if you want like wood frames like this, I have some of these in my store. All right, so I'm just going to start with some white craft paint, and I was already using a— now if you've ever— how many of you are familiar with McKenzie-Childs? Have, have any of you looked at her stuff before? I just think it's so fun. I've— we got to go in a store when we were out in Arizona, and it was the first time I ever got to see all her stuff in person. But she's got these fun like lines and stuff, but you can tell in the white there's different colors in there, so it doesn't have to be just solid white. And all her stuff is hand-painted, but it's just so fun. And whimsical. So that's kind of what we're inspired by today. So I'm not going to stress if there is a little bit of color— can you see on that a little bit of yellow in that white? Um, in my white, and I'm just using a flat brush to do this part, and this will probably take 2 coats, I'm guessing. This would be a fun little gift for you or for the kids to do for their moms or grandmas and then put a cute picture inside of it. So what I think I'm going to do on mine is I'm going to do black and white stripes like in the middle sections, and then the corners I'm going to do black with some gold dots. And then we're actually going to paint flowers on top of that, so there's going to be some layers to this today. Make sure you're getting all your edges. Now you may be a little neater than me and not go ahead and paint your edges. You could wait on this, but I'm going to go ahead and paint mine. White, because I want that first coat to dry. Make sure you're cleaning up any little drips along the way. One of my friends introduced her to me because she knew my style, and she's like, do you know who this is? And I didn't know who she was, and then she showed me her stuff, and I was like, oh, I love it, it's so fun. Like I said, these frames would be cute if you just had some like chalk paint or just regular craft paint. You could just do that if you're not a big fan of like the black and the white like I am, and then add some flowers to it. So that first coat is already drying super fast. I'm gonna go ahead— whenever— if you're new to painting with acrylic paint, whenever you're painting, you want your paint to dry in between layers. So I wouldn't be putting the second coat on unless it was dry, because otherwise it gets thick and gloppy. And I think just to be a little bit more her style— I wish there was a bigger picture I could show you guys. I'm gonna see if I can find one. I have— see these cute little owls? I bought those in salt and pepper shakers. I just think they're adorable. So I'm gonna grab, I think, a little bit of— I'm gonna do metallic gold because I like metallic. So I'm gonna put a little bit of this next to my white here. This is DecoArt 24-karat gold. My DecoArt link is in the description. So I'm just going to get a little bit of that with my, um, white, and I'm going to go this way on this side. Because this is the direction my stripes are going to go. And you can add in as little or as much gold as you want streaked in there. And I'm not worried about those corners because I'm going to paint them black, so that's why I'm not putting more paint there right now. You guys like the gold? Gold is kind of like glitter. I feel like people either love it or they don't love it. I love it. I love it when it catches that edge like that too. Okay, so I'm gonna grab a little black. I'm going to grab a different brush just so I don't have to rinse that immediately. Now I'm not trying to make this perfect, but we're going to do these corners in black. Now I would continue whatever design or color you're doing on the front of your frame. I would continue that on the side. So I'm just kind of lining it up with the opening there, and this still has a little bit of wet white in it, so we're kind of getting a little bit of that blended in. But again, I kind of like that look, so I'm not worried about it being solid black. And then at the end, after you do your frames— people ask me this a lot about like how to seal them, or like what do I put over it to protect them— you can pick what kind of finish you want. So you can do gloss, you can do matte, Her style is mostly like shiny porcelain, so I'm probably going to have more of a gloss finish to mine. And you can do acrylic sprays, or you can do like a gloss varnish. I'll show you the one I'm going to use here in a minute. You can also get that from DecoArt. So again, for the kind I'm doing, I kind of want to see the brush strokes and a little bit of white mixed in with the black. You can choose whether you want that more solid or not. Okay, so now I'm going to go into the black, and again, we're just doing stripes. Now what I have here, obviously she's got the squares, so we're going more with like the inspiration from this table. So I'm going to do my stripes like this, and I want you to notice hers are not perfect. And then my corners, I'm going to put these little gold dots in them. And then after we do that, I'm going to add some like fun flowers on. See how she's got these like 3D flowers on this mirror up here? I think I want to add some of my crazy little flowers around the corner. So I'm just going to kind of eyeball it. I'm just using about the width of my brush here. So I'm just going to kind of show you up close. They're not all absolutely perfect, so it's going to be more of a rustic style, but I personally think like hand-painted and not perfect is more fun, in my opinion. I kind of like the little bit of the streakiness in this too. Now I know some of the Type A's out there are cringing right now because it's not perfect. That's okay, you can measure yours and make it perfect. You also have to keep in mind we're not done yet because we're going to add some flowers to this too. Now when I'm done, I will go ahead and carry the black around the edges as well. But for the sake of the Facebook Live, I'm not going to do that right now. Straighten that up a little. So again, it's kind of got more of like that rustic look to it where the edges are not perfectly finish, maybe a little bit of dry brushing. And if it's really bothering you, if you get it more off than you want, you can always come back and add a little bit more white paint and go back over top of it again. I could come back and add a little more in between there. I can even add more gold in if I want. I like the gold finish on there. Yes, this is a wood frame that we're doing. This black up here in the corner is bothering me. Hold on, let me fix this up here. And just remember, anything you do with acrylic paint, you can always go back over and And I caught that just because I'm looking at the video. So, you know, I always recommend taking pictures of your progress along the way. So I'm gonna blow dry this really quick. I'm gonna try to hold it away from the phone so it doesn't get too loud on you guys. Okay, so I'm gonna go to my favorite ever gold paint pen. This is a DecoArt Color Premium, also in my store, and we're just gonna do some little polka dots in the corner. Where did I see— I was gonna show you on another one of her designs. See, like on her little clock right here, just these little random gold dots. Well, I just think they're fun. And I love this pen. It's my favorite gold paint pen because it's so metallic. It doesn't have a dulled finish at all. And if you just joined, we're going to be adding flowers over top of this. Um, you don't have to, you may just like the black and white, and that is okay too. Kids, teens will love this project. You can probably do it with supplies that you already have at home. And then I'm gonna go in and just add some quick little stripes through here too. I need to get a little bit more flow in there. It's already just a fun little frame. Let's just put a picture of the girls in here. You just see, see, that's pretty cute even just like that. It's just fun and whimsical. And I'm going to finish it with a gloss finish. So let's get to some fun paint colors now. And notice, like, when I add the gold stripes into, you don't notice as much the difference in the lines and them not being, you know, perfectly symmetrical all the way around. So I've got some Hot Pink. I'm gonna use— that one's Dragon Fruit. Some Blue Harbor. What was the other one I was gonna do? I'm probably going to make my own orange with this yellow and Dragon Fruit. I need my purple. I've still got plenty of white on my other palette that I'm going to use to. So I'm just going to use a round, and I think I'm going to put some white underneath my colors first just to give them a more solid base. So I know I want a flower down here in this corner, so I'm going to be covering up a lot of what I did. I think I'm only going to do these two corners though, so you'll still see the polka dots in some areas. Maybe a big one over on this side. So basically I'm just making some blobs, and then these blobs are going to turn into flowers. I think I may pull out some of my paint pens too, because I had a lot of fun doing those. And my funky flowers. So these, if you haven't seen my flowers, these are kind of what they look like. And this is kind of the style we're going for today, so just crazy and messy. Squeeze this back here really quick. Yeah, I think I want some of my paint pens because I love that lime green. Oh yeah, got to put my green on here. These Arteza pens are also in my Amazon store if you're looking for what I'm using right now. How many of you are worried this is not going to turn out? It's looking a little crazy at this point. Okay, so I think I'm gonna do this bottom one kind of a Yellowy orange. So I got a little pink more around the edges and some yellow. We're going to be adding some scribbles over these. Probably going to add up— end up adding more flowers on here than I intend. We'll see. I like that little bit of pink. In here. I'm gonna get some of the white with my purple, maybe even just leave it not all the way mixed. I told you I'd be adding more flowers on. I knew I didn't put enough on there when I started. Oh, that blue, it's too runny. No, I don't like that blue. Let's switch blues. I'm going to go to More of like a teal. Now, I don't always have specific flowers that I'm doing. They're just kind of my style of crazy flowers. You guys have a little bit of a glare, I feel like. I don't know if that's better. I'm going to add a little bit of greenery in here. I think I want to mix some yellow with that, make it more of a limey green. I love mixing colors. It's a lot more fun to just mix and play and create than just stick with what's in the bottle. Let's just add a couple of leaves here and there. I love the green added in, don't you? I think I may add something to these purple ones. Okay, I think on my purple ones I'm going to make them more like I did in my funky flowers and add a little bit more of the Purple and white. Thinking that's kind of fun. I'm liking where it's going. Yeah, I think the green makes a big difference. I may even take a skinny little liner brush here, maybe add a couple little curly Qs. Just fun little extras. And if you're feeling like you're not good at curly cues, make sure you have a mixed media pad and just practice away. You get better the more you practice. I think I'm gonna do some black circles inside some of these bigger flowers. Set it on white paper so you can see better.
Actually, I think I can.
I don't know if that helps, if that's big enough. You can at least see the inside edges better. That help? This might help even more. There we go. How about that? Okay, so I'm gonna add my black in. I should have thought of that earlier. Well, now I want more flowers with the black centers because I love them so much. What to do, what to do. I think I may just add one more just to offset it so it's not 2 and 2. I feel like I need a third one in one of the corners. That's going to be my solution. I'm not going to add a bunch more, but I'm going to add one more. I'm going to blow dry that real quick so I can add a little bit more layer to it. That's not good. So I'm just lightly adding some yellow to there because it's kind of thick right now. I don't want to add too much. And then we're going to get a little bit more black. Yes, I did all the flowers with a round brush, the same round brush. Mine's a 7. This is from my brush set in my store, also the Nik Pro round set that just has a whole bunch of different size rounds. I love it. I don't like the shape of this one. I don't know, um, it depends on the picture I put inside of here which way I'm going to do it. Probably like this. I'm going to try not to get paint on the picture of the girls. I kind of like that. So I do kind of want to add some of my markers on here, I think. Okay, so I'm going to use these green— this green paint pen and add— I love the lime green color that it adds to the leaves, and I'm just going to do some little scribbles inside the actual leaf part. Can you see how much that makes that green pop? You can even add— we're talking about like if you're not good with the curly Q's and the skinny lines and all that kind of stuff, These paint pens are perfect for that. You could just draw them on there. It's just basically a marker with paint in it. And let's grab some of the black. So you want to make sure you're doing this when the paint is dry, and you don't have to add the black in if you don't like that addition and you liked it better softer before. You can definitely leave it that way. I like the edging that the black gives to it. And then I'm going to add a little bit of white. We're just adding a little bit of the white in, just some— oh, that's wet. I don't want to do that. We'll have to save that flower to later.
There we go.
Okay, I think I'm about done, but, um, this is from DecoArt. This is their DuraClear High Gloss varnish, um, and you just apply with a flat brush once everything is dry and let it dry, and it's permanent. That's it. It's going to be high gloss, nice and shiny little frame. So yeah, we just took a basic raw wood frame. I'm gonna see if I have any— this is what it looked like, this, before we painted it. So even like getting like these wood panels, like Like, how cute would this be with some black and white checks on the back of it with some flowers on it? That'd be so fun. So this goes perfectly with my Funky Flowers painting that I did, so I can put them in the same room together. So it's just another fun way to add some painting to your decor. It doesn't just have to be on canvas. So yeah, I love that you guys are thinking of all the things you can paint on. There are watering cans. I'm trying to think of some of the stuff I got. There are watering cans, there are metal buckets, there are vases. There's so many, so many cute things that you can paint and make look pretty. So again, this was kind of our beginning inspiration from McKenzie-Childs and that is our finished frame. So I can't wait to show it to you guys all finished, all glossy, with the picture inside. But I'm super happy with it, and I hope you guys had fun painting with me today. I will talk to you soon. Bye!










