Paint a Mix Media Flag with Christie
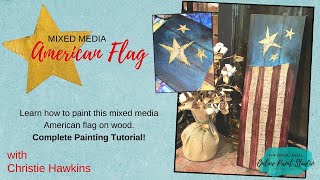
Christie Renee Hawkins shows how to make a rustic mixed-media American flag on scrap wood using scrapbook paper, DecoPodge, and paint. She tears paper for texture, adds polka dots and optional stars, and seals it for outdoor use. The whole thing is improvised, kid-friendly, and made from cheap supplies.
Chapters
Hey everybody, it's Christie with The Social Easel, and we are on day 3 of our Americana theme of Facebook Lives, doing some painting and crafts with you to celebrate the Fourth of July. So today we are gonna do an American flag on this piece of wood, piece of scrap wood I found out in the garage. So this was day 1. I freehanded this. There's no template for it, but I do like teach you in that video how to make your own mason jar. That's a super helpful tip because you can make a mason jar for every season. And then we did our Americana gnome yesterday. And I wanted to do something a little bit different today, so I found this piece of scrap wood out in the garage. All right, so we are going to do a vertical Americana flag on here. I'm going to grab some of my sandpaper really quick. Pretty smooth, but I'm gonna, I'm gonna make it a little bit smoother. And I am just doing this with supplies that I already had around the house. So if you've got a bunch of scrapbook paper, that's gonna, that's gonna be what you want for this, and then just some different kinds of paints. We're gonna play around with it. So this is kind of my idea. I've got a few papers that I want to play with and some stencils. I'm gonna use my DecoPodge. It's not actually what I wanted, but I can't find my other one. This works. This is DecoPodge by DecoArt. It's photo transfer medium, but it works for adhering papers and stuff on your wood too. Okay, don't forget to sprinkle this Let your friends know what we're doing today. So I've got some star stencils here. I've got this piece of scrapbook paper that I thought was pretty. I may use it. So if you haven't done mixed media with me, um, before, I kind of just work through the process with you guys. I don't have everything figured out ahead of time or pre-planned because Mixed media is usually pretty organic, and you're just kind of playing with what you have around you. I was hoping— I thought I saw— there it is, this one. So I liked this paper, but I need it to be dark blue, not this. So I can take this paper and use it if I decide and add paint to it to get it the color I want. So I've got a couple pieces of scrapbook paper here that I'm thinking about using for the blue part of the flag. And then this paper, I'm going to show you the package this came out of. I will add these items to my store, my Amazon store, after we get off of here so you guys can find these. This is Decoupage paper. This one's called Old World, and it came with like map stuff and these letters, but I loved this paper, and it reminded me of like all the signatures on the like Declaration of Independence. I just thought it looked old-school-y, and that would be kind of cool to have those words and instead of just doing white and red stripes, I want this underneath and then I'll be adding paint on top of it. And then the other thing I had, and I probably— now that I found that old wallpaper, I don't think I'm going to use it. But this, always when you guys are at Hobby Lobby, go look at their clearance. I got these rolls of scrapbook paper, this one and this one. I love both of them. Big thick rolls. These were on clearance for like $1.99. Such a good deal, and you can use these on all kinds of projects. I'm going to flip through this one really quick and just see if there's any, um, burgundy or red paper that I can use. So these are all— I keep all my scraps. I know that may seem crazy, but I tear a lot of my pieces. See how these are all torn? And sometimes you just need a little a little something. I don't think there's gonna be anything in here I want for the red. I think I'm just gonna paint red over top of that old world paper. So I've got my decoupage, I've got my paper, trying to decide. What do you guys think? Let me see if I can raise you up just a tad. So I did think this was really pretty, and this is how I'm gonna do it. Like, I'm gonna have the blue block up here and then some stripes down this way. Or do you guys think I should use polka dots and paint blue over top of them to get it the blue that I want? I'm gonna go ahead and tear this. Again, this is going to be kind of primitive and rough, so I like these rough edges. I'm kind of wishing I had two boards cuz I like both of these papers. I did like the polka dots because I thought of it being, you know, kind of to represent the stars, but then I thought this would also be cute because I could add the stencil stars on top of it. I may just have to come up with something else because I really think I want to do both. Polka dot seems to be the overall fave here. All right, I'm gonna leave that one. Let's get a little paint on this guy. This is just a navy paint, and I'm gonna— I just grabbed this brush out of there. I'm just gonna water this down a little bit because I don't want to completely cover up the polka dots. Okay, and mixed media— how many of you have done that, by the way, played with some mixed media and doing papers and stencils and all kinds of different stuff on your art? If you haven't, it's very fun. There's no rules really, but it is messy. You can't be afraid to get your hands all sticky and wet and covered in paint and glue and all kinds of stuff. This is turning out kind of cool. What do you guys think of that color so far? I want to grab— I think I want it a little bit darker in some areas. I'm grabbing just a tiny bit of black just to make it a little bit darker, more of a navy. I never like the navies straight out of the bottle. I always have to add black to them. It's like they just can't get them dark enough. I have no idea what size this piece of wood is. Um, let's measure. It's about 18 inches By 6? 6 by 18? It was just a piece of scrap wood I found in the garage. Oh, see, I already like this better. And if you don't want it to go too much, just as soon as you get it on there, you can wipe some excess off. I love the way that brown comes through on the paper. Okay, so we're gonna go with this. I'm gonna get a little of my decoupage here. That literally just exploded everywhere. I'm just gonna squirt some on here. Okay, so I'm just using my thicker brush, my bigger 1-inch flat, to spread this on here. You know, I hate to cover too much of the wood. Because the wood itself is cool. This is where I get my hands involved in this, and the stickiness gets a little messy. I'm gonna do a little darker around the edges here. Well, I like the way this is starting to look. What do you guys think? This is why I love mixed media, because you really just never know what you're gonna get. You're just playing with it and then it just starts coming together. Love that. Look how it's faded in some areas, darker in others, a little bit of wood grain coming through. I definitely like it darker around the edges. I'm gonna go on my sides here too. I think I'm really gonna like this. Okay, so I'm in love with this. Got a little bit of a bubble right here. I got to push down. And I'm gonna put just a little bit more decoupage on top of that just to make sure my edges don't come up. Okay, so now we're getting down to the bottom part here. I talked about using this old world paper I have. So originally I was thinking covering this, but I don't really want to do that because I want this wood to show through. So what I'm thinking I'm gonna do is tear or cut strips of this for the white part of the flag and then paint the red part of the flag directly on the wood. What do you guys think? Oh, I think this is gonna look cool. And obviously I'm not worried about these being the same width all the way down. This piece of board is not the same width all the way down. So again, we're going rustic, primitive. There is no part of perfectionism that can come into play here. I think this is going to be super cool. There, see this crease here? I'm going to go along that crease because I don't want that to show up. See how many more can I fit. I'd like to have an odd number just because odd is more appealing to the eye, so I may have to make these a little skinnier. This guy, I think I'm gonna have to make him skinnier. We'll cut this side. Oh, I'm so gonna love this. Don't you love it when you're doing something and you see it start to come together and you get so excited? I do anyways, because sometimes things don't work out that way. Hold on, I'm pausing for just a second. Do I want— should it go red, white, red, white? Should I have 3 of these? And have 4 red lines and 3 white lines. This has actually been really fun for me this week because I didn't have anything planned and I can just create while I'm on here live with you guys. Instead of having to have a plan in place, which works great for me. I still think I'm gonna have to make these— 3 white, 3 white. Yeah, okay, I think so too. But now let me— I'm just trying to eyeball that because that makes that one super skinny. I think I'm still gonna have to cut these down. Just a little bit. This is another fun thing, um, mixed media in general, that kids love because it's messy and fun and it's crafty and it doesn't have to be perfect. So if you've got kids or grandkids, like do this with them. Let them make their own American flag. I think that would be really fun to do this weekend. Anyone got exciting gigantic plans for the Fourth? We always go to my husband's parents' house and buy a ridiculous amount of fireworks. That's upside down. And usually we get to watch the local fireworks show too, but I don't think they're going to get to do it this year because of COVID I feel bad for wasting all this awesome paper. I'm gonna have to use those scraps on something. Okay, let's see how we're looking here. And I kind of like— do you guys like this uneven edge at the top? I kind of like the way that looks. I think this is good. I like it. All right, I'm gonna— I hate that wobbly noise. I'm gonna do a little— well, maybe not. I was gonna say I'm gonna do a little section at a time, but I really can't if I want my placement down correctly. So I probably got a little thick on here, but I'm just gonna load this up in my brush and leave that and then go over top of it. Susan, I am using DecoPodge by DecoArt. Mod Podge is ideal. That's what I'm gonna put in my store for you guys. I've always used Mod Podge, and I couldn't find mine this morning, so I'm using, I'm using the DecoPodge. Any of them work. I think I'm putting these in the right order. I had them by length. I know this is my final one. Maybe these two need to be switched. No, I think I had it right the first time. And I really thought that lined up a little bit different than it did. See, this decoupage already started drying underneath here, which is what I was afraid of. It'll dry quick and absorb quickly into the wood. Okay, so now we're gonna put a little bit more on top. Instead of squeezing it on my board this time, I'm gonna put some on my plate so I don't get too much on there. I gotta move it off that. I really think this is going to turn out super cool. Look at that color of the wood underneath too, almost has like a reddish tone to it that I really like. So you're just gonna want to keep smoothing out with your fingers so you don't have any bubbles. I think that glue didn't go down underneath here. Kind of push that down underneath there.
There we go.
And with this, I honestly don't mind, like, some of the texture in here and the wrinkles and stuff. I kind of like it for this particular project. Okay, hopefully that's not gonna wobble too much. All right, so going to my red. This one, I haven't used this yet. This is a brand new bottle. Let's see if we like this color. Okay, this one was called— what did I say that was called? Burgundy Wine. It's pretty bright. Let's pull some black into it. I'm gonna need a little bit more black. You guys can see my plate, right? See what I'm doing over here. All right. I got to be a little bit more careful here because I don't want to overlap. Oh, I like this color. So I've got plenty of paint in my brush and it's allowing me to just pull straight down for my stripe. I am in love with this piece of art. I'm gonna drag this down over my edge. Now let's try something here. I got the paint on, but what if I wanted it to not be that pigmented, that, that dark? Let's just see what it looks like. I may come right back over and paint over top of this. This is just allowing more of that wood grain to show through. That's so pretty. I love how that made it faded out right there. Oh, it just added to the rustic nature of it. Cindy, yes, I am gonna seal this. You can do an acrylic sealer I'm gonna use this. This is DecoArt Clear Coat, and it says add a durable protective topcoat to home decor pieces for use outdoors. So I think this is going to be perfect. It dries to a clear eggshell finish. I don't want it glossy, so eggshell would be good. Specially formulated to be more durable— durable and weather-resistant than a varnish. So this is actually a new product I hadn't used yet. I had it sitting over there and I never even read the back of that. So for all of you who always ask me what to use outdoors, I would say this. So I'll put a link to that in my store. Yeah, I'm loving it. I'm loving it. And I think— did you guys like it better before or after I wiped it off? I'm just being careful up against that top edge. So you've got one without it being wiped off, one with it. After— I think after, too. I just love that one little section. And I can always— here's the thing, guys. If you do this and you wipe it off and you're like, "Oh, I wish I wouldn't have done that," all you have to do is go back and put a second coat on and you're good. You're good to go. So I'm running out of my red. Someone asked what red again. It's Burgundy wine, and then I'm adding black to it. I'm excited about my little discovery of this clear coat too. So fun. Can you guys see this? I'm getting a little bit more black on there. I'm going to do the same thing I did up top and make it darker around the edges. I got a splintered piece of wood here, but I'm going to leave it like that. I like it. So I'm gonna go— let me get a little bit of water on here with my black. This is so cool. This makes me want to paint all kinds of stuff like this now. I may have just reignited a new thing. I'm gonna have to find more wood to paint on and do this rustic primitive look. I've always loved this look. I love folk art. I love primitive art. You probably wouldn't know that by a lot of the stuff I do, but I love all kinds. Yeah, I think the red is a little darker up here. I kind of like the transition of it. Cindy said, are you gonna use small chips of Americana paper for stars? I don't think so. I honestly have not decided exactly what I if anything, I'm gonna do up here. If you can't find this paper, you could look up like old-world signatures. Oh, some of it's torn, actually. See, that's one of those happy little accidents. I'm gonna let that stay like that, and it's just gonna add to the primitive nature of it. But you can print paper off like this if you can't go to the store and and buy some. Okay, so I haven't added anything to this, and I'm really trying to decide, do I want to add like a whitewash to it, or do I want to leave it this color? Because this is a pretty cool color. You know what, I'm gonna use— let's do this, let's use one of my scrap papers. And I've got— this is just a whitewash, another DecoArt product. And we're just gonna try a little bit here. Everyone's saying leave it. I know, I'm thinking probably so. I think so too. The white's not— like I said, it's just a wash, but I really like the rustic look of the way it is right now. Okay, so we're leaving all of this. I don't want to change anything on the bottom half, right? But what do I want to do up here? Do I want to do anything? I don't know if I do. I don't want anything super bright. I definitely don't want to add stars. I don't think that goes with the rustic theme. And I'm scared if I add polka dots, they're gonna look too bright. Let me know what you guys think. Give me some advice here. While you're doing that, I'm gonna finish my coffee. I'm really, really leaning towards leaving it because I don't want to mess it up. I don't want to waste too much of this paper, but I think that might make it pop, give us a little bit of contrast up there. It reminds me of something I would see at like, um, a craft show. Now they put the, you know, the crazy little stars on there. So many ideas, I can't keep up with all the comments. 3 stars would be cool. I guess the 1 star is kind of Texas-y, isn't it? Man, my hands are shaking super bad right now. But I guess if we're going for Americana, maybe I should do the 3 crazy little stars, all different sizes. I like the shape of this one. Okay, let's, let's play a little bit here. Yeah, the tin stars would be cool, but I know myself and I'll never actually go get any. So we could do one Or I can do— and obviously these are not cut yet— maybe like 3 little stars up here. You guys have given me so many ideas that you're gonna have so much fun making your own. I can't wait to see what they all turn out like. Now everyone's saying one. I can't decide. Stressing me out. 3, 1, 3, 1. Oh my gosh, I love that little star. I like my little wonky stars. I think I'm gonna go with 3. Hmm, now I'm gonna struggle with placement. Maybe those little stars are too similar in size.
This one looks like it's dancing.
What do we think? I want them kind of off-centered. I don't want anything too, too lined up. Okay, I'm gonna leave this for a second. Yeah, I'm kind of leaning with the maybe making a medium one. I didn't realize these were gonna be so close in size. I think I drew that one almost identical. I actually think I just got it. I like it just like this, and they're not too identical to anything. Like, I mean, they're not in any kind of perfect arrangement. So, okay, I'm good. I'm not gonna look at any more comments. I'm just gonna do it. This has red paint in it. That's not helping me. This is why I love creating, the creative process and how things just come together. Sometimes you just have to play around a little bit. Oh, I like the gold. I hope you guys can see that. The gold is so pretty. I'll get you a little bit closer here. Yes, Heather, I was actually thinking that. I like the— I love the little stitches on stuff like this. I think I might do that. So this is very, very faint. I don't know if you can tell what I'm doing here. Just a very— I'm like wiping off the excess on my table and then just putting, just to tie the gold in. Doing like a dry brush of gold over top of my white stripes. I don't want a ton, just a little hint, maybe a little heavier at the top. This is DecoArt Metallics Vintage Brass. I think it ties it together too. Okay, I'm gonna do the little stitches on the stars, and then I'm gonna be done. Mm, that's not coming up enough. Let's see. That's too fine of a Sharpie. Oh, I wonder if this one will work.
Mm-mm, we'll see.
Oh, my paint's still wet on some of those. That kind of makes them look like 3D. They stick off the board a little bit more. I'm gonna try to angle this to see if I can get the whole thing in the camera view. That was a lot of fun to do with you guys today. Hope it inspires you to Go find some scrap wood. I'm gonna turn it this way and we're gonna go ahead and put the clear coat on. I like to— I don't use my nice paintbrushes for clear coats and stuff. Get one older that you don't care about because sometimes it just doesn't come out. And this is gonna protect my paper and the paint, and then it's gonna be ready for outdoor. Oh, I love how finished this looks. Can you guys see this? I actually think that made everything like show up even better. Okay, like officially, like my new favorite thing that I've done. So much fun. Thank you guys for hanging out and painting with me. If you loved it, make sure and sprinkle it with your friends. Have an awesome rest of the day. So hopefully I'll see you back here tomorrow at 11:30. Bye!










