Paint with me!! Buffalo Plaid on Pumpkin || The Social Easel
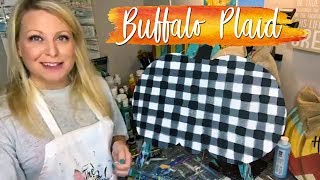
In this live YouTube session, Christie Renee Hawkins, owner of The Social Easel, demonstrates how to paint a rustic buffalo‑plaid pattern on a pumpkin‑shaped door hanger. She walks viewers through her step‑by‑step technique—using a 1‑inch wash brush, dragging strokes to create imperfect, textured stripes, and adding black intersecting lines—while emphasizing a relaxed, non‑perfectionist approach. Throughout the stream she engages the audience with live contests (picking a previous winner and announcing a new share‑to‑enter brush‑set giveaway), encourages viewers to comment and share, and promotes her upcoming Social Easel Online Paint Studio launch (opening September 16, limited‑time 4‑day enrollment, monthly membership with tutorials, technique videos, and live Q&A). Christie also shares design advice on color choices, metallic gold lettering, dry‑brushing, and aging techniques, and offers motivational coaching about overcoming artistic hurdles, building regular creative habits, and using the free Facebook community. The video blends practical painting instruction, community interaction, and marketing of her art‑education platform.
Chapters
Hey everybody! I am excited to show you some Buffalo Plaid today. So if this is the first time you are joining me, my name is Christie Hawkins and I'm the owner of the Social Easel and the Social Easel Online Paint Studio that we are opening in less than 2 weeks. So I am super excited about that. Today I am going to show you guys some Buffalo Plaid. On a pumpkin cutout that I'm working on that is gonna be a door hanger. So I'm just gonna show you real quickly. This is— I'm repurposing these so I can show my class multiple techniques. So this is one from last year, our thankful pumpkin, and then today I am going to show you guys some buffalo plaid. So I'm super excited about that. As you guys are hopping on, say hi, let me know you're here, give me a wave or something. Before we get started with the Buffalo Plaid, we are going to pick a winner from our drawing from one of our videos last week. So last week when I was painting the flower topiary with you guys, if you shared the video you got entered into a contest to win this pack of brushes. So we are gonna do the same thing today, but first we're gonna pick a winner. So again, as you guys are hopping on, say hi. I'm gonna go back up here, make sure I'm not missing anybody. We've got Linda and Rosette and Heidi, Nikki D, Lynn, Christie, and Jackie. So welcome all of you guys. So what we're gonna do first, I'm just gonna position this a little bit closer for you guys. So someone from last week is winning this. We had 30 shares from our episode last week, so we're gonna do the same thing today. So as you guys are hopping on, say hi, let me know where you're from, and then right next to the comments there's a little button that says share. Go ahead and hit that. It will automatically send it out to your Facebook friends and it won't kick you off the live feed. So we're gonna do the same thing today. Once you— once you share it, comment shared, and then you will be entered into a contest to win another set of brushes. So I have another set, a little bit different. So, but this is an awesome value. This is a 12-piece brush set. You can use it with acrylic or watercolor. So, oh, um, sorry, my thing is telling me connection lost, but now it's telling me it's back on. So hopefully this doesn't kick us off, but make sure you comment below that you shared so I know to enter you in the contest. Okay, so let's pick our winner from last week. I've just got a little bowl here. Hi, Janet. And I'm picking our winner from last week. I'm just gonna grab a name. Jackie! This is Jackie Harper. She is in my Social Easel online paint studio. So Jackie, now you have some extra paintbrushes to work with on the paintings that we do in the group. So that's awesome, and you just entered again. So congratulations to Jackie. She is getting this brush set from last week. And then if you're just now hopping on, make sure you share and then comment below. Let me find my other ones. Someone is gonna win this one. So I will pick a winner. Let's see, today's already Tuesday. I'm gonna pick a winner on Thursday's live, and someone is going to win this brush set. So just hit the share button and then comment below and let me know you did it. And we will get that all taken care of. All right, so let's get to some painting. Get my stuff out of the way. So, you're welcome. As you, as you can see, I kind of already prepped the background here. So I just, this is just plywood, and these are the door hangers that I'm going to be doing in a local class here at the end of the month, and we have lots of different options. I already flipped that one around and showed you. Here's another one that's super cute. You can just do your initial on it, flip it around. We've got blue thankful pumpkin, and then we've got this welcome one back here so you guys can see that. And then what else do I have? Oh, this, I think this is just one side, the happy fall, y'all. So that is just a couple of the designs that I've got. So lots of varieties to choose from, but today we're going to do the Buffalo Plaid, and it's a lot easier than what you would think. So already prepped it, it's going to be white, and then I'm just going to go in to my gray paint here, and I'm just going to start kind of right about here, just come down just a little bit. and I want mine to be a little more rustic, so I am not trying to get perfect crisp lines. If you do that, you're just going to drive yourself crazy. So kind of embrace the messiness. That's what I tell my class all the time. So we're just going to go back and forth, and I like just the width of this brush that I'm using. That way you don't have to try to stress over getting each one the same width. They're all going to be about the same because we're just— can you guys see that? This is a 1-inch wash brush and we're just dragging it back and forth. So by doing that, that makes our job even easier. So we're not having to worry about the width. Again, I am not getting this too perfect. I know there are those of you out there that really, really love perfection, and that is just not my style. So if you really want it to be perfect, you can go as far as getting blue painter's tape and taping off all your lines if you want to. That sounds like a whole lot of work to me, and I don't want to do it that way. I'm going to show you this really quick just so you can see. And I'm fine with this. Again, if it bugs you, you can go back. But you see that little, um, that little spot over here where my paintbrush drug down just a bit? If that does bother you and you do want to go back and fix it, you definitely can. But when you're doing something like this, you do not want to try to fix your mistakes while your paint is wet. If you do that, you just create a huge mess for yourself. So we're just going to keep on moving and adding our lines in, and then if I decide to go back and fix that once it's dry, I can come back and add a little bit of white there to cover it up. So just keep that in mind. You don't want to try to fix your mistakes with acrylic paint while things are wet. So I'm just going to jump down just a little bit and do the same thing. So how many of you on here are loving the buffalo plaid style that's popular this, this fall? I'm digging it, and I want to go back to Hobby Lobby. They have all kinds of cute stuff right now. I want to go back and pick up a few things and change up my fall decor. Just a little bit from last year. Fall is my favorite time of year. I love decorating for fall. I do a little Halloween before I do fall though, so I have a little bit of a mix. I throw up my Halloween, mix it in, and then pull all that down and really get the fall stuff going. But this will be really cute added to that collection. And depending on what color of front door you have, this could really give it a lot of pop. So I have a teal front door. So this is going to look super cute from the street because that white and black is going to contrast really nice against my door color. And honestly, most of you, any door color, the black and white is really going to pop off of it. All right, so hey Carla from Texas. If I missed some of you, I apologize. I'll go back if you guys have any questions as we're going. So again, I'm just kind of dragging this across. And letting it be a little bit rustic. I'm not going to worry about any of my little mistakes yet because you never know, my vertical lines may end up going over top of those and then I wouldn't even have to fix it anyways. So don't get too caught up when you're painting and too focused on if you make a mistake. Just keep going. You don't want to mess with it anyways, and then come back to it later and you may not even have to fix it after all. Okay, so what this is gonna look like once I get all the way done— I'm now gonna lay in my vertical stripes, and I may come back and actually I'm gonna add just a little bit more up here at the top. Now normally I would not have my wire on here already, but this is just because this is a finished one from last year that I'm kind of repurposing. But what I was gonna say is once I let this dry completely and I get my plaid on there the way that I want it, I am going to come back and I'm gonna add— you could do a couple different things. I'm gonna add mine in gold. Really bright metallic gold lettering. Let me see if I— I don't think I have one with that example on it, but you saw me add gold to my palette sign the other day, but it's gonna be that really, really bright gold. And to do that, I'm gonna use my Silhouette and I'm gonna make a stencil for it to go on there. You can definitely hand letter as well. When you are doing a metallic gold or silver, whatever kind of metallic that they are see-through, so you want to always put a base coat of white down first with your lettering and then let that dry and then go back and put a couple layers of your metallic on there, um, to really get a good effect. Okay, so I am just going to kind of start here because I don't know if you guys can see that or not, but I have a little mistake there. So I'm just going to drag my first vertical stripe over that and kind of let that be the deciding factor of where my first stripe is going to go. I think I'm actually— I need to come down here and add one more at the bottom, kind of going off our edge. So I just kind of eyeballed, you know, my layers and tried to get the width in between my stripes about an inch. So again, just kind of eyeballing it. There we go. And I'm gonna pull this a little closer so you guys can see. I don't want to move my camera, but I'm not worried about perfect edges or perfect lines. I want it to be a little streaky. There's a little darker gray in some areas. Lighter than others. Hello, Becky. So I'm just going to continue with my gray, jump over here a little bit. So I thought about tomorrow we can do a couple different things. I kind of want to do this same thing on a pallet board. So what I was thinking is doing one of the pallet boards like I do with, you know, my wood slats and doing a buffalo plaid on the background and then painting some pumpkins, or maybe just one big pumpkin, over top of it. So that's something I may want to do with you guys tomorrow. Or I may show you how I add the lettering on here. So why don't you leave me in the comments, let me know what you prefer, or if one sounds better than the other. And I really actually kind of like this look. I'm gonna pull this a little closer again. See how that is picking up that wood grain? That looks really pretty in person. I'm not sure how that's showing on camera. So they don't all have to be really, really heavy paint. I'm gonna go back over just a little bit so it's not too different from my other stripes. If you guys were joining a little bit later, make sure that you get entered into our contest. So at the beginning, and we gave away a brush set, and we're gonna give away another one tomorrow, or Thursday. So in order to get entered in for the brush set, just hit that share button right next to your comments and then type in "shared" below so that I have your name and I can enter you into that contest. Because who doesn't want to see a little buffalo plaid? It's fun, and once you know how to do it, then you can do it on so many different projects. And you could even do a pumpkin, like a, you know, a real pumpkin like this. Or if you were painting a pumpkin on canvas, you could have more of a solid background and then a cute little buffalo plaid pumpkin. All right, I ran out of gray, so I'm gonna grab a little bit more if I can find my bottle. So how many of you have seen— well, two things. How many of you are in the private free Facebook group? We have the Social Easel free online group where I share some videos and techniques and stuff in there, and it's also a place where you guys can share your artwork with others. So if you're not in that group, make sure that you get in that group. So I was gonna ask, if you are in that group, how many of you have seen our interview video I posted in there the other day? And then just a little while ago, I posted one of my— one of four interviews that I'm going to be sharing with you guys this week of some of my current members. We had a fun little interview last week, and I'm just now getting to editing and sharing those. So I'm gonna share one a day, but today we shared Debbie's story, and she's been painting with me for a long time. So it was just kind of neat to see the progress that she's made over that time and how, how it's kind of worked into her life. So if you haven't seen those, be sure to check those out as well. And if you want more information about the Social Easel online paint studio, again, we are opening doors on Sunday, September 16th, that evening. And then we're only open for 4 days. And this is a monthly membership group that you will get 2 full painting tutorials with me each month. You get a technique video and you get a live Q&A as well as our online community, which is just awesome. So if you want to learn more about painting and you don't know where to stop, start, and you want some people to do it along with you, um, let's make sure we get you some information so you can know a little bit more about that. So if that is something you want to learn more about, just comment below and just type out waitlist, and we'll be sure to get you that information. All right, Carla saw it. Awesome. Leah says black and white is her current fave. Mine too. It's so cute. Okay, so what we're going to do now, that was just gray and white, white background, gray over top. Now I've got some black, so everywhere where these meet, I'm just going to do these little sections of black. And again, I'm really, really not trying to make this super perfect. I'm gonna pull you guys a little bit closer. Hey, Deborah! Hopefully you can start seeing that black show up a little bit. So it's on all my intersections. And I think this is gonna look so cute once I let this dry and then we come back with our gold lettering over top of it. I've also seen some where people did like a really bright orange or maybe like a rustic orange lettering over top their buffalo plaid. That also looks really cute. Just getting these little corners. Are you guys starting to see that? I love it. And you can see it really doesn't take as long as what you would think because we're not trying to make it perfect. This is just a rustic little design that we're doing in the background. And again, since I used my brush as my width, I and my height, you don't really have to try to make any extra brushstrokes. You're just kind of dragging your brush back and forth where they intersect, so it makes it super easy because you're not trying to like measure and make sure you got it the right thickness. So I'm just going to keep going in. See how quickly you can do that. I'm gonna try to pull you guys up on my phone really quick because I'm having a hard time telling from looking at my camera what your view is like, but I want to make sure that you're really seeing this contrast here. So let me pull you up really quick. And there we go. Turn my voice off. Okay, you guys can see that pretty good. Did we get any votes? Did you guys— let me go back and look at the comments here. Lots of shares. So those of you that are on here, comment below. What do you want to see sometime later this week? It might be tomorrow, it might be the next day, but would you rather see how I add lettering to this door hanger, or would you rather see me show you how to do a pumpkin? The pumpkins are fun, and we can work on a bigger one, and then we can also— I can show you how to do the little ones like I add in my in my little— I can't think right now— in my little truck. Thank you. There, my brain decided to work. In my little truck full of pumpkins. So you guys leave me some feedback in the comments and let me know what you prefer. Julie's listening to me while driving. I'll try to keep it entertaining since you can't watch me. So what do you guys think of this so far? I'm really loving the way that it is coming out. And you can kind of pull back and forth if you want to straighten your edges up just a little. So it doesn't take as long as what you would think. It's not as hard as what you would think. It's just a fun new way to stay on current trends, stay with what's popular, and hopefully add it to something fun, some kind of project you have going on in your house. And another thing I may do, since I am making this a little more rough and rustic, I— after this is all dry, I am probably going to dry brush some white over top of that again. Let me see, I don't think I have a example of my, my dry brushing on that, but it's something we do a lot on our signs and just to add a little bit more character. So I may go back and add a little more white dry brushing just to add some streaks in there. I'm also probably going to grab a little bit of sandpaper and rough it up just a little bit, maybe knock a little bit of the paint off in a couple areas. I like adding a little bit of age to my projects. Now this makes me wish I had more than one door to hang a door hanger on for fall, because my favorite one from last fall, I did a mason jar that's black and it has gold lettering that says "Hello Fall," and it's super cute, and I love that one, but I'm thinking I love this one even more. So there you go. Let's see what people are saying. You want to see the lettering? Yes, Becky, no painter's tape. Like I said, you can, but that is a, that is a whole nother level of a project and requires tons of patience and and honestly, I just don't have that much for that type of painting. So I like the rough, messy edges. I like the streaks in it. So I'm just gonna paint my pumpkin stem black. You could paint it something different if you want to, and we can even go, like, afterwards, after I do all my roughing, after I add the lettering on, I may add some little highlights of gold like that I use for the lettering. I may add that around the shape of the pumpkin or maybe a couple brush strokes on the stem. So there's a couple different ways that you can accent this, and then of course you could always choose a different color if you don't want to do gold. I would say silver is not going to stand out enough, so I would avoid silver, but if you want to pick like a fall orange or rustic orange color, that will look pretty too. So the only place I'm gonna go back and fix something is down here at the bottom. I had a little smudge that my hand dragged across, and I'm just getting the tiniest bit of paint on there, and that's already dry, so I'm not having to worry about that dragging into something. So I'm just gonna stand back and look really quick. So I think I'm good with that. The other awesome thing about this— this is almost dry. Already. So this is a very fast process, and then it just comes down to you adding your lettering on there. So I hope you guys enjoyed that today, and we'll jump back on tomorrow. What color should we get for the gold? I have a couple favorites. I'll show you the ones I like. Let me see if I have my other one over here. Hold on just a second. I think that's the same. So there's a couple different ones, and the FolkArt brand, this one you can get at Walmart. And it's FolkArt Metallic Pure Gold. And then this is a DecoArt brand, and it says Extra Sheen 24-karat gold. But really, either, either one of these— you want a nice strong, really bright metallic. And anytime you do metallic, again, you want to use white underneath it for that lettering to really stick out. So I'll show you guys that tomorrow. And if you're really brave and you're good at hand lettering, you can also use the DecoArt gold metallic pen and you could write "thankful" on there or "happy fall" or whatever it is that you want. I feel like there was something else I was going to show you guys and now I forgot. So if you didn't already, if you came on late, hit share, comment "shared" once you do it, get entered in for that contest. We're gonna pick a winner on Thursday. So I'll do that in the live video. I'll show you guys the lettering tomorrow. That's kind of the feedback we got, and I may do pumpkin or little pumpkins later in the week too. And then I had also posted over the weekend, if you have any questions regarding painting or what are your struggles, what is it that maybe is holding you back from pursuing this? Are you worried that it's just not gonna turn out good? Is it a self-confidence issue? Is it time? Is it your workspace? Are there certain areas that maybe you paint a little but you're still not to that level that you want to be? Or maybe there's certain areas that you struggle in. So we're gonna have a live later this week that's more of like an interview style with you guys, kind of like a live Q&A like I do with my group, where you can ask me questions. And some of those questions have been previously posted that I will address in those videos to kind of help you guys. Get over whatever that hurdle is, whatever that thing is that is stopping you from being creative. Let's figure it out so you can get past it, because this is such a fun way to have time for yourself and to just maybe escape the world for a bit. Do something creative. It helps you forget about other things, and we all deserve that time, even if it's only once a week, just to take to take— maybe it's only 30 minutes— but to take that time and just say, I can block out 30 minutes out of my entire week and do something I want to do. So that's my job, is to help you figure out how to do that and to show you the steps on how to create the paintings that you want to create. So let me know. You can comment below with more questions. You can go back to that post. So look forward to seeing you guys tomorrow, and we'll finish up our pumpkin door hanger. All right, bye.










