Painting a Christmas Wreath on a Burlap Canvas today!
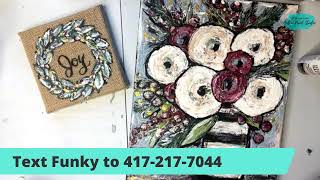
In this live YouTube stream, Christie Renee Hawkins demonstrates how to create a 6" x 6" Christmas wreath on a burlap canvas. She walks viewers through sourcing the burlap, sketching with a Sharpie, and applying modeling paste with a palette knife to create a textured surface that prevents paint from soaking into the fibers. Christie compares modeling paste to gel medium, referencing a blog post that details their differences, and explains why she chose paste for this project. She mixes and layers colors—using DecoArt paints, green and black for foliage, red for berries, and white for highlights—while employing a blow dryer to control drying and achieve desired tints. Glitter, holographic foil, and gold metallics are added for festive sparkle. Throughout the session, Christie engages with the live chat, answering questions about Costco, desk setups, and art supplies, and encourages viewers to text a phone number for direct links to the products she uses. She promotes her membership programs (Tribe Sister VIP and Painting of the Month Club), outlines the upcoming "Funky Winter Flowers" 3‑day workshop (Nov 3‑5, $10, live with replay access), and points to related blog posts (modeling paste vs gel medium, Christmas countdown wreath). The stream blends instructional art techniques, community interaction, and promotional information for her art education platform.
Chapters
Hey everyone, we are going to do something a little different today and we're going to paint on burlap. So I just got this burlap canvas on clearance a few years ago, but you can get them at Hobby Lobby and you can check other craft stores. I know for sure I've seen them at Hobby Lobby. And, um, Amazon. So those are two places you can get burlap canvases if you don't have any. I'm going to send out our text alert really quick to everyone, and then we will go ahead and get started. So I thought it would be fun today to do a little Christmas wreath on here. I did one Either last year or the year before, but it's tucked up in all my Christmas stuff. Otherwise I'd show you a finished one. But, um, you're gonna get to watch me design it from start to finish today. So this is a 6 by 6 burlap canvas. We're gonna use a Sharpie to sketch it on. Um, I'm gonna use a palette knife, actually probably a smaller one than this. Um, and we're gonna use this to put modeling paste on here. Which is gonna give us a surface to paint on where it's not going to soak through the burlap as much. You don't have to do this. I have painted directly on burlap before with no modeling paste, and my recommendation, if you want to do that, is that you're just gonna water down your paints a little because it'll soak into the fibers of the burlap better. Hello everyone, and I'm never live on a Saturday, so I'm anxious to see how many of y'all show up today. I don't know if Saturday is a good day to go live. I normally go live during the week, and yesterday Cory, um, was off work and surprised me with just like a whole day of us hanging out together and Christmas shopping, which obviously is, uh, my love language. And, uh, so anyways, we went to Costco yesterday and went to, um, At Home and stocked up on all the things we needed at Costco. That's always a fun date. And then, um, we went to At Home because I knew they had some cute gingerbread man stuff, and I'm kind of obsessed with them. So if you haven't seen what I got, you can go check my stories out. It's all there. Um, but we had a lot of fun yesterday. All that to say, I was gonna go live, and that took priority over me going live. So I'm here with you on a Saturday. So the first thing I'm going to do is just do like a little circle. And don't worry about this, I'm using a Sharpie. Um, this is all going to get covered up with paint, so you're not really going to see it. I'm doing this just as a guide for myself so I kind of have an idea of where I want to put my modeling paste at. So I'm just gonna do some leaves going around the sides. Again, this is like rough sketch. So what I'm— shape I'm doing is this and this, and I'm just continuing to go around the circle. And they don't have to match up exactly. Usually when I do these, they're not identical all the way around. Sometimes they end up next to each other, sometimes they kind of overlap. It really doesn't matter. Um, Sandy said, what is Costco like? So we, we have a Sam's Club. We've had a Sam's Club forever. Um, so it's very similar to that. We just got a Costco a few months ago, but it's, it's like Sam's. It's just a big— um, I don't even know how to explain it. Like, you buy a lot of stuff in bulk there, but they also just have all kinds of things. Um, in fact, I'll probably show you guys this, um, tomorrow or the next day. We ended it— so we were buying groceries and stuff and then just looking to see if we find Christmas presents for anyone. And then we went down this aisle of, you know, home and office stuff, and we found this really cool desk. So I don't know if you can tell right now, I'm just working on a just a 6-foot table that we put up in my office because it's easier for me to sit over here, um, in front of my window when I'm doing Facebook Lives with you guys. And, um, it's okay, but my office is pretty small, so it's like butting up next to my cabinet doors over here, so it makes it hard for me to get in there, and I'm just constantly kind of working around it. So anyways, we found this table yesterday that's super cool. It's shorter, um, it has like, um, an acrylic or glass top, which is going to be awesome, because if paint gets on it, I can just scrape it off. It— but it has USB ports on the side of it, and it raises up and down, and you can just control it on the tabletop. And so I can have it to where I'm sitting like I am with you guys today, but I stand a lot when I paint, and it can raise all the way up, like literally almost to my chin. It can go that high. So it's a really, really cool desk that we bought for my office that I'm really excited about. He's going to put together for me. Tomorrow. Um, hey Patty, hey Kim. Sheila said, are you painting? Yeah, I'm going to be painting. So I'm just drawing like a rough sketch on of what my wreath is going to look like, and then I'm going to grab some modeling paste. And if you guys want the link to like art supplies that I'm using, the palette knives, the modeling paste, burlap canvases, all of that stuff, you can just text the word Amazon to, um, this phone number. And you have to text that phone number. You can't comment in the comments. It won't send you the link. But if you text Amazon to this phone number, it will send you the link to my Amazon store where you can find all these goodies. So we're just going to start. You're actually going to get this on the back of your palette knife, and I'm just going to go— I'm going to start filling this in. Now, this— what I'm doing right now does not have to be exact. It doesn't have to be right in those shapes. It's just going to give me a surface. It's not going to soak through as much. And I've also done this. I've done a completely palette knife wreath before like this, and then I've done it with a paintbrush. So you can do it either way. Again, you don't have to use modeling paste. I haven't done modeling paste on burlap before, so this is actually the first time I'm doing it. But the reason I wanted to try it is because it's going to stop that paint from soaking through the burlap fibers so much, and it'll give it a little bit of texture when we add the paint on too. So I'm really anxious to see what it looks like. So this is a little bit of an experiment today, and if you missed my Facebook Live the other day about the difference between whether to use modeling paste or gel medium, you can go back to my videos and check that replay out, and there's lots of valuable information in there if you're not sure which thing you need to use for your project. And we also made it our new blog this week, so I have a full blog full of all kinds of tips and information on painting that you can check out whenever you want to. And the blog this week is all about the modeling paste and the gel medium. So it's a great resource for you if you're new to painting, or even if you're not. That's where I share a whole bunch of good information for you guys. And you can just go to thesocialeasel.com and then click on blog to see that. Deanie said having the right desk is important. I keep looking and haven't found one that I want yet. I'm really excited about this one. Um, so I'll have to— I need to see if they sell it online. I haven't even looked yet, but, um, I need to look and see if there's a link I can share with you guys once I get it set up and I can show you. So if you think you want one for your craft room or office, you can, uh, get one. Awesome. Patty got her modeling paste yesterday. Janice is asking, is the nativity painting included in Tribe? Yes, Janice, it's already in your library. So all you have to do is log into the membership website. And go to the section of all the Christmas tutorials. We have over 100 tutorials on the Tribe Sister website, so if, um, if you're a Tribe Sister and you haven't gone to that part of your membership yet, you definitely want to because there are over 100 tutorials for you to choose from. Last 3 years of Christmas and holiday are all there for you. Cathy said, I love things that sparkle. Me too. I got some glitter set out here that I think I'm gonna add to this also. Now I'm kind of pushing this into the burlap. You wouldn't have to if you wanted to leave it where it's got more texture and it stands up more off the canvas. You don't have to press it in as much. I I just want a nice solid base there that I'm painting on. So what's everyone doing this Saturday? You guys just hanging out? After I get off here, I'm gonna go bake some homemade cupcakes with Sophie. I got her some cocoa powder yesterday. She loves baking right now. I got her some cocoa powder yesterday while we were at Costco, and she was so excited. So she found a recipe to do some homemade cupcakes, so I'm gonna go help her do that. And then Corey and I are going to work on some projects. I'll have to share them with you. I'll post them in my stories. We're doing some renovations in the home, finishing our bottom basement room. And then I'm gonna start decorating for Christmas, especially the basement, so I'll let you guys see some of that too. So we've got our base down. Christine, I'm not sure what you're asking. This is— you're on the Social Easel page, so this is open for everyone. This is not just for Tribe Sisters. But if you are a Tribe Sister, you can let me know in the comments. If you are not and you are interested in learning more about that, you can text "waitlist" to this phone number. Being a Tribe Sister is my VIP membership, and we are getting ready to open the doors next week. Oh, sorry, not next week to the public. Next week to those of you joining me in the challenge, which I'll share more about, but If you've been wanting to be a Tribe Sister for a while and you've been waiting, I only open the doors a few times a year. Um, November 9th, I believe. Why don't I have my calendar in front of me? Yeah, it's November 9th. Tuesday, November 9th is when we open the doors to the public with my PJ Paint Party. Um, and then you will find out everything you need to know about being a Tribe Sister, but you guys can ask me questions if you have them too. Hey, Leanna said I'm a tribe sister and love it. I'm so glad. Teresa's finishing up her blue pumpkin painting, put it on hold to watch this. Yeah, I think this is going to be a fun project. All right, so listen, I'm gonna go blow dry this just a little bit, just so my green— because if going back to modeling paste versus gel medium. If I add Hunter Green to this right now, it is going to take the white and mix it with the Hunter Green, so it's going to be more of like a mint color, and I want it to be darker on the background. So I'm going to go blow dry a little bit before I add that paint. Just a quick little dry here. Okay, so let's put this lid back on my Sharpie so that doesn't get dried out. Sally is painting Christmas coasters for her daughter's craft show. How fun! I'm glad you love Tribe. All right, so I'm going to get some paint on here. Thank you, Brenda. I am glad it is a blessing to you. And someone had brought up the Nativity earlier, um, so I'm So I have 2 memberships. I have Tribe, which is my VIP membership, and it's $47 a month. And then I have Painting of the Month Club, which is my second membership, where you get 1 painting every single month delivered to your membership home. And these are exclusive. They're not anywhere else. You can't find them in my store. And the one for November— I cannot believe it's getting ready to be November. Is my palette knife nativity scene. So you can go to the website and check that out again, just Socialeasel.com. There's only one more day to sign up for Painting of the Month Club. If I had the painting here with me, I'd show you, but it is also in Christmas storage. But I'm really excited about that painting, and it's your only chance to get it for $20 in the Painting of the Month Club. Okay, I'm gonna take some of my green and black, and I'm using DecoArt's Hauser Dark Green and their black. These are all DecoArt paints, by the way. Um, Allison, do you have my DecoArt link? If you don't have a Hobby Lobby near you, or you just want a bigger selection of colors from DecoArt, their website is a great place where you can stock up on all the colors, um, and they have more to choose from. So I've got my own DecoArt link that we'll put in the comments if you want some of these specific colors. So see how nice and easy this is going on over top of that, that modeling paste? I'm liking it so far. Like I said, it doesn't quite matter Like, my modeling paste is just a background. You'll see some areas— you can see a little bit of difference there, how that looks when it's just on burlap versus having the background underneath it. But we're just going to keep going around. I have to play with these shapes a little bit. Hey, Debbie, glad you got to join us for the live. Now, the modeling paste does dry white, so you are going to want to make sure wherever you put it that you are putting paint over top of it. Um, Sharon's asking about Painting of the Month Club. Yeah, um, as a Painting of the Month Club member, you have lifetime access to those tutorials, so you can go back and watch them whenever you want to. They go in your library on the 1st of each month, so for the Nativity, it will go in your library on November 1st, and you do have rights to use the Painting of the Month Club paintings or my Tribe Sister paintings, um, at paint parties. So if you teach paint parties locally, you can use those. None of my tutorials are allowed to be taught online though. So you may be wondering, is this really going to turn out? Because you can't see a lot of difference between this, right? When we go back in with our secondary colors and start adding some of the accent colors in, we'll start getting some separation in our leaves, and it won't just look like one big ring. So this is where I would say you have to trust the process and just keep going. Don't worry about what it looks like right now. We're just at the beginning stages. Make this one a little bit bigger. And once I get done, I may come back and change my mind and have some poke out a little bit more. Yeah, if you guys like this project, be sure to sprinkle it with your friends. They might want to do this holiday project too. These make great little gifts. Just going back where I'm seeing a little bit of white in there. And I have another— if you guys love wreaths, another one of my blog posts from last Christmas is a Christmas countdown. Calendar that I did. Um, it's farmhouse style. I love it. It's— I did it on a wood sign on like black chalkboard paint and painted a wreath around it. And then in the middle of the wreath is where you— we erase every day and put a new number for the days until Christmas. Um, but it turned out super cute. It's one of my favorite projects that I did. That's up on the blog as well. I'm actually kind of liking— can you guys see this texture? The texture on it's really pretty cool. Thank you, Brenda, for sprinkling. Hey, Regina, if you missed it, you can catch the replay, but I put modeling paste down for first, and now I'm painting over top of that. I kind of love these small canvases too. I like holding things while I'm painting them. You can get them a little, you know, closer to your face, do a little more detailing. I paint big and bold sometimes, and sometimes I like to paint small too. One of my favorite paintings I did last month was my little Mr. Pumpkin Man, and he was on an 8x10 canvas, and I love him because I can just put him on my shelf. I'm kind of like really liking— even though they don't have a lot of definition, I really like the way the wreath is looking. I'm kind of surprised at how much I like it. So you just never know when you sit down to create what you're gonna come up with. That's the fun of it. I'm liking it, it's so cute already. Um, Paula, this is a 6x6. Um, I did not make it, I bought it. You can get burlap canvases in, um, my Amazon store, or, um, Hobby Lobby has them. So I'm mixing my green and black together. You probably can't tell that from up there, but that's That Hauser Dark Green and black. I'm doing a little bit more black in some areas again just to create some contrast in the shape, and then we're going to go back with some lighter colors too. Regina, I actually blow-dried the modeling paste when I was done. It did not take very much at all. I just did a quick little blow-dry. If you— you don't have to let it dry, but if you, if you paint modeling paste, if you add paint to it while it's wet, it will tint whatever color you're painting with. So it would have made my dark green more of like a minty green. So it's just like adding white. To whatever paint color you're using. Yeah, I'm actually really liking how rustic and rough this is. It kind of goes with the nature of the burlap. I need a water break. Pretty cute so far. Let's add a little white. Now we've got this really nice kind of calm green color here, a little bit softer. Oh, I love that color. So I'm just very quickly kind of going over the leaves with this lighter color. Again, not being super specific with my leaf shapes, but you can start seeing the shape kind of come together a little bit more. Okay, said she painted the pine cone this morning. Love it. If you guys ever want to text me your work too, you can. So that phone number we put up on the screen earlier, 217 Sorry, 417-217-7044. You guys can text me your work from my Facebook Lives, Painting of the Month Club. If you're a Tribe Sister, um, and you want to make sure that I see it, just send me a text and show me what you're working on. I love to see what you guys do from my projects. What do you guys think of the lighter color? Isn't that pretty with a little bit of dark? Underneath. Connie's saying, do different brands of paint blend well? Yeah, it doesn't matter what— acrylic is acrylic, so it'll all blend. All right, shoot me up some hearts if you're liking the Liking the second color here. I'm kind of digging it. But you see how fast this is? Again, not really overthinking it too much, right? I'm going to add some more white to this, and we're just going to keep kind of going back in and layering this to start adding some dimension to it. Thank you, Regina and Cheryl. Yes, Sarah, the Christmas countdown wreath that I did is on my blog. So if you just go to thesocial easel.com and at the top of the page just click blog and then scroll back to last year and you can see the, all the directions and everything you need for the countdown calendar. So what I want you to pay attention to what I'm doing right now is constantly re-dipping and applying, re-dipping and applying. I'm not worried that I have the same amount of white in my brush for every brushstroke. You want there to be variation in your artwork. And because my paint is still wet underneath, I can even go right into my white like I'm doing now and put it on there. Oh, I'm just really liking how this is coming together. So fun. That's why I love painting. You do one little thing and you're like, oh, that's what it needed. It's just the littlest little details make such a big difference in paintings. I love the texture on here. I'm gonna lift this up again so you guys can see. They kind of look like they're 3D off the canvas, don't they? Joanne's asking, would wall texture work similar to modeling paint? I'm not sure because I haven't tried it. Hey, this is how I look at it. It's worth a shot, right? If that's what you've already got at home, instead of you going out and buying one more thing, try it. Try it on just a scrap piece of something that you don't care about and see if it works. You may discover something completely new. Like this, for me, I was literally just testing this out. No idea if it was really going to come together the way that I wanted it to when I started it. So you never know. Always worth a shot, right? Now I'm going to go back with more just pure white now. So we got lots of different tints and shades of our green in here. I'm loving the white on its own though. I'm gonna have to get a little bit more. Yeah, a little bit of modeling paste and it worked perfect. Yeah, I think we're gonna have to definitely put some, uh, gold in here. Hey Christine, this is Christie Hawkins. I'm the owner of The Social Easel, so I'm the only one— unless I have a guest speaker— I'm the only one that teaches for The Social Easel though. Sometimes I have guest speakers on my page or in my groups. Um, normally I just randomly go live. I don't have a set schedule. Um, for the next 2 weeks, I'll be pretty much going live every weekday. Um, I believe next week it'll probably be in the afternoon around 2 PM. Central Standard Time. But here's what I would recommend if you want to make sure that you know when I'm teaching live. We have a text alert list that you can sign up for, and you can just text live alerts, um, or whatever you want to, to that phone number, and it will put you on our text list so you get notified every time I go live. I love the white on there. I love how frosted it is right now. It's so wintry. I can get carried away with the white, but I really love it. Belinda said she's used caulk before and it worked. Very interesting. I think it's just fun to like, what do we have around our house? What can we play with? What can we paint on? You got any scrap pieces of wood hanging out in your backyard, in your garage? I'm known for going into Corey's, um, workshop in the garage and just digging around and finding pieces of wood to paint on. I love painting on all surfaces, not just canvas because you just get a different look and a different texture. It's just fun. I'm loving, loving, loving the white. I am going to add red berries. Okay, now I'm trying to decide what I want to do in the middle. So on my previous one, I did a bow, like did a bow loop at the top and then had, you know, the bow strings hang down in the middle. But this would also be cute as like a monogram if you wanted to do like a letter inside of there. If you were giving them as gifts, that would be a cute idea. Um, or we could write the word joy inside. Joy might be cute. Let me know your ideas. While you guys give me some ideas, I'm going to get my paint ready. Now I am going to put this red— this is Cherry Red by DecoArt— I'm putting it next to my green. And the reason why I'm doing that, if you are not familiar with a color chart or color mixing, green and red are opposites on the color wheel. So when you add them to each other, it tones it down. So if I want this red to be more of like a burgundy, I can add some of that hunter green to it and make it darker and make it more of like a burgundy red. So good information to know, like when you're putting colors on your palette, put ones that are going to work well together, whether they be opposites and you want the effect that I'm going for, or whether they are next to each other on the color wheel, like your warm colors, because you can blend them together to make new colors. We've got one vote for joy. Shirley likes the monogram idea. I'm running out of water. Sally said put a small manger with Baby Jesus. There's not enough room for that on this burlap. That is actually going to be something I'm going to teach inside of my tribe in December though. Looks like Joy is coming away with the, with the win here. Oh, and look, let me show you guys this. As I was just looking over here at these red berries on my other painting, this is what I'm teaching next week. If you haven't signed up for it yet, there's only a few days left to sign up. You can do this workshop with me for only $10. It's the Funky Winter Flowers. But look how cute this wreath— and this is going to be like hanging out next to each other on a shelf with your Christmas decorations. They coordinate very well together, um, using some of the same techniques that I used today in the burlap wreath. I'm going to teach you how to use modeling paste to create these flowers and this texture in this painting. It's a 3-day live workshop that starts Um, next week, Wednesday through Friday, November 3rd through the 5th. Um, if you want more information on that, you can text the word funky to this number and it will send you a direct link so you can sign up for that class. Um, registration— last day of sign up is Tuesday, so you have to get signed up before Tuesday to get that class for only $10. Um, Norma said, can we see the one you did with the bow? I don't have it on me. It's in all my Christmas decorations. Um, I'm trying to think if I ever shared a picture of it. I can probably go back and, um, find a picture to show you guys later. So I'm going to start adding some berries on now. Um, Dana's asking, will the lessons next week be available on replay? Yes. So I'm assuming you're talking about the Funky Flowers lesson. I'm going to add a little bit of green. Look at that. Look at this pretty rich burgundy color. So yes, when you join that challenge or workshop, whatever you want to call it, it's only $10 to join and you do get lifetime access. So you don't have to catch me live. You can go back and watch those whenever you want. Now I'm being kind of— it's hard to see in this light. I'm going to try to be pretty sporadic with these berries. I don't want them to look too, too planned on here. I think I'm going to need a little bit more red paint. That bottle was almost gone. I'm trying to use it all up. And these are just messy little blobs of paint. Nothing real specific here. Awesome, you've already signed up. Yes, you can catch the replays as soon as I am finished with each live. They are immediately available for replay after that. There's something satisfying about getting the last little drop out of a jar or bottle of paint. So again, even with this, see how all my berries are going to be a little bit different color because I'm just mixing. Connie, the challenge, the workshop is included for Tribe Sisters. All that information is in the announcements in our Tribe Sister Facebook group. So anytime as a Tribe Sister you have questions or you're not sure what's coming up for you or what's included, we put all of that in the announcements of our Facebook group. So that's your like go-to place. For anything regarding Tribe. Anything you need to know is going to be in that Facebook group. What do you guys think of the berries? Let's take a little Add a little white to this now. So look how much we're doing with just 2 paint colors and black and white. Yes, Kathy, you can sign up for $10 if you're not a tribe member. It is open to everyone. We want you to join. I want you to join the workshop and see how fun this, uh, Funky Winter Flowers is going to be. I'm going to go back, rinse that red out a little. Thank you, Brenda. I love getting my nails done. Um, I get them done probably about once every 3 weeks or so. I try to stretch it to 3 weeks. So I'm just adding little white dots on some of the berries right now. Alright, I'm going to take some black and just do a couple thin lines around some of these. It doesn't have to be around all of the leaves. Can you see how that's starting to pull those out just a little bit, adding that black on there? So this is all about the pressure. I'm barely dragging the tip of my brush onto the canvas, barely touching it. But I'm really thinking that black is starting to kind of tie everything together. Cindy, these are detail brushes that are in my Amazon store. This is a size 4 out of that set. I love it. Again, just those little things. Who would have thought black lines make such a big difference, right? Christine said, can you quickly show us the finished product? I can't show you the finished project because it's not finished yet. So I'm just going to add a little bit. Under some of the berries too. Yeah, I'm liking the way that looks. All right, so I'm gonna do some gold and some glitter, and we're just gonna bling this up a little bit for the holidays. So this is 24-karat gold Extreme Sheen from DecoArt. This is Holographic Illusions Crystal Ball from DecoArt, and you can use my DecoArt link to purchase those. I'm gonna go in and add this holographic glitter. To my leaves. And I'm not covering the whole leaf. I'm doing it like an accent, and it's going to look like that's shimmery snow when it's all the way dry. It's going to be so pretty. I can't wait to see this dry. I know, in the burlap, so pretty. I really love like farmhouse rustic kind of stuff, so I love painting on surfaces like burlap. I'm going to get a little bit more and just add a dot. To the berries as well. Yes, so this— the, the holographic illusions will dry clear. So if you look at the Funky Winter Flowers, it's hard— it's— oh yeah, you can see good at that angle. See how pretty glittery that is on those berries? I love it. That's the holographic. Illusions. So like when I do that and I really want those to shine, I'm literally just kind of covering up— it's going to look white right now, but they're not going to stay white. I'm going to do a quick application here and then I'm going to blow dry it and hopefully get it dry enough to where you can see how different it looks Wet versus dry. So we've got it all glittered up. Um, Patty, you can email customer service for that and they'll take care of you. I'm gonna go blow dry this really quick. All right, check it out. It's not all the way dry everywhere because I put really thick dots on those berries, but can you start to see the glitter? If I hold it too close, it takes it out of focus. Oh, look at that angle. Check out all that glitter. I love it. Okay, let's do some gold. I think I'm just gonna add— that was a big gloppy amount. Some gold here and there. I'm not happy with how big this glop is. I may have to do something about that. We'll just paint over top of that where that happened. Yeah, silver would be pretty too. I tend to always go for gold. I love gold, but I do love silver. I like all metallics, really. I'm liking the gold in there. That's pretty. I'm just going to spread it out a little. Cute. Where'd my Sharpie go? All right, I think I want to do the word joy in the middle. I'm going to practice over here. Maybe something like that. Cute. What do you guys think? Are we done? I feel like that needs something, but maybe it doesn't. Maybe the black just needs to be black. So I hope you guys had fun with that today. Um, like I said, you can text that number on the screen and show me yours that you do. Um, and if you text the word funky to that phone number, it will send you the link so you can sign up and join me for the full class for our Funky Winter Flowers. This painting is going to be broken down over the span of 3 days next week, live lessons each day in a private Facebook group that will be available for replay immediately afterwards, and you have lifetime access to the painting instruction, um, the videos, the color list, the supplies, all that. And it's only $10 to sign up, but you have to sign up before Tuesday, so make sure you're signed up for it. If you are a Tribe sister, it is included in your membership. Go to our Facebook group for all the details on that. Um, Kathy said put some gold in the Joy. I know, that's what I'm like debating. Does it need something? Listen, I can always try it, and if we don't like it, then I can go back over with black, right? I don't know if it's really going to show. I'm going to go ahead and go around the other letters just so it's all the same, but I don't think the gold is actually really going to show up too much. Now if we put some of The glitter on there, that'll show up after it's dried. Yeah, I think we'll leave that and let it dry. So I will post the finished 100% completely dry, um, picture, um, in the comments later today so you guys can see the finished project. But that was so much fun. So thanks for hanging out with me on this Saturday and have a beautiful rest of the weekend. I will be back live on Monday. All right, bye.










