Painting an Owl for Newbies with Christie
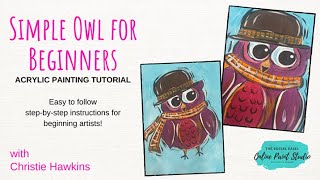
In this 60‑minute live‑style YouTube tutorial, Christie Renee Hawkins of The Social Easel walks beginners through painting a whimsical fall owl using a printable template. She begins by explaining how to transfer the owl outline onto an 11×14 mixed‑media pad with graphite (carbon) paper, then outlines the sketch with Sharpie for clarity. Christie selects affordable acrylic paints (Apple Barrel, DecoArt, Michaels) and demonstrates a simple two‑tone background, emphasizing loading the brush with enough paint for smooth strokes. Throughout the session she shares practical brush‑pressure techniques—light, medium, heavy—showing how paint volume and pressure affect line thickness. She then fills in the owl’s eyes, body, hat, and scarf, discussing color choices (plum, burgundy, cream, burnt umber, hunter green) and on‑the‑fly mixing, including complementary color adjustments (adding red to green). Christie repeatedly encourages flexibility, reminding viewers they can overpaint, adjust colors, and add accents without fear of “ruining” the piece. She involves her 9‑year‑old daughter Sophie, suggesting the activity is family‑friendly and suitable for kids. The tutorial concludes with final accent details, a reminder that the project is part of a four‑night series (background, shading, palette‑knife watercolor effect, mixed‑media), and a brief promotion of her Inner Tribe ($47/month) and Painting of the Month Club ($20/month) memberships, outlining the benefits and content access. The overall aim is to help novices overcome painting anxiety, get paint on the canvas, and enjoy a relaxed creative process.
Chapters
Hey guys, it's Christie with The Social Easel, and we are gonna do a little fall owl. So, um, I just created this today because, you know, I don't really work ahead. Um, but we're gonna do this same little owl template, and you can download it. So we're gonna paint this same owl 4 different ways this week, and this is the first one. And again, we're going to use the same version for the next 3 nights, so we're going to start from the very beginning. Um, again, you're just going to print this off. This is just an 8.5 by 11. I am going to paint it on an 11 by 14. This is my mixed media pad that I'm using. And for those of you that haven't ever transferred a template before, I'm going to show you how simple that is. All I'm doing right now is just tracing over this with pencil. This is graphite paper, also called carbon paper. You can get this on Amazon. I like to order it in a roll, um, because I do a lot, but you can get sheets of it at any store, or you can order it from my Amazon store. There you go. So I looked at a bunch of different owls for inspiration for this, and I just love little owls. And then I started thinking about these little birds that my mom and I got last fall, and they're not owls, but they're cute little birds. And some of them had these little bowler hats on, and they had scarves scarves, and I thought, oh my gosh, why didn't I think of that before? My owl needs a hat and a scarf. So that's what we're doing today, and I can't wait to show you all the different versions we're going to do. So tonight, again, we're doing super simple. Tomorrow we're going to add a background and some shading to it, and then we're going to do palette knife. I'm going to show you how to do it like a watercolor version of acrylic paint. And then the last night we're going to do a mixed media version, which is going to be super cute. So what I like to do after I trace it on— now you can leave it like this, but if you're worried about possibly covering up your lines with paint, usually what I do is outline it in Sharpie once I get it on here. So if you've got kids or grandkids at home, this is going to be a great one. For them to paint along with also, because you've just got it traced on here, and then they can paint or color him in. Sometimes, um, Sophie just likes to color my designs too if they don't want to paint, or maybe you don't want to get that messy. And I made him purposely a little bit smaller because when we do some more stuff with the design later this week, I'm not going to want him to take up the entire, um, canvas. Um, okay, so the first thing we're going to do is the background. And again, I said this was just going to be super easy. This part is super easy. I'm just gonna— my brush is still wet from earlier today. This is just a regular Sharpie. Yes, I'm gonna grab some paint that I already had from earlier. This, I'm just going to do the background. This is Caribbean, um, it's from Apple Barrel. And I'm going to get a little bit of white. I usually like to have more than one color, so my background is not just one solid color. So I'm just going to load up my brush, and we're just going to make a very simple background. You can hear the door unlock. So if you're new You just really want to load your paint up. Hey, Sissy. Make sure you have plenty of paint in there so your brushstrokes are nice and easy. See how easily it's spreading across the canvas for me. Now here's the thing, I'm not going to stress about overlapping my lines a little because number one, I did it in Sharpie. I know I'm still going to be able to see through it. Number 2, when we come back with our other colors, we're going to be able to paint over top of that. So same kind of lesson I've been telling you guys, if you do something and you're not happy with it, you can paint over it. So same here, I know I don't have to worry about going over those lines because I can paint over top of it, and I don't want it to look like I tried to avoid the lines to where it kind of has like a little outline around it. We're just going to fill in around those legs there. And you can get more creative with your background. I'm keeping it simple for today. Tomorrow, I think we're going to add like a night sky to it and some tree branches. I'm going to show you some shading and different things that we can do. But this is just to get you painting. My goal this week is to help you get past your fear of painting if you've never painted before. And that's why we have this, uh, this episode titled Excited Newbie. So if you are a newbie, this is for you. I just want to get you to get paint on your brush and get going and not worry about if it looks —perfect. I just want you to have fun and have a little break for yourself, or maybe you want to share it with your kids or grandkids, whatever you want. But I'm painting in a mixed media pad, which immediately kind of lessens my stress, right? You're not feeling like it has to be anything perfect because it's just in a big sketchbook. Okay, and this is in my Amazon store. For the painting itself, I have no idea what colors I want to use. I think I'm going to start with filling in the black eyes. Let's get those filled in. I could do traditional I could do some fun crazy fall colors. I may use— this is Spiced Pumpkin by DecoArt. We're just going to play around with some— I'm going to just get some fall colors on my palette here, whatever fall colors you can get a hold of. Uh-oh, this one's not open. Okay, well, we won't use that one then. I love this color. This is one of my favorites, y'all. This is from Michaels. It's called Plum. This is a Burgundy Wine, and then we'll probably use a little cream color too. Where's that new one I brought in? I just grabbed some new paints from downstairs this morning. This is like a light buttermilk. Any kind of cream color that you find is fine. And some burnt umber. This just means dark brown. And I forgot to put an apron on, so I'm going to do that real quick before I ruin my chief sweatshirt, because then I'm going to be really mad at myself if I do. So I'm just filling in the inner circle with black right now, and I'm doing the whole thing black. We will probably come back and add a little white dot there later. Later, y'all, I think I've been live too much today. I'm gonna move this paint water so I don't drip it over my canvas, which I'm known to do sometimes. Okay, what do you guys think for the hat? I'm thinking burnt umber is what I'm thinking. I am just using a round brush again, getting plenty of paint in there. And here's, here's the thing you want to— if you have a hard time doing edges when you're doing this, see how much paint I have in there? Start light, and I'm just pushing down. See the bristles spread out? Flip it over and just kind of push it along, and you get a nice smooth edge that way. These would be really cute Thanksgiving decorations if you had kids and grandkids do these and like had a little art display for Thanksgiving. How cute would a bunch of little Thanksgiving owls be? Do a contest, see which one— maybe that's a bad thing. Sometimes contests don't go well for kids, depending on your kids and grandkids. But either way, it would be fun for all the kids to do it together. Last fall, I went down to Arkansas with my brother's kids and my kids, and We all did a haunted house together, and it was fun to see all the different ones. So I'm just dragging across again. So if you're just starting out, you know, two important things to remember is the amount of pressure you put down and the amount of paint you have in your brush. And I'm just going to pull this piece of paper to the side here. All right, so let me show you something. Same brush, right? You're going to see this in a few of my videos because it's that important for you to think about when you're painting. I can do light brush strokes like this, medium, and then if I push down really hard Thick. So all with the same brush. So it's all about the amount of pressure that I have. It's also about the amount of paint that I have. If I just barely get any in my tip, it's going to start running out and it's going to look streaky and I can't do much with it, right? Even though we're using a small brush, don't be afraid to really load that up, because when I really load it up, it doesn't mean it's going to be thicker when I put it down, as long as my pressure is light. So when I say the amount of pressure, I mean the tip of the bristles is just barely touching the canvas. When you want heavy pressure and you want big thick lines, you're pushing down, the bristles are spreading out on the canvas. Okay, so you can see the difference of having enough paint in there, and then of course when you don't, you need to load back up again. So that's just some tips on brush pressure. I was thinking I want to do— these are my colors that I have, so I was thinking, hmm, now I'm starting to change my mind. All right, we're going to start with this cream, and I'm going to go around the eyes here. And again, I'm not worried if a little bit of that black is showing through. I'll decide at the end how much of that I want to show through. Thinking about doing orange for the owl, but then I'm thinking, well, his beak's going going to be orange. I don't know if I want to do that, or should I do this plum color? I think I want a plum owl. I'm going to leave this cream in here. It's gonna possibly— you might see a little bit of the cream coming through, but I'm just going to go around here. And if you need to switch to a smaller brush, you can. Um, the smaller round is just going to allow you to, you know, get in tinier areas easier. And keep in mind, if there's anything that we see while we're doing this, this is our first coat. For some of these, it may be our only coat. For some of them, we may want to add another coat on, but we're going to let it dry first. We don't want to add heavy thick layers of paint on here. So don't worry if you still see lines through, you can always come back to that later. This guy has a little ear peeking out over here. Now I could choose if I wanted to— it's really hard for me to not just mix my colors right now. I'm trying to keep it simple. But, um, I may still change this. You could choose if you wanted to to make the wings a different color. We're going to stick with the plum. I like this color. What do you guys think? I think he's pretty cute so far. And see how you can see a little bit of my blue showing through? I don't know if that's picking up on the camera. But I can see a little bit where my sky color overlapped here, but again, I'm not going to worry about it right now. Let's go in the middle here. Sophie wants to do this one with me. Maybe I can get her— Sophie is my 9-year-old, for those of you that don't know her yet. She wanted to do the live today, and I knew we'd be cutting it too close on time. So I'm gonna do that for the body. And then— yes, someone just said between the eyes. Thank you. Yes, between the eyes. Thank you for catching that. And then I was thinking for— see, I'm going to end up touching all this up. I was thinking for inside, I'm going to grab some of this red that I have on here. What did I call that one? Burgundy wine. And where I have that little inner section of his belly here, we're just going to make that a different color. Why not? And this is optional, you can paint the whole thing one color if you want to. I'm overlapping where that plum is in some areas. So for my Inner Tribe, this is my VIP painting membership. We only open it a couple times a year, um, in the fall and in the spring. I won't open it again until, um, late spring of 2021. The Inner Tribe includes 3 exclusive paintings with me each month. These are my original designs. One of the 3 will be like a behind the scenes called Learn the Process, where you get to see me take idea to finished painting all in— I say, I want to say one session. Sometimes they're more than one session. Like, for instance, we took— I taught the tribe last month how to take a still life and turn it into a painting. So I actually showed them how to create their own still life out of things that they had in their home. We did fall decor, um, and then I showed them how to take that image, transfer it to canvas, and then turn it into a painting. So that's a learn the process painting. This is really good for those of you that are already teaching and you want to paint online I don't allow my designs to be taught online, so these lessons are to help you be a better artist, help you learn how to create your own artwork. So that's one of the 3 that you get with me each month. It's different every month, but you get 3 paintings each month. Then you also get a guest artist or speaker, and that's your monthly content. In addition to that, a new thing that we offer— I have 2 memberships now. The other thing that you get as a Tribe Sister is free access to the Painting of the Month Club. So the Painting of the Month Club is one exclusive painting per month, um, that you get for $20 a month. So that is an option if you can't do Tribe and you need a lower price point. Painting of the Month Club is $20 a month. You get one painting per month, um, and it's uploaded to your membership website. There's no Facebook community or anything with that. It's just one painting per month, but they are exclusive to that club. So as a Tribe sister, you get that membership included with the Tribe membership. So I know it's a little confusing when I explain it, but basically you get two memberships for the price of one, um, all for the cost of $47 a month. So Painting of the Month Club is $20 a month. The Inner Tribe is $47 a month. So that's the difference between the two. In addition to— for the Inner Tribe, in addition to the 3 paintings per month and the guest artist, you also get our private Facebook community that's filled with all our tribe sisters, which I think is the best part of everything. People come in to learn how to paint, and they end up staying because of the friendships and the community that we build. In there. So you get our Facebook community, and you also get access to the entire membership website. And this is the last time that you'll get access to that entire membership hub at this price. So it will go up next spring. The membership hub, the website hub— I kind of call it both things— um, that is where all past tutorials are. So I have had this membership for about 2 and a half years, so that includes 2 and a half years worth of content, over 75 videos for you to choose from, technique videos, live Q&As, bonus templates, all kinds of stuff in there for you guys. So, um, Tribe sisters that are on here, let me know if I forgot anything when I'm painting and talking at the same time. Sometimes I forget some of the details. I think I, I think I got it all. And I think I'm also regretting my decision to make this orange, but we're gonna go with it. Just means I'm going to make his beak a different color. I switched to a little bit smaller brush here. Come down here. Fill in these little triangles for legs that I have. And then I'm kind of changing my mind on— I think I'm going to do the beak red. Maybe red with a little orange. I don't know yet, y'all. Good idea. So this is like a kind of— well, it's— I think it's actually called hunter green. So I don't know if you saw what I just did, but I still had red in my brush when I went into that green. And I knew that wasn't going to bother me because they're opposites on the color wheel. So actually, if I add a little bit of red to this— we're going to talk more about color mixing later this week too— but it actually tones down the green a little bit. I don't know if you can see that color kind of changing. It's not quite so bright. It tones it down because they're opposites on the color wheel, so I can just mix that red right in there. And just go in and fill the hat in here. I think I might make some little plaid stripes on the scarf. I'm thinking, I'm thinking. So let's do this. I'm going to show you like a really quick and easy way to do little plaid stripes. I'm just going to do vertical line— semi-vertical, they're kind of curving with the fabric here. And then let's go across. I'm just lightly dragging. It doesn't matter if it's the same all the way across. These are just cute little designs. We're not trying to make anything too perfect here. That already looks so cute, doesn't it? Then we can do the same thing here. Again, don't try to make it too perfect on the ones that go down too. Because it's fabric, right? So they're not going to be perfect lines. Could be folded up a little. That looks like zebra stripes right now. So nothing too fancy. Now if I wanted to, we could come back. You know, most plaid has more than just 2 colors. So you could come back and add another color to that scarf as well. Someone had the idea to add a little cream to the green to lighten it up a little. So see, I'm just mixing again, make myself a lighter green. Kind of mix that in there. Maybe do a little darker in some areas and lighter in others. It doesn't all have to be one solid color here. Let's take our cream and add a couple little accent marks. So accent marks are really like a little finishing touch to a lot of my paintings, and just light little wispy lines. They don't have to match or stay with an outline necessarily. They can go on the inside, on the outside. So if I want some out here, just kind of adds a little bit of movement, kind of pulls the lines out a little bit. And we're going to do the same thing with black. So I'm adding a little cream first, and then we're going to come in and add a little black in there. And I— what I was thinking is pulling in a little bit of this cream into the plaid. But here's the thing I want you to remember. Let's say you're doing this and you do something on your owl and you're like, uh, I just ruined it, I wish I wouldn't have done that. You didn't ruin it. Just let it dry. You can come back and touch it up. Okay, there's nothing you can't come back and fix. Just add a little bit in there. I think he's looking cute. What do you think? Yeah, the dark green does blend with the hat a little bit, so we can let that dry and change that if we want to. I'm going to come down here with my black and get his little feet down here. And I'm just not pressing down very hard. We're gonna add some black around our edges too. Notice how I'm not doing a solid outline. These are just light little wispy brushstrokes. Let's add in some, like, um, so inside the belly area, we're just going to do like— think of it like the letter U, just these little U shapes. And there's no right or wrong. They don't have to look a certain way. Just couple little more black accents. Let's give him a little mouth here. I think I'm gonna lighten up his nose just a little. Maybe take some of my orange and my cream together, make like a really light orange. What do you guys think? I like that better already. So this is what I mean. You can always change your mind. You can always make choices throughout your painting. Don't feel like just because you put it down that it has to be that way and you can't go back and change it. Like, let's see, I don't want to run out of time. I think what I'm going to do up here, because I wasn't thinking when I filled in that extra circle around his eyes. Um, I shouldn't have done that cream because it's supposed to be more of like an accent color. The inside is going to be white. Um, I didn't even get any— oh, I have it over here. So I'm going to do the inside here white, and then that color that I have cream right now, I'm actually going to change that to like an accent color. So what color do you think would look good there? Let me know. My white actually has a tiny bit of blue in it from my palette, but I kind of like it. Okay, so I'm going to come around with this accent color. Did anyone give me any ideas yet? Renee says pink. Yes, the eyes will have a little sparkle too. We can go ahead and add that here in just a second. I actually overlapped some of my black a little bit. I have to touch this up. See, this is sometimes why I don't like painting with a template. Um, some of you ask if we always have them for things. We don't always, because in our heads we think having a template is going to make something easier, but sometimes what it does is it makes us very, very type A. And we feel like we have to stay in those exact lines, right? Like right now I'm looking up and all I can see is that one of my eyes over here is like more, uh, like drooped down than the other one. And like I want to try to make them perfect instead of just like having fun with it and not worrying about it, which when you don't have a template it's easier to do that. That makes sense. Sometimes it kind of frees you up a little bit when you don't have one. So let's do— I'm going to do a couple things here. Let's take a little of that turquoise we used. We're just going to lightly kind of streak this into our white. If I get more than I want, I can always go back and add more white to it. But we've got this accent, uh, ring kind of around the eyes here. I think since I have red down below, I'm going to pull a little bit of red back into it, maybe lighten it up just a little bit so it's kind of like a pinky red. Let's add some more of our plum out here. And again, it's okay if these blend a little bit. They don't have to be completely separated. I'm thinking I like that better. This needs a little bit more of that red and pink on the outside. And then for my little dots inside of the eye, I'm going to load up the back of my— the tip of my paintbrush, not the bristles, and come and put the little white dots right there in the eyes. I do think I want to change. I think I'm going to actually make the— this color up here, we're going to add orange to it and make it match the scarf. Checking the time, I think I have time to make this plaid. What do you guys think? I think that'll tie it together. I think that helps. And then I'm going to go to the dark green I had here, and it's still wet, but we're gonna, we're gonna test it. For the sake of time, I'm going to go ahead and put it on there. Now, if you were doing this at home, I would say let it dry first. But you guys kind of got to see me work through this, right? So you don't always have to have it figured out. That's the main thing I want you to remember is it's okay to change your mind. In the middle of your painting. It doesn't have to be a certain way. Now, if I let that dry completely, that orange would be a lot brighter, like the oranges down below. Let's add some orange around his belly. I'm just kind of feeling it. A little red. It's so hard for me to not just keep adding colors. Y'all know it's hard for me. All right, I think he's pretty cute. I'm gonna add a couple black accent marks around those outer rims of the eye, and then I think I'm gonna call them done. And then I'm gonna go watch volleyball and football for the rest of the day. So real quick, if you guys have any questions, pop them up there in the comments and I'll try to answer them before I hop off. I forgot to add some little black around the bill of the hat here. So I hope you guys had fun with that today. See you later.










