Painting Birch Trees and Cardinals with Christie
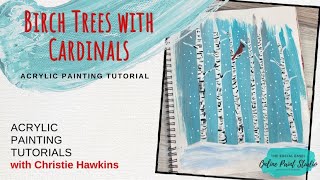
In this 2021 YouTube tutorial, Christie Renee Hawkins, owner of The Social Easel, walks viewers through a complete acrylic painting of birch trees against a teal winter sky with cardinals perched among the branches. She begins by explaining how the lesson was chosen based on audience feedback, then demonstrates how to prepare a quick teal‑and‑white background, add metallic silver highlights for a wintry feel, and build the birch trees using layered white, gray, and black brushwork. Christie emphasizes key acrylic fundamentals—loading enough paint on the brush, allowing layers to dry before re‑painting, and using pressure and brush size to control line thickness. She then shows a simple, scalable method for painting cardinals, breaking the bird down into basic shapes, applying red, black, and orange accents, and offering tips for adjusting proportions. Throughout the session she shares practical troubleshooting (letting paint dry to fix mistakes, using accidental silver, creating snowflakes with a dab technique) and teaching philosophy, recounting how The Social Easel grew from a kitchen class to a nationwide online studio with a supportive community. The tutorial is framed as an encouraging, beginner‑friendly guide that balances technical instruction with personal anecdotes and motivational encouragement.
Chapters
Hey guys, we are gonna learn to paint today. So today we are gonna do— I posted last week and kind of got some feedback from you guys as far as what you wanted to learn to paint this week. So there was an overwhelming response with birch trees and cardinals, and I just happened to have a painting from the past with those two things combined into one. My name is Christie Hawkins, and I'm the owner of The Social Easel and The Social Easel Online Paint Studio. So I have for 5 years taught local classes, and now I teach online classes as well. Today I don't have the original in here, but we are gonna do birch trees with cardinals, and we're gonna have a teal kind of sky background. I'm gonna throw in some silver I just love metallics and I like to mix them into my paintings. So we're going to throw in some silver in there as well. And then I'm going to show you a little more up close how to do the cardinals. I'm going to do some little ones on here, but that'll be a little bit hard for you to see. So I'm going to get you a little bit closer and do a bigger version of a very simple shape of a cardinal for you to see as well. All right, let me grab my big brush here, which I just had. I don't know where I set it down. Here we go. So we are gonna jump in and get started. I'm just getting some teal and a little bit of white, and I'm just doing a really quick simple background. I'm going to scoot you guys a little bit closer for this. So I'm just doing a quick background with teal and white. And I'm just doing this on my mixed media pad. Zoom you in. You can do this on canvas, on wood, whatever you want. And then I'm gonna grab a little bit of my metallic silver and white just to change it up a little bit from my original In winter scenes, I love having a little bit of that silver streaked in there. I just think it adds to the feeling of winter, especially when you're doing like skies and stuff. So if you are new to painting, maybe you haven't done it before, maybe you're just getting started. Step 1 is making sure you have enough paint on your brush. So you guys can see how quickly I'm able to fill that page with paint. That is because I have plenty of paint on there. So just make sure that— you want to make sure that you have enough paint on your brush. If you do not, then it makes it harder on you. So so it's harder to fill your canvas. You feel like you're having to force the paint in when you're painting with acrylic. We're doing acrylic, that's all I teach. Well, I say that, I'm teaching watercolor a little bit in the group now too. Um, but you, um, when you're painting with acrylic, you want to have enough on there that it glides easily for you. It shouldn't pull, it shouldn't tug. If that's happening, especially if you are on canvas, then that just means you need more paint on your brush. So those of you that are on here with me right now, how many of you already paint from home or paint where you're at? Because we've got people from all over today. So let me know, do you have any experience, or do you guys paint at home? And if you're new to painting, that is perfectly fine too. Like I said, this is a very simple one. Anyone can do this. You You just have to go grab some paints and find something you want to paint on and you'll be ready to go. So I teach people with zero experience, so if you've never picked up a paintbrush before, then you are my client. So you don't have to know what you're doing. That's what I'm here for. All right, so I am switching brushes here. So right now I'm just adding in my ground here, and I like to add a little bit of blue in there. I may streak. I might just add a little bit. I'm grabbing just a little bit of a darker blue. I like to add different shades of blue in my snow just because it adds a little bit of contrast and you can create shadows and a little bit more depth if you want to. So if you're doing this at home and you start to add your blue in and you get way more than what you meant to, with acrylic paint all you have to do is let it dry and then you can go back and paint right over it. So this is the great thing about painting with acrylic is it's nearly impossible to mess up your painting. So as long as you can be patient enough to let it dry and come back to it, you can fix it. So if you ever do something you don't want, just let it dry and go back to it. All right, so all I'm doing right now is loading my— this is like a number 2 round and I'm just loading it up with white paint. I'm not worried about if it picks up a little bit of my color from behind there. That's fine. If it bothers you, you can again let it dry, go back and add another coat. That's the other thing about letting it dry. When you are painting, especially certain colors, they will be a little transparent in the beginning, and you just have to be patient and not let that bug you. You want to let it dry completely and then add a second coat. If you try to keep adding— like right now, this is a little thin right here— if I kept adding white paint on white paint on white paint while it was all wet, it just gets really gloppy and sticky and it's hard to move and it's just really hard to work with. So just be patient, let it dry. By the time we're done adding these birch trees in, this one over here will be dry and I can come back and add my second coat. So I'm not worried about getting these perfectly separated or the same size. In fact, I want some a little closer together. It's okay for them to wave a little bit. So I'm just going back and forth. Maybe we'll separate this one a little bit more, have a little bit of space in there. And then I'm gonna come back so where it's overlapped my snow, I'm just gonna grab my white and just kind of pull back over top of that so the snow is covering where the trees are entering the ground. So just streak a little bit, a little bit more white on there. Okay, so I am gonna grab No, I want a smaller one than that. Hold on just a second here. Let me get the paintbrush I want. So I'm gonna get a little bit smaller one. This is like a 0. I still want to really load my paint up on it. So a lot of people tend to think when you are painting with a smaller brush, you don't need much paint. If you don't get enough paint in there, you're gonna get really streaky lines and not the solid lines. That you want. So you want to make sure you have plenty of paint. It's all about the pressure that you put as far as the size of the line that you get. So if you want little skinny lines, you're just barely dragging those bristles across. So like, pretend this is the canvas and see— watch my bristles, they're barely moving. Can you see that? So I'm not putting a lot of pressure down. So if you put a lot of pressure down and you push See the bristles go flat? The harder you push down— this is hard because it's white. I don't think you guys can see that. Anyways, the harder you push down, the thicker your line is. So it's all about pressure. You want to have plenty of paint in there though. I just— I don't want to add a ton of branches, but I want to add maybe just a couple here and there that come out. You could have a few that maybe overlap your trees if you wanted. So nothing too hard, just pulling out a couple little white lines. And then I'm just gonna— I've got a little spot over here where there were some brushstrokes that were dragging. So now I'm going back in. If I had some of those areas where it was a little thin like I was talking about and too much of my background color was showing, I'm just going to go back and I'm using my smaller brush and then I'm just going back and adding more white into those trees. And I actually on purpose kind of leave it to where I have some areas where it's really thick white and some where maybe you get a little bit of that color from the background showing through. Not a ton, but basically it just looks like a different shade. Of white because it's got a bluish tint to it, and that just gives you some more definition in there. So I'm just going in, I'm just adding a couple, couple little branches here and there, maybe little twigs coming off. All right, so now I am going to rinse and I'm gonna get some of my black. So the black is how we're gonna start adding what makes it look like a birch tree. So we are just gonna come on and A lot of it is like horizontal little lines, so I tend to hold my brush like this. And again, I'm not, I'm not pushing down very hard at all, and I'm just lightly just dragging it across in some areas. So with birch trees, and it's definitely fine if your white is still wet, sometimes that's even better because then you'll get some different gray tones in there. But with the birch trees, we basically want to— I don't think you guys can see that. I might move the, move the camera. So see how I'm alternating back and forth between each side? So we don't want all the lines to come from one side. Some can be closer together. Maybe you even have like a messy little knot in some of the trees. Can you see that? So I'm just doing that just by taking a little bit of paint in my brush and just kind of dragging it across. So usually when I do this— okay, so again, I'm just kind of holding the brush like this and just kind of dragging across. Don't worry about if you get heavy-handed, even though that overlapped. My line a little bit. I'm not concerned about it because I can come back and kind of pull that in to the tree. So I tend to do this fairly quickly. I don't want to overthink where I'm adding— we'll just add a little black on that side of the tree. I don't want to overthink where I'm adding all these little black marks. I like to come back and add. So all I'm doing is just taking my brush and just kind of smearing it and adding those marks in there. But you want to have it to where they're all a little bit different. We don't want it to look like just a bunch of dashes. So you see all those different brushstrokes? So I kind of bounce around pretty quick when I'm doing it so that I don't overthink it. Overthinking is our worst enemy when it comes to painting. So you guys see how quickly I just moved down that tree. And don't worry, don't think things like are a mistake. Bob Ross says there are no mistakes, just happy accidents. You can turn it into something. If you really goofed and you just got way more than you wanted, just let it dry. You can always go back and add white to it later. Easy, something you can try at home. I will say you definitely want some small brushes. I want to add a little bit of black here. On these ones coming out. Maybe a little in that crease where the branches meet. My favorite set is— this is like a detailing set. There's 10 pieces that come in this set. They're in my Amazon store, but it's a detailing set. It's actually meant for like, like model cars, like that kind of detailing, but they are awesome for painting. I highly recommend getting a set of detail brushes. So it's really cool for me as the teacher to see— I can teach you guys a painting that's maybe a 16 by 20 or an 11 by 14, and you take that and you make it your own, and it's not completely duplicating my work. It's taking it and and then turning it into something for yourself and using it on different materials and just thinking outside the box. What can you put a little painting on that just gives it some character? But my mom is an artist, my grandpa is an artist, so I come by it naturally. I come from a line of artists and I just love that I get to do this for a living now. And expanding into the online world and getting to create with people all over the United States, or really America for that matter— I have a member in Canada as well— it's just so cool to me. I mean, never in a million years did I think this would be what I was doing. I started The Social Easel locally 5 years ago. We're actually celebrating our 5th anniversary right now, and I started with just a group of 10 friends in my kitchen, and we did a little Christmas tree, and I thought, if I can teach them to paint, I can teach anyone to paint. So they were my guinea pigs, and it worked. And then I started doing local classes, and we've just grown immensely. Over the past 5 years, and it's been so exciting to watch what's happened. But in the last— the major growth has come in the last, like, 9 months of my business. I didn't even have an online presence at the beginning of 2018, so it's just so cool to see where it's gone and all the people I get to teach now that I never, never got to, you you know, meet or have access to prior to teaching online. So very cool for me. I love these ladies. They're all over the United States, like I said, and Canada that are in my group, and it's just very, very cool to get to do this and share this with you guys. All right, so if you wanted to So I'm going back in and just maybe adding a little bit of white and gray mixed in in a couple areas just to kind of add some shading here and there. You could even do this with— I picked up a little bit of silver by accident, but I kind of like it. I picked up a little bit of silver that I thought I was dipping into my gray, but I like that little bit of metallic in my trees, so I'm gonna go back and add that everywhere. See, that's what I mean. Sometimes you do things and you think you messed up, and then it just turns into a happy little accident and you discover something in your painting. So always just enjoy the process. Don't overthink it. Let the painting happen on its own. Okay, so that's the base of our trees here. I am gonna show you a quick way. I'm just going to flip this around. I'm getting white paint on the back of my brush here so I can get some pretty dainty little snowflakes. You can use your bristles, but this is like a little cheat that I do for my students in class because if you tend to be heavy-handed or it's hard for you to get those small little brush strokes, this is a great way to get those perfect little dots. And again, the amount of paint you have on there will determine, you know, the size of those circles, but you don't have to worry about pushing down too hard and having a big blob of white. So same thing with snow as with the lines— try to be random. Try to just dip in your paint, bring it to the canvas, and wherever your hand lands, that's where you're adding some snow. So I do not overthink it. We don't want it to look like a pattern. I don't want it overthought. We're just coming in and adding all these little dots. So hopefully you guys have a little bit of time, maybe before next week, that you can grab yourself 30 minutes to try a little painting on your own. If not, you can always come back to this. All right, so just adding that snow in really quick. So now I'm going to come in and add a couple of cardinals. Hopefully turn this to where you guys can still see. So I want one right here on this branch. I'm even going to cover up that little— so this is just plain red, and I'm almost doing like a little parenthesis-type shape, filling that in. I'm gonna flatten that back out a little bit more. And come straight back at an angle, but straight down. And I want to leave the tail kind of flat and angular. I don't want it to have too much curve to it because that's more of what they, what they look like. So that's the bottom half of our cardinal, and then it's almost like a triangle except kind of connected to the backside. So I'm just extending the back and I'm pulling it forward like a triangle. Maybe extend this point just a little bit more. So that's your basic shape for a cardinal, and then the thing that makes the cardinal is adding that black in there. So we're going to come on the front of this triangle and add that black in. That may be a little bit more than I wanted, but we'll see. You can always come back with a little red and kind of pull that in just a little bit. We'll let it dry a little bit more. So just streak that down here, and then I want to give just a little bit of a beak right at the end. Of that. So I'm just— it's like a little dot of orange. So I'm gonna pull you guys a little bit closer. Can you guys see that? So it's a very simple shape, and again, when you get super close to it, it's not like it's perfect and detailed and everything, but this is about what your painting is gonna look like when it's hanging on the wall. I joke with my students all the time, think of Monet's paintings. Monet was a Post-Impressionist painter, and if you looked at all of his paintings up close, you would just see a bunch of brushstrokes and they would make no sense. But when you stand back and you look at them from further away, it makes sense. So I am going to show you guys a bigger version. So we're going to try something here. I'm going to fold this over and drape this over the top here. Now I'm going to do a bigger one for you so you can really see what the cardinal looks like. Again, you— this is a very basic version for a very simple painting. You obviously can get very detailed with a cardinal. This is not that detailed version. So see what I mean by like parentheses? So I'm going to start with that basic shape, and then I'm going to pull this back down, so back down at an angle. Tapered back towards the body where it flares out a little bit down below. And then we will just finish the body off here. And you can alter this a little once you get your basic shape on there. If you need to tweak it, you'll know once you get the head on if you need to kind of change some of your angles a little bit. Then we're going to come up a little bit. This is the back of my triangle. It's got a slight curve to it, and then just come down for one part of your triangle, bring it back to the body. I'm just gonna fill this in really quickly. I'm kinda looking at this from the side. I gotta turn it just a bit. So I just get plenty of paint on there so I can just kinda mush my, mush my paint around and fill it in. When you're working with red, remember how I talked about Sometimes it'll be a little streaky, and you don't need to stress about that. You don't need to try to fix it right now. You can come back and add a second coat once it's dry. And this is drying really fast because it's just on a thin piece of paper and I'm not using a ton of paint. So I'm just gonna add that little bit of black towards the front here. And it doesn't need to be this perfect crisp, crisp line. We want it to be a little bit messy. So just like that, maybe come in a little bit where that I would be, and then I'm gonna rinse that. So I just came right back over that black on the end and added that little bit of orange in there. This is— this red's already dry again, so if I wanted to, I could come back in with a second coat. I could grab a little bit of black if I wanted to add some detail in there, a little bit of shading. And again, if you ever get too much on there, wipe off your excess, grab red, and blend it, and then you've just got this darker tone. Of red that you're working with. So just breaking these things down into basic shapes, and that's what I try to do when I teach you guys, is take something that may look harder than what you think, and once you break it down into shapes, it's something that anyone can master once you're given those steps. So you get the general idea there. I wonder if I tilt— I know that light is glaring because it's so close. We'll scoot you back just a little. And if I wanted to, I could grab a little bit of white with my red too and add a little bit of highlight. On there. So you can get more detailed with it if you want. Maybe pull that out to where it's more of a wing coming through right there. Or you can leave it simple like I did in the smaller version. So that is your big version. And then here is our smaller one with the birch trees. So I hope you guys enjoyed that. Thank you so much for coming and painting with me today. So I will talk to you then. Bye!










