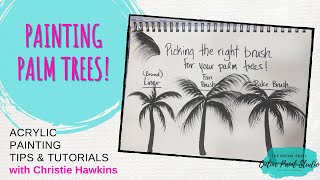
Christie Renee Hawkins shows how to paint palm trees with three brushes: a round liner for thin strokes, a fan brush for bristle separation, and a rake brush for fine lines. She demonstrates loading and thinning black paint, then emphasizes practicing on mixed-media paper before moving to canvas.
Chapters
Okay, I wanted to give you guys a little mini lesson on picking the right brush to do your palm trees in. Now this is specific to you, picking the right brush that works best for you because everyone is different, and I'm going to show you that you can make palms with all 3 of these brushes. Okay, so the first one I'm gonna do is a liner brush, and this is just a round. It just basically means a skinny, really skinny round brush. This liner is a 0. So I'm going to set that right there, and then we're going to do a fan brush. This is what I have used for several years to do grass, palms, and all that good stuff. And then I have a new one, and this is either called a rake brush or a wisp, so I'm just going to put rake brush here. And I have these in my Amazon store, so the liners, the rake brush, the, um, the fan brush, I have several to choose from. So these are the 3 types of brushes— excuse me— these are the 3 types of brushes that you can make your palms with. So let's jump in and get started. I'm gonna grab a little of my black paint here. And by the way, these rake brushes come in a set like this, and there's 5 different sizes, so you won't just get one brush like that. And I really, really highly recommend them if you are new to painting, or even if you've painted for a while but you struggle with fine lines. You're gonna love that rake brush. So I just got a little black paint here. I'm just going to grab a round and give us some tree trunks for each one. And when you're doing your palms, these do not have to be any certain shape, or they can curve a little, they go skinnier at the top. And wider at the bottom. And then what I like to do with my palms to get them started, I kind of make them like little fireworks. See what I mean by that? Looks like firework bursting. Maybe come a little bit lower. On this one. And you can make your palms all, you know, be heavy one direction, and there's no right or wrong for how these branches even have to go. Maybe they look a little shorter on top and you've got some long ones. Just play with it. And if you really like doing them, you can keep adding palms to it. So with the liner brush, I'm going to wet my brush and mix it in my black paint. So just— it makes the black a little bit thinner and easier for you to work with. And when you're using a liner brush like this, you just want to have very, um, light pressure. So I'm going along that angled line and just pulling down. And you get these fun little wispy lines. Now I could even go a little bit lighter. I'll do this on the next one so you guys see how I'm doing that short, quick little brush strokes. But let's say I want to go even skinnier, I can be a little slower about it. You can fill back in as needed. So I want to show you that there really is several different ways you can do it. They can be, you know, clumped together closer along that original line, our firework line, or they can have more individual palms showing. They look pretty both ways. So this is what I mean, it just comes down to preference. What do you like? And I would encourage you to do this in your mixed media pad. Practice several palm trees before you go to your painting. You're going to like it so much better if you do that. Because you've given yourself the ability to play and just have fun and figure out your preference instead of going straight to canvas and then being frustrated when it doesn't turn out the way that you want it. So that is the liner brush. Our next one is the fan brush. So this one can be a little tricky for people, which is why I was really happy when I found out about this rake brush. And I'm going to show you why this can be tricky. Right now, this is— see how the paint is all just kind of together? The bristles are not separated, so you get where it's thicker and then it spreads out. Now again, I think that's fine. I still think that makes a pretty palm, but if you want it a little bit more separated— I'm actually going to dry this off, it got a little wet. See how when I dry it, it separates those bristles? Now I'm dabbing it. Let me show you what I'm doing here with my paint. I'm dabbing it and it's picking up paint, but it's not clumping together like that. So I go against that line and pull the direction that that is going. So for this line right here, you can barely see it anymore. Let's pull that out a little bit more. And I'm just kind of quick little pulls. And honestly, these little wispies that end up on the side, I don't mind those at all. So it's all about having those bristles separated. We'll pull another one up here. See how I can kind of pull that down to add those extra palms in there? Now you could obviously use a smaller fan brush than this, and you'll be able to get a little bit more detail with that. And then the last one we're gonna do is the rake brush. I think I'm trying to decide if I want to do this size or this other— let me see this other one really quick. So this is kind of like the medium-sized one in there. It says, uh, 1/2 on it, so 1/2. So I'm gonna load this up with black paint again, just making sure these bristles are separated. See how that looks nice and separated for you? Look how easy that is. Now I'm still not putting a lot of pressure down, so you don't want to push down hard. I love the way it makes these palms though, and I was just introduced to this brush not too long ago. So just keep in mind, as an artist, we're always growing, we're always learning new techniques, new styles. So I don't think you ever get to where you just know it all because there's always something new and awesome out there, and this is one of my new favorite things. There you go. So you've got 3 different ways, 3 different ways you can do your palm trees. So I hope that little mini lesson helps you, and have a lot of fun doing the painting, and be sure to post them in our free group under our specific post just for the Painting of the Month Club members.