Painting Santa || The Social Easel
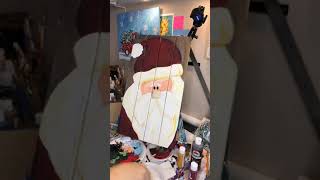
In this live YouTube session Christie Renee Hawkins finishes a rustic, primitive Santa painting on a large pallet board while interacting with viewers. She demonstrates step‑by‑step techniques—using mustard and yellow for antiquing, angled brushes for curved edges, layered color mixing, and detailing with skinny brushes and the back of a brush for snowflakes. Christie explains the advantages of pallet boards over canvas, describes how her husband builds custom boards, and shares tips on handling wood texture. Throughout the stream she engages the audience, calls out participants, and promotes her upcoming local paint‑night events (Nativity, Christmas truck, wreaths) with limited spots and specific dates. She markets her online offerings: the Social Easel Online Paint Studio, a membership “Inner Tribe” with monthly paintings and technique videos, and individual on‑demand tutorials priced around $35 (with a $20‑$25 truck tutorial). She outlines how to purchase, the included supply lists, and the benefits of aerial‑view video tutorials. Christie also discusses promotional tactics—encouraging shares, flash openings around Black Friday, and urgency due to limited class capacity. The video blends artistic instruction, community building, and business promotion, offering insight into her creative process, teaching style, and monetization strategy.
Chapters
Hey everyone, we are going to work on finishing up my Santa today. I'm gonna wait for a few of you to jump on here. And join me while I'm painting. Hey, Carol! So jump on, say hi, let me know you're here. And if you'll do me a favor and hit the share button, it's right next to where you comment, that'll be awesome. You can share it with your friends. While we finish up on Santa. So I've got kind of some different base coats going on here, and this is kind of more of a primitive, rustic Santa. So we're not gonna do the super bright, cheery red colors. I want to do more of the rustic and primitive. Colors. Hey, Becky! All right, as you guys are hopping on, say hi. Let me know where you're watching from today, if you're here local in Springfield, or maybe you're watching from out of town. So I'm finishing up all my seasonal paintings, and it's crazy to think we only have a few paint nights to add to the calendar because I'm not gonna work a ton of paint nights in December. So there's gonna be a few available, and then these are also going to be available online. So if you can't make the paint night, or maybe if you're out of town, I will show how to do these paintings through a video that you guys can purchase the online version. As well, and that will come with the supply list and all that good stuff also. So I'm just going in and getting my white filled in. And so for this kind of style, we are going around our edges here and kind of adding a little bit of that antiquing around the edge there, give it a little bit more of that primitive look. So I'm just using like a mustard color to go around my edges a little bit. And this is just a personal preference. Some people want the bright, cheery colors. I like a little bit more of this style at Christmastime. I kind of have a little bit of a different theme in every area of my house of what style I have going on in there because I love Christmas, and my house is like the North Pole at Christmas, and we have tons of, tons of decorations, and I like a whole bunch of different stuff, but I really love these old-timey looking Santas and giving them that antiqued look. So I'm just going around the edge. I'm going to turn this light down just a little for you guys. I think you'll actually be able to see the colors a tiny bit better. Yes, Becky, this is like the one that Corey made for my front porch last year that I painted. So my husband built me a 4-foot-tall 3D version of this Santa last year that I painted, and then I decided to paint it on pallet board this year with you guys because I love it so much, and I thought you guys might want to paint a Santa. Like this too. So this is the same version, and I do still need to go back and find that picture to show you guys what he did last year. So I'm just going in, filling in with paint, and I like to use an angled brush when I'm doing something that's got a lot of curves. So if you're doing flowers or anything with like curvy edges, like his beard and stuff, and like around his hat, just because the paintbrush kind of does the work for you, and it does a nice blending job and just helps you go around curves a little bit easier than some other styles of brushes do, or like a flat brush or wash. I like, I like the way the angled one gives you a little bit more edge. There. And so we're just using this mustard color to kind of give us some definition in between our layers for Santa. Also, let me finish this. I'm gonna jump over here and read a few of your guys's comments really fast. Hey Heather. This is— these are pallet boards that my husband builds for me. So he just goes and gets 1x4s from Lowe's and picks them out and then builds me whatever, whatever size I come up with. But I really love— this is a big one. This is a 14 by $24. But this looks super cute, like these big pallet board signs. You can hang them on the wall. There's a hanger on the back. But you can also like set them on your fireplace or, you know, protect them, put like an acrylic spray over them and put them on your front porch. So I just love the look of the pallet board, and I just think it's, it's a more substantial piece. It stands stands out a little bit more than some of the canvas paintings do sometimes. I still love both, but if you want something that gives a little bit more of a statement, I think the big palette boards do that. So I'm just going in just a little bit here and there just to give it a little more definition. I may pick up a little bit more yellow. Pull it in over on this side. So the same way I'm using the yellow down here in his beard, I'm using black up there in the, the hat. So like in that red burgundy color, and that's going to give me a little bit more of that definition around the sides up there. And I've started on the little puffball up here. I have super thick paint, so I'm letting that dry a little bit, but it was so thick it was starting to drip a little because I've got it on my easel here. Roxy, yes, we are selling the tutorials now. I don't have this one up yet, obviously, because this is the original that I'm working on right now, but these will be available. If you go— I have two websites, and if you just go to thesocialeasel.com and then click Online Paint Studio, it will take you to my new website. But the Social Easel Online Paint Studio is my newest website, and that is where my members of my Inner Tribe— this is a membership group that I have where we paint a couple paintings a month and then they get technique videos. That's where they can log in. But just this month, I also added individual tutorials that you can buy. So almost everything that we've done in my membership group is now available on that website, and you just click on the painting that you want, and when you click on it, it will take you to the payment screen. And they're $35 apiece for the full painting tutorials. I have the truck tutorial on there also. I believe that one's $20. I can't remember if it's $20 or $25. But yeah, those are all available for you on there, and they come with your color list to let you know everything that you need, your supply list, and then the full painting tutorial from start to finish. And when I do those, I don't know if you guys can see this. This is my little holder. For my camera, and then I paint flat, and so you get an aerial view of the painting up close. So, um, you know, I tell my students all the time, I think if you're really wanting to learn and have an up-close view there, this is better than coming to one of my paint nights because you are so close to the painting you can see all that detail that I'm adding in there. And these will be really fun to have going into the holidays. We already have the Halloween and fall ones up, so if you guys are still wanting to do some— I mean, it's not even Halloween yet. I'm just already painting Santa. But if you already are, if you're ready to do some fun Halloween and fall paintings, those are already available on the website. And that's something fun you can do with your kids, or you can invite some of your girlfriends over and pull the video up either on your laptop, or a lot of my people run it through their TV. and you guys can watch the video and all paint together. So it'll tell you exactly, exactly what you need for the paintings. So there's all kinds of fun ways you can use that, or if you want to learn how to paint and you'd love to do these as gifts for people, you know, it's great for that also. So let me know any other questions you guys have while I'm working on this. I'm gonna let that dry a little bit. I'm gonna come back and I've already put his face color in there, but he needs his eyebrows. So I'm gonna grab a little bit of my white paint here, and I like them kind of coming down. We've got a little bit of a maybe shy, bashful-looking Santa. And then we're gonna come in and do his eyes here. So if you guys are local, make sure you're checking the calendar of events. I will be posting the nativity. If you guys don't know what I'm talking about, scroll back on the page after we're done here and and you can see the Nativity I posted earlier today. Tons of feedback on that, that everyone wanted it. Hang on, this brush is messed up. It's got a loose bristle on it. So the paint night for the Nativity is going to be on Tuesday, November 27th, after Thanksgiving. And as of right now, I'm just doing one paint night for it. I may consider doing a Wednesday night class if that Tuesday one fills up. But we only have 5 paint nights for building up until Christmas. So because of that, if you know you're wanting to do one of these and you're available that night, I would not delay in getting your ticket bought because this time of the year stuff starts selling out. And since I'm doing fewer paint nights this year, there's only so many spots available. So last year I did the nativity 3 different times. I did the Christmas truck 3 different times, and this year I'm only doing it once. So there's only 38 spots at each one of my events. So again, if you're local, just make sure you get over there. Jump over there to the, to the tab where the events are, or go to thesocialeasel.com. You can go to either one of them and just click find tickets or register now and to get signed up. So this one is what I was showing you guys last week that I painted, and this class is already half full. So just keep that in mind if they're— if you're going to— this is a sensory light here, that's why that keeps kicking on and off. So if you want to get in on one of the local classes, make sure that you get over there and grab your spots. And if you're registering with a group of people, I recommend one person register for everyone so that you ensure that you all get in to the class, because once it's full, it's full, and I don't have any way to add any extra spots to it. Okay, so I'm gonna pick up a little bit of some, like, cranberry I have here and my white again, come back in for his nose. How many of you saw the wreath video or picture that I posted the other day? I did both. So that is another paint night that I want to have coming up too. They are so fun to do. I gave my membership group a little bonus technique video on how to do the wreaths today, so they got to got to see that and play with it and anxious to see what they come up with. But I'd love to do a local paint night doing the wreaths too. I think I'm gonna have Corey build me— instead of doing it on pallet board, I kind of want to do— I don't really know how to describe it— kind of like a shadow box. So a big square and then maybe like 2 to 3 inches thick on the sides, and then it just hangs on the wall. I'm trying to think if I have anything. Well, it'll be kind of like this, obviously not glass, but a square like this where we paint the wreath, and then it'll be flat on the front, just a piece of plywood, and then he's going to build a box, and then it'll have, you know, this much width on the side, and then you'll just hang it on your wall like that. So that's something I'm wanting to do with the wreaths. If you haven't seen that, I can show you really quick. This is my baby one, and I did this on burlap, and everyone loved the look of the burlap. These I got on clearance last year at Walmart in the craft section, like a 2-pack. They came in this little 2-pack at Walmart. They're just 6 by 6. They're super adorable. So you can go, um, pick these up at Walmart probably. I don't know if they still have them. That was last year. Um, so we probably wouldn't be able to do a burlap class because they're kind of expensive if you buy the canvases individually. But if you're interested in doing something like that, you can get burlap canvases at Michaels and Hobby Lobby too. But we're gonna do ours on wood and then you can do a bow in the middle like this, or you can do something like this with the bow on the side and then do your initial in the middle, or you could write out Merry Christmas or kind of whatever you wanted to. So this is an idea of what I am wanting to do for the wreath. So I'm hoping Cory's working on building me some pallets tonight for our fall chapel class tomorrow night, and I'm hoping maybe he'll have time to throw together one of those 3D boxes for me so I can do a demo and get that ready for a class also. So I'm just going to give Santa a little pink nose here. And with the wood, you got to get plenty of paint on there sometimes where it's a little rougher, just to get it to really soak in to the wood there. All right, so what do you guys think so far? Julie, the video was just a little time-lapse. That I had shown the other day of me painting this one, but if you go in our Inner Tribe, in our membership, I showed you guys how to do this today. I did a couple live videos showing you how to make the reeds, so if you missed that, that's in the group. And if you guys are interested in the group and you're, and you're new to painting with me, you can add yourself to the waitlist by going to the Social Easel online paint studio also, and you will be the first to know when I open the doors again. We may do a little flash opening before the holidays for those of you that want to get in and paint some of these online classes and, you know, be able to do some of the holiday Christmasy ones or Thanksgiving ones. So we may do a little flash opening just for a few days to let some new members in, and then we won't be opening the group again until 2019 in the spring. So I'm just going around here adding a little shading. You'd be surprised how much a little shading adds to the paintings. So what do you guys think? I think I like his nose. Thank you, guys. His nose and his cute little face. So I'll pull it a little bit closer so you guys can see some of the detail there. And now I'm gonna come back in. I want to add a little bit more. I've got about a million paintbrushes in my water right now. I'm gonna come in and add just a little bit more yellow up around this edge here. A lot of times, you know, I tell my class or my students in my online group, sometimes if I'm pausing when I'm talking to you guys and taking a step back, I kind of like to look at my art from different vantage points, from across the room, and even look at it through the video with you guys. If you're at home, I recommend doing the same thing, stepping away from your your painting and looking at it from different, different places, take a picture of it on your phone. And the reason why is because things look different on— in a photo than they do in real life. Same thing if you're really up close to your painting all the time, you're not really getting a true idea of what it's going to look like once it's hanging on the wall. So it's always a good idea to step back when you're working on your stuff. Get away from it just a little bit, come back to it, and that will, that will help you kind of with any finishing touches that you have. So I'm just going to add some little streaks down in here. Thank you, Becky. Theresa, the group info, if you go to— sorry, if you go to thesocial easel onlinepaintstudio.com when we hop off here, you will be able to add yourself to the waitlist for that. And then I also have the individual classes available online that you can purchase until we open the group back up. So I'm going to come in here just a little bit, my white dripped down just a tiny bit. And when you're— if you do have pallet boards that you're working with, you can go in between your slats here. That's what I'm doing and just getting in those little tight spots with a small brush to make sure that's filled in. So I'm gonna go around and add some little black lines around my edges here just to kind of separate things and pull them out a little bit. You don't have to go overboard with this, and we don't want it to be like a solid outline. You just want real quick little brushstrokes that aren't real heavy-handed. So I tend to do them fast because the faster you do these, the lighter your brushstrokes are going to be. We don't want it too, too heavy-handed. We just kind of want the idea of a little bit— excuse me— of a little bit of an outline here. Actually want a different brush. I like a nice skinny brush to do that with, so like a size 1 or like a detailing brush. See how I'm just kind of dragging that across? And it doesn't have to be right perfect on the edge. You can have a couple little lines on the inside. If you're paint gets too thick, if you're especially doing little lines like this, get a little bit of water on your brush, thin it down. Makes it a little easier for you to do those little details there. And I don't think I want to put too much around his, his face and his beard. Maybe just a little, little bit here and there. And if you ever do something like, let's say I just messed up really bad and got a real heavy black spot or line on here that I didn't mean to do, when you're working with acrylic, you just let it dry and then you can come back and paint over it. If I try to fix a mistake while it's wet, then it just creates a big, big mess for me. So just keep that in mind if you're, if you're new to painting. Thank you, Robin. Thank you, Becky, for putting that on there for me. Becky's in our Inner Tribe and our membership. But I'm thinking what we're gonna do, if you want to mark your calendar, make sure you're getting notifications My plan is probably to do a little flash opening for our membership group on Black Friday, so that will get you in before we do all the fun Christmas paintings, and it also gives you access to everything that we've done prior to these months. So you get access to the full full library of paintings that I've done with my group. So this one is gonna be for a local paint night here in town, and then I'll do a little— teach a little online version that you guys can buy too if you want to paint Santa at home. Alright, so what do you guys think? Do I need to add anything? I'm trying to decide if I want to add anything around his eyebrows or not. I kind of like him the way that he is. All right, shoot me some thumbs up and hearts if you think I'm done. If you don't think I'm done, tell me, tell me what I need to add. I'm gonna get a little bit of white on here while I'm waiting for some of you guys to comment, and I'm gonna come back up and add the second layer up here to Santa's little puffball off his hat. If I can find the brush I want. I love them. And you could come in— oh, I know what I was gonna do. I'm gonna add a couple little snowflakes and stuff up here. If you wanted to, you could, you know, add your name down here in his beard and put the Hawkins, or obviously that's my last name, or whatever you want. Or we can just leave him him without any personalization. I think he's cute just the way he is. So I'm just going to dab a little bit more on here, nice and messy, and I may even come in, maybe add a little— dab some extra brush strokes in here, maybe to just make it look a little fluffier. Holly on his hat rim. That would be cute, Stephanie. I like that idea. I may do that. So, you know, part of the fun of painting is just playing along, kind of thinking up things as you come, allowing yourself the freedom to change your mind if you want to. I had this smooth at first, and then I thought, well, maybe I want to come back in and rough it up a little and kind of make it look a little fluffy like his hat would be. So don't, don't feel like you always have to, you know, start off with one thing and stick to that. It's all a process. That's the fun part of it. You can change your mind as you go. So I'm gonna come in here. One of my tricks for doing snowflakes is to turn my paintbrush around, and I get paint on the back end, and I'm just gonna start adding the little dots. For our snowflakes coming down around Santa. And I love this technique because you get perfect little— I'm gonna see if I can zoom you guys in a little bit closer here. Maybe it will let me do this. Let's see. Oh yeah. All right, I'm gonna try to get you a little bit closer so you can So I'm using the back of the brush, and you're just dabbing it on there, and it gives you these great little dots, and you don't have to worry about your paintbrush pushing down too hard or giving you bigger snowflakes than what you wanted. When you're adding little details like this too, you want to try to be really random when you do it. Maybe have some that are close together, some that are further apart, just so it looks more natural. You don't want things to look too evenly spaced and too planned. Some are bigger than others, so just have fun with it. I'm gonna add a little bit more over here, I think. Maybe a couple little small ones mixed in. There we go. Hi, Lisa! And then I'm gonna come in with a little white here, just add maybe a little white around his nose, a couple little white highlights. On his cap. Just a little here and there. I love the little accent marks. They just add just a little touch. So you guys can see that okay? All right, so that is gonna be it for tonight, and I hope you guys enjoyed watching and painting with me for a little bit. And we'll be back on later this week. I'm not quite sure when, most likely Thursday. I may hop back on here and finish up some more paintings with you guys. So I hope you enjoyed it, and if you haven't already, you can hit the share button, share with your friends so they can see this cute little Santa Claus we have coming. And I will put— for those of you that are local, I will post the date for him when I hop off here. And for those of you that are watching from out of town and you want the online version, I will let you know when that is available also. All right, so that's it. You guys have a good night. Talk to you soon. Bye.










