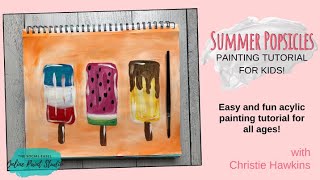
In this video, Christie Renee Hawkins, owner of The Social Easel, guides viewers through a step‑by‑step acrylic painting of three summer popsicles designed for parents to do with their children. She begins by creating a loose, orange‑and‑white background, emphasizing that there is no right or wrong way and encouraging kids to enjoy the process without pressure. Hawkins then demonstrates how to paint each popsicle— a watermelon‑flavored one with pink flesh, green rind, and black seeds; a bomb‑pop style red‑white‑blue treat; and a banana‑chocolate version with vertical ridges and drips— using mixed colors, blending, and brush‑stroke techniques to keep the work lively. Throughout the tutorial she intersperses teaching moments: letting children explore independently, using mistakes as learning opportunities, explaining color theory (complementary colors, mixing, the color wheel), and highlighting the value of patience (letting paint dry, covering errors). Hawkins shares her personal artistic lineage (mother and grandfather were artists) and her philosophy that adults should paint like kids to rediscover joy. She also mentions her kids’ art camp, a Facebook community where participants share their work, and suggests interactive ideas like flavor‑creation challenges and family voting. The video concludes with final touches, encouragement, and a farewell.
Chapters
Hey everybody, so my name is Christie Hawkins and I am the owner of The Social Easel, and tonight I am going to do a quick little painting with you guys that you can do with your kids throughout summer. I have a trio of popsicles that I'm gonna do. And I'm just going to hold this up so you can see. You'll be able to see it better once I start getting some paint on there, but I've just got 3 little rectangles on here, and that's going to be our popsicles. And I'm going to show you— this is how ideas like this pop in my head. I had this little flyer in the mail, and I saw it, and I thought, how cute is that? We'll just paint popsicles tonight. So this is a really fun summer painting for kids. So for my background, I just kind of want like a peachy color background. So I'm just going to grab a little bit of orange and white on my brush, and I'm just going to start filling this background in. Now I like mine messy, going all different directions, and I'm just going to go in between. We'll try to box these rectangles in so you can see. Are you guys seeing seeing that okay, what I'm doing here. So this is just orange and white, no fancy colors or anything, and we're just going to go all over the place, all different directions with our brushstrokes. All right, looks good so far. So I'm just going to fill the whole thing in here. And I love doing backgrounds like this. These are really easy for kids because there is no, like, right or wrong to the background. They cannot mess this up. They can have it, you know, brighter orange in some areas, more white in others. So these kind of backgrounds are just really fun and easy, and they just enjoy getting to go through the process. And, you know, I've taught kids for so long, and, you know, I tell moms all the time, it's important for us to let them just have fun and do it. They're not as worried about it being perfect as maybe we are as the moms, and we want it to look like the original or look like the picture, but they're just having fun playing in their paint and getting to have paintbrush and a canvas, and they're just excited about all that. And just let them do it on their own and then wait to see if they ask for your help, because if they don't and they're having fun with it, just let them go. Let them, let them keep going because they're not going to know that it's not perfect unless they're told it's not. So hopefully that makes sense. And I say all the time, if we as adults could paint more like kids do, we would have a lot more fun and we'd stop putting so much pressure on ourselves and just enjoy the process of creating. All right, I am going to start with this one. So I'm just switching to a round here and they can do whatever they want to with these. This is why, like, the popsicles are so fun because you could do literally anything. I want to do a watermelon one in the middle, so I'm just going to start and, you know, they're all like kind of rectangular. And again, this is kind of, you know, just freehanding. I don't want this to be like No one needs to be getting out a ruler and making these super straight lines. We're just having fun filling this in. I'm gonna get a little bit of white kind of mixed in here. Very rarely do I have just one solid color in my paintings. I always like there to be a mixture, and I like you to be able to see the brushstrokes. So we're gonna start here in the middle with our watermelon one. So we're going to start with this one here, and then I want— all right, so we've got our pink on here, and I apologize if this is going in and out fuzzy. It's doing that on my iPad, but that could be my, that could be my connection again with my WiFi, because it looks clear on my phone. So let me know how it looks to you guys. Hopefully it's okay, because there's not much else I can do. So we're gonna add this little bit of white down here at the bottom for our watermelon line. and you can decide whether you want it to be more solid. Can you see that okay? Or maybe you want it to transition more kind of like ombre does, and it just kind of blends in. Both look pretty either way you do it. Oh, I had orange in my white. I'll have to go back to that. So once we do this Then we want to come underneath to add the rind in there, and I've just got a dark and a light green, so kind of like a mixture here. And same thing, you can— I'm blending it a little bit with that white. Got some dry paint on there. I'm going to get a little bit more of this like lime color here. I'm just gonna add a little bit more dark down here, and then we want to add— I'm gonna actually go ahead and do this on all of them— we want to add our little stick that we're holding our popsicles with. So this is just really easy, just another little rectangle. And I just pull down with the brush and then go over and pull down a little bit more until I get it the width that I want. So I'm going to hold that up so you guys can see a little bit easier. And if you notice the orange there, that was because I dipped in some dirty white paint here, so I've got to go back and fix that. But I'm going to go ahead and add Since I've got the paint, we'll go ahead and add our sticks onto our other ones. But this would be really cute painting, and then if you like wanted to add like "Hello Summer" at the top of it or something cute, that would make a really cute summer painting for the kids to hang in the house. So I was thinking for my other one to kind of make it like a bomb pop. You guys know what those are, like the red, white, and blue. So I thought I'd start with red at the bottom here. These were always my favorite. I loved the Blue Raspberry. And then I'm going to do the same thing. I'm wiping off that red, that extra red, but I'm going in and grabbing a little bit of white so we have that little bit where it might mix just a little, just like in the popsicle where the colors kind of mix a little bit before they've melted all the way. or frozen all the way. I'm saying the opposite of what I mean. So we're going to have a little bit of blending there. Then I need to get some clean white paint. So we'll do Some white here in the middle, and then I'm going to transition to the blue. I think I want— because those popsicles have more of like a turquoise blue. I've got some of this Ocean Breeze left over from a painting I was working on earlier today. I'm gonna add some of that in there. You know, it's got the blue raspberry at the top and then the cherry at the bottom. Kind of pull this line out just a little bit more over here. I mean, who doesn't love these, right? And I kind of like— you can see that little bit of blue in here. I usually like pulling a little bit of a blue into my whites just so it's not quite so plain. You can kind of do a little bit of shading with it. I do that like when I do snowmen and stuff. See how it kind of gives it almost like a cool effect. I'm going to hold that up so you guys can see that. Looking cute so far, right? And now this is drier, so I can come back and add my white back over top of that where it picked up a little bit of orange by mistake. I love blending white with colors because it just kind of pulls everything together. I'm gonna add the little black dots to our watermelon one, so we've got our watermelon seeds in there. I've got a bunch of yellow paint here. Let's start with that and see what we come up with. See if we like it. So I'm starting with the yellow, and then I'm gonna grab a little bit of white with that too. Again, you know, I don't like just one, one solid color in my, in my paintings here. I think banana would be cute, right? And then we could add a little chocolate on the top. Sounds good, doesn't it? It's making anybody else want some dessert right now? It's so cute. I love doing these kind of paintings. But it would be fun, you know, as creative as kids are, for them to come up with their own flavors. Or maybe make it a challenge, like if you have more than one kid, or even if it's just you and one child doing it, you should challenge each other to come up with all different flavors. And then maybe have someone vote, have the family vote on which 3 they think are the best flavors. Flavor trio, that would be fun. I'm gonna grab a little bit of orange in here, I think. I'm gonna put those vertical lines down the middle. You know how the popsicles kind of have those ridges in them? And then let's get some chocolate over here. Just kind of dripping down, nice little wavy lines. All right, I'm going to try something here. This idea in my head, and we'll see if it kind of works out. I want to do these vertical lines kind of down the front of all of them, and I've got to switch back and forth between the colors here. What do you guys think of the banana one? It almost— it's making me think of Frankenstein. Like, I need to like curve this more or something. I've got a little bit of a black in there. Let's kind of give the illusion of that. Go back and fix my little black that I accidentally pulled through. And we talk a lot in the kids' camp while I'm teaching them. I think, you know, it's longer drips. Okay, so we'll do longer. We'll do longer on the brown and maybe it'll look better. But I am talking to the kids while I'm teaching them, not just going step by step, but trying to teach them just some basic art lessons that they're learning along the way. And these are all skills that they're going to be able to carry with them into the next painting that they do. So we talk about, like, if you make mistakes with your painting, you know, not to freak out about it, but you can let it dry because anything can be covered up with acrylic paint. It just requires patience and, and stopping and letting it dry. But we talk about a lot of different things in the lessons that they can carry on into the future. So I'm introducing like the color wheel to them and, you know, all kinds of different stuff— what complementary colors are and why they're complementary and why certain colors look good next to each other in, in a composition. So all those extra little things that I think are really important. And, you know, I was saying earlier, I was lucky enough— my mom was an artist, my grandpa was an artist, so I grew up in a home full of creativity. And because of that, I think that's why I'm the way I am now, and I'm a kid at heart, because my childhood was all about fun stuff like this, and I want to bring a little piece of that to your kids and their summers as well. So I hope that's what this art camp does for them. I'm really excited to see all the pictures, and just from the free ones, that I've done, and people have shared the pictures with me and put them in our Facebook group, and they are just doing so good, and it's just so exciting to see young artists do that. All right, more chocolate, longer drips. Is that good? That looking better? I think we're getting there. All right, looking good. We're going to do just a couple little lines here. I always like to go around and add these little white accent marks just to kind of pull things together. All right, I think we're finished. Fun little painting. I will talk to you guys later. Bye!