2015 05 12 09 02 eConnect Training
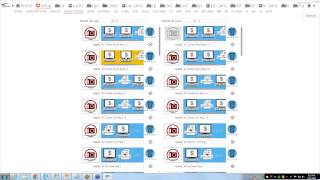
Zach Whitney and Marcus Kelley walk through eConnect setup for cameras and POS systems. Learn how to configure DVR channels, restrict camera access by user, set up real-time alerts, and manage roles like viewer and sysadmin. Examples use Kings Island and Cedar Fair sites.
Chapters
Cameras, change cameras, users associations, any other sort of back end things that we might have. Starting off we're going to use Kings island as our example for probably majority of this. So if you guys have admin rights to login, which I'm sure all of you or most of you do, once you have the setup tab, you'll see a bunch of different options in here. You're not going to see all of these sites in here. You'll see the ones that are relative to your site. So like I said before, we're going to use Kings island as our example. So starting off we're going to go to the cameras for Kings island and then from here you'll see different options. Down here you have export servers, access control list. We're going to go to Devices for starters and in here we'll see all of the cameras that are added for the exACQQVision system. So in here we have our basic server address. Now this is a public address that is used for our office to reach the DVR over on site at Kings Island.
So this is pretty much going to be defaulted to whatever the public IP will be for your site. And that will be something when you guys want to add more cameras and stuff like that. If you already have them, you'll probably just want to mimic this ip. And if you don't then that's something we can work with you on. Getting server ports default now each, each site has, most sites have a different DVR but the concept is pretty much still the same. We need a username and a password that would have admin rights, not admin rights, full camera control. So pause, play, fast forward, rewind, stuff like that, exporting and essentially just gives our application a user to access the cameras and do what you're requesting it to do within the app. Then the channel ID is pretty self explanatory. It's whatever port or ID or logical ID that the system uses that we refer to when we look at the camera time zone export server. So pretty straightforward. So when you're wanting to go to add a camera over here at the very top we'll have a drop down menu and this will have a lot of our integrations, but not all of them. You see ExacqVision is right here. So if you know that we have an integration with a DVR and you're not seeing in here, it's very likely that the player control that we provide for the integration is not installed and essentially that acts as a plugin. So once you have that installed and you reload the application, you'll see it appear in this list. So in this case, if we just wanted to add an ExacqVision camera, you would highlight ExacqVision, click the plus sign right here, and that will add it to our system. You see, over here we have a new device, a blank template essentially. And you can name it whatever you'd like. In this case, you name it test 1, 2, 3. The IP in here, that is just a randomized default IP. I'm not really sure where we generate that from, but it's something we're going to change regardless. The server port is a default port. That's what we listen to. That's what the DVR does. All the requesting for, I should say the username password. This is all defaulted. This is something that we would change to one of the other camera settings over here. And then the camera channel, obviously we would change to whatever camera we're looking for. Time zone, export server. So the export server, you guys should only have one to select. And that's really all you guys have to worry about. This is our ASP exporting server. And then obviously time zone, you set it to the proper time zone, depending on where you're at. Once you're done with that, just go ahead and hit Save all. And it would add this camera, it's based on alphanumeric, so you go A to R. It has all the other letters in between. And. Yeah, so once you have that camera added next, you'd want to add it to a device group. And over here we have our groups. To the right, you see all the different groups and if you click on each one of these groups, you can see all of the cameras that are in each group. So to add a camera and take out a camera. So you see that? Here's the test123 that I had that I just added to the system. So if I wanted to add Test123 to this group, I already have this group selected. That's how we're able to see all of these. You just click on Test 123, you can hit add selected and it's going to bump it over to that group. So when you go over to your Kings island cameras over here at the top, and you bring over the AZ group, you'll see test 123 added to that. So I'm going to remove that really quick.
Next is going to be Access Control. And this is something that we've had for a while. It was a request from a lot of customers. So essentially what it is, it is.
We'Ve had a lot of requests for. We want certain employees to be able to see certain cameras, and we don't want other employees to see any cameras or no cameras or maybe just a couple of cameras, depending on for whatever reason. So let's say, for example, can I use me as an example?
We're going to use Travis, our CTO as an example in here, as far as permitted devices, you can see that he has access to see all the cameras, including the one that I added. But let's say, for example, that we didn't want Travis to see any of the AZ cameras. So what we do is I'm just shift clicking and I'm highlighting all of the cameras at the AZ and I'm going to bump these over to deny devices. And essentially what that's going to do is when he logs in as his user, these cameras will not even exist to him. He won't even know that these are here. For all he knows, he's never existed. They were never in the system. He's only going to be able to see these cameras. And you can do that specifically with whatever camera and however many users that you want. So if there is a certain set of users that you only want to see them see certain venues or certain camera angles, this is the ideal way of doing it, of just removing those cameras entirely from them. So they have no knowledge of those ever existing.
Just to add to that, I know when I do train at a lot of the casinos, most surveillance rooms do not allow for their video to go outside the surveillance room because it's a closed network. This is where, let's say you're in a casino environment. You want your audit team to see the econnect software, but you don't want them to have access to the cameras. This is where you would restrict that access of the cameras for your audit team, but still allow them to see the data from the econnect software.
So, moving on, under setup here, this is something you guys won't ever have to worry about. This is a pretty specific feature that we very rarely use, so you wouldn't worry about that. And export servers. So this is our export server is essentially whatever machine is going to be handling all of the video exports. Hold on one second.
There you go.
So this is essentially the machine that will be handling all of the exporting of video.
Majority of the sites, unless you're part of the Cedar Fair properties, will have the local econnect server doing the exporting, unless there is a very unique setup going on at your site. But majority of the time, I would say 95% of the time, the econnect server that does all the parsing and hosting the application will also be doing the video exporting. And it's very important that we make sure that we have every camera in the system pointed to an export server. If this isn't here, if you guys have to make a case, say for example, we don't have test123 added to an exported server. If you saw an incident or something happen on the test123 camera shop and you wanted to get it exported, if this isn't associated to an export server, it's not going to export the video. It will throw a couple of errors, it will complain and it's an easy fix. You just go over here and you hit the plug and it's going to add that camera to the list and it's the same thing as when we were adding the camera. It's the same thing as doing this. I found in the past if it's a new system or if you guys purchase 15 or 20 extra cameras, instead of doing 15 or 20 drop down selections, it's easier to just kind of shift. Click whatever you want and you can hit the plus sign however you want to do it. But I found this to be much easier.
So normally this is something that's set up with the original install and it normally doesn't have to be touched until really ever. It's usually once you set it, it's good to go.
Moving on, we're going to go over here to more of the settings within ki. So for the query manager, I'm sure these guys here.
Prevention department have gone through this quite a bit, but I think there's a couple more things we can touch in here just in case you guys haven't seen it. So in here under Query Manager we pretty much have all of the queries saved within the system. These could be private queries only for a specific user. They only want to see it, nobody else really cares about it. Or all the queries that are saved in general. And then we have the default query. So this is a pretty specific list that's been created by our loss prevention team over the last year or so. And.
So what they did these queries made from a query builder. You see something here that says link private. So depending on how they created the query and where they saved it from, etc. Etc. It'll depend on how it's shown in here and this is pretty much where they go to tailor all the queries. So if they're looking. I don't know if any of you guys are familiar with the language link, but essentially it's a querying language that we use for a lot of our queries. And you can see in here, some of the guys have gone through and just kind of modified the queries to what they are looking for. This is a little advanced, but this is the ideal way of creating a very specific query. If you guys are looking for some very, very, very specific and detailed information that you're not able to project with the query builder, this is where you'd want to do it. And this is something we can help you guys out with too, creating queries. So if you guys know exactly what you're looking for, this is something we can help you out with, tinkering around with, for sure.
In here you also see you can disable query if you're not a fan of it. If you're still working on it, you're not sure if it's working. The real time alerts. This is a pretty cool feature. If you have this checked, what this will do is every time that this query fires off. So right here we have a drawer open longer than 30 seconds. If that were ever to happen and we had to save, it's going to bring up a little alert at the bottom right of your screen and it will have a hyperlink. You can click on the hyperlink and it will bring you to that exact time. Pardon me. It will bring you up to that exact transaction that had just happened.
My only warning about this is I wouldn't set it to a query that happens a lot. Like I wouldn't do it to. Every time somebody pays with cash or every time there's a very common discount just because you will get a flooded amount of alerts on the right hand side. So I would set it to something that's very specific. Maybe there's like a query that you have for a very specific employee that you're wanting to keep your eyes on, that he keeps doing something over and over. And you just want to make sure that you're able to watch it as he's doing it.
Moving on, just to go back on queries.
This is where.
I'm sorry, but this is Marcus. I'm the investigations manager. When I do my training, this is the part that I usually don't go into because as Zach said, this is pretty much an advanced portion and you're writing some code to get the queries to work. But if you guys ever have problems or you want a certain advanced query that's basically an advanced query is looking for two or more lines of data on a check. This is where you would go. And if you guys are having problems, you can email investigationsconnect TV telling us exactly what you want. And we can show you how to. We can either show you how to build the query or we can build the query for you, because that's one of the things that we do as a service to all of our customers.
Moving on. So entity setup, this isn't really something you guys would be too interested in.
This is essentially just all of the terminals that are automatically added to our system. So depending on what point of cell vendor you have, whether it's a Micros or a Jilisys.
It will vary on how the terminals are added to our system. But this is a way to kind of. You can edit the terminals in here, I should say, in a sense of you can change the familiar name. So, for example, we like to change the Revenue center names at our site that we do training at. And that's for when we use our behavior report function. If you guys are trying to compare all the employees at a certain venue, off the top of my head, I can't tell you what venue revenue center 536 is. But if we were to change the familiar name to Bar123 or whatever popular venue is, then you know when you're running the behavior report that you'll know that you're looking at all the employees that were working within that specific venue. Otherwise it's kind of hard to tell off the top of your head which which Revenue center is which venue. So in here you can see at the bottom we have ADD Workstation, Add Revenue Center. This isn't something that we normally do because as soon as we receive the data, if you're using Micros or once we set up the system initially with Agilisyst or whatever other point of sale you're using out there, these are automatically added to our system by default. Very, very rarely do we ever actually have to go in here and manually add a workstation. But if we do, that is an option. The only thing I would say is if you are going to add or change or do anything on the workstation is make sure that this system ID is never duplicated in your system, because that would be something. It is going to duplicate your data for that single terminal permanently, unless we have to log into the system ourselves and then make some adjustments within Our SQL database.
Sometimes we have in the past we've had to add a terminal just because the terminal has been problematic or something isn't quite looking right. And we've had to over the time add a terminal manually. So not a big deal. Pretty helpful at times. But again, something you guys probably wouldn't want to venture too much into.
Oh, just a couple things as we talk about entity setup with a lot of the parks. As you guys add new terminals, you can export a list from Micros, Infog, Aloha. Whatever system you're using, keep in mind you might have a four digit number, but there's a specific number that we're looking for that you can pull from your systems. And like Zach said, those are ones we're going to change. Something to also keep in mind, Zach, you can correct me, I believe it's if that terminal is inactive for. Was it 30 days?
Yeah, 30 days.
If it's inactive for 30 days, that terminal will kind of go into hibernation and you won't see it in your behavior report until you populate or until that terminal works again. The data is still there, it's just in hibernation. I believe it was a performance issue is why that feature was installed.
It's only effective for Micros customers too. So if you guys have Micros, that would be something that you'd want to look out for if it's been inactive for some 30 days or longer. It's kind of like Mark says, it kind of goes on hibernation mode within our application. So you won't see it in existence there until it's beginning to be used again, then it will reappear.
So moving on to point of view, any questions yet?
So moving on to the point of sale settings, this is another one of those things that.
You really don't have any need to touch any of this stuff. Once it's set up, it's good to go. There's really never a reason to change it, but if you have to, for whatever reason, you can. So data retention, number of records removed for pass and the point of sale specific settings. So depending on what point of sale system you're using, this drop that menu would change.
Data retention. This is based off of days. So right now we have it set to zero. And essentially what that means is forever. So for certain clients we record data forever. We can do that for anybody. The thing that comes on the question most is data, piece of space.
What version of people and how much parts you guys have available.
So they can look at Trends like that, months and years and quarters and stuff like that. Other people really like having data for 90, maybe 180 days just because they like to go back and try to search some stuff on other stuff and anything older than that might be moot to them. So number of records to remove for paths. This isn't really something you guys would mess with too much again, but essentially it's just how many rows of data would it take out? So once it hits, like say for example, we had 90 days of retention, as soon as it hits the 90 day mark, it's going to start removing 1000 rows of data at a time until it gets back down to its quote unquote, its 90 day cap. And then it will start filling up again and it keeps that retention going. And then point of sale specific settings for micros and stuff like that. There really isn't too much to touch in here. For other point of sale systems there are a couple of specific settings, but it's not important to cover in this.
So next we're going to go ahead and go over, we're going to go over to a couple other settings in here under home. Obviously anybody can change their username and password. Nothing too special in there.
Next up is actually going to be associations. So one thing that I know we wanted to have covered in this was to show how to associate cameras to cameras. So if you guys have done this before, we're going to use ki as an example again.
Ki cameras keep going down. Oh, there we go.
So you see in here we have the terminals, we have, we have the cameras and we have the case server. So obviously whatever terminals you have associated to each camera is going to show which terminals you'll be seeing, what point of selfies you'll be seeing. And obviously if it's not right, you're going to see data coming from another venue being displayed on a camera view that might not have anybody there. It might be the right employee, might be completely wrong transactions.
So you always want to make sure you have those spot on obviously. And then the cases server, this is almost like having the export association, but a little bit different. So you can still export video without this in here. However, you cannot add that video to a case without the plugin associated. So if you go to export a video using the option down below by the player control or the little down arrow, you can actually export the video and that will export it to your machine locally. The E Connect server will grab the video from the dvr, work its magic and then it will ask you where you want to save it on your own personal machine. If you have the cases server associated and you actually want to try to save it to a case like we have over here, it's going to create the case, the E Connect server will pull the video again, work its magic, and then it's going to store it within this cases plugin under whatever case and folder and all that other stuff you want to save it under.
Again, it's pretty mandatory to have this associated each camera just because when you guys make cases, you don't want them saved to the E Connect system. Usually.
Can you show them how to set up cases on the back end? Because I've actually been to certain properties where they didn't have the IP address or anything set up for cases.
So I'll keep that to the side or yeah, we'll take care of it right after. So next I'm going to show you guys how to associate a camera to a camera. And so the reason you would associate a camera to a camera, it seems kind of useless is let's say for example, that you guys have a bar with two point of sale terminals and you have four cameras. And each four of those cameras are you looking at both terminals from different angles? Let's say you can't quite tell what an employee is doing from one angle. You know he's stealing, but you just don't know what he's doing. Or she. If you have a different angle from it, or if you want to get multiple angles because they are walking back and forth, you want to make sure you capture everything. If you associate a camera to a camera, what will happen is as soon as you try to create a case and start exporting video, our application will ask you, there are multiple cameras associated to this camera shot, would you like to export those other views from the same time as well? You hit yes. And what it's going to do is it's going to export the first camera shot that you were doing and then right after it's going to call up the second camera that has the other association to it and it's going to start exporting that video at the same time. This way you can get multiple angles of the same exact case at the same time. And this way you're not limited to just one view. You can have several different kind of views to see what's going on there and solidify your case. So no different than really associating a terminal to a camera or a case.
So let's say, for example, I want to associate AZ Chicken Shack Reg 3 and 4 to 1 and 2. Let's say these are the same venue, which it looks like there, and I just want to see a different set of angles that share a common point. All I do is just drag and drop and you can see that it has a camera associated to a camera. And whenever you guys associate, it does it both ways. It's a mutual agreement. So if you associate this camera to this camera, it's automatically going to associate this camera to this camera. So you don't have to do it two times or anything of that sort. Then obviously if you guys mess up and do the association wrong, you can hit drop to delete and it will remove it from both ends as well.
So moving on to users, I don't know if you guys have really added users or taken them out or anything of that sort as far as just user management, but this is where you would do it. Let's say you guys have a new user in the system, you want to add somebody. So we have a atkins. If you wanted to, you can add more information in here. If you want to add an employee, just hit Add user and it will also do it here real quick. And it's actually going to bring up. You see over here, the name changed, all the information went away. You can set a new username now. Usernames have to be a minimum of five characters. So you can't have. My name is Zach and I like to spell it short Z A C K I have to have. My user is actually Zach W because I asked P5 you can send the SMS address and an email address. So we do support alerts and it is something that's fairly new and I know some people use it, some people don't. So the SMS address is, if I remember correctly, if I wanted to have it sent to my phone, it would be like you do your phone number. So I'll just do 1, 2, 3, 4, 5, 6, 7, 8, 9 and then.
And then if I remember correctly, each cell phone provider has their own domain. So I think for Verizon, I think it's@vzwireless.com again if you want to do this, if you want to have email alerts sent to your phone for queries or users or whatever the case may be, you can do that. And all you need is your phone number. And then I have a list of the cell phone provider specific domains to use. But it would look something along like this.
Yes.
All you have to do is have that enabled and as soon as you have that you will start receiving text messages on your phone essentially with query information. So if you have real time alerts set up and you have this enabled every time, say Jane Smith runs a no sale in a void or something of that sort and you are really interested in that person, it will get sent to your phone and then you can tell your surveillance room or whomever that it will take a look at that person. Do keep in mind that if your site doesn't have any sort of Internet access, for example, what we are using here, these are our ASP customers. So if you guys are on the asp.
This is not an issue at all. You guys already have, you're already on the Internet essentially. For those of you that have closed systems and close networks, this would be something that we would have to work with your IT teams and try to get information like that routed through their network and then pushed out. So that would be a different process to approach. But for those of you on the ASP system, this is not an issue. Email address, pretty straightforward. You put on their email address and you check the box and it's going to essentially send alerts to your email. Same thing with the Internet scenario. So if you guys have wide open access, that will be something that will have to work with the IT or whomever controls your network. And then same thing with SMS in here. Once we have a user, let's see if we can scroll all the way down.
Let's do. There we go. We'll use Travis again as an example. So you see in here.
He'S got all this information in here. Then if we go to permissions, he's set as an admin. So depending on again your site, these permissions are going to vary, but the ones that will be consistent are going to be service only, sysadmin, viewer and admin. You might see some different ones added in here and I'll show you guys how to do that later on. So admin obviously is pretty much the highest of permissions. They'll have pretty much access to do everything. I have admin as well typically. That's why I'm able to see all of the options in here. If you guys have Viewer, Viewer is very basic. It's meant to view cameras and make queries and create cases. That's about it. They can't remove anything, they can't change anything. It's just a pretty much basic functionality user and that's what 99% of the users should be. You don't want to have too many admins in there. Making changes, messing things up, essentially the way you don't want them to be. Viewers should be for pretty much everybody. Sysadmin gives you a couple of more advantages over Viewer, but not many more. Again, admin takes over all. So sysadmin is somebody you'd want to give. Hey, can you make sure.
Joe Smith can have his password reset? Sometimes people forget their passwords, so if you want somebody else to handle that, you can give Sysadmin Service only is only for. It's for E Connect use only. We have a service, the Data event service that we use to parse data uses this set of permissions right here. And that's essentially to log into our API and insert data. So this is never used for any actual human user. It's meant for our application use only.
Going back to the user list in here, the service account essentially reflects that of the service only permissions. So if you go over here to permissions, this service only is also enabled with the service account. And again, it's really only used for our data events. It's nothing you guys have to worry about.
So going over here to Permissions, this is where it gets. It seems a little intimidating, but it's actually quite simple. So over here, let me just go like this. Move this down a little bit. Over here on the left hand side you'll see all the different permission groups. You'll see admin, service only suited for it. Admin. If you guys scroll down over here, you see sysadmin and viewer and these are all the permissions that we saw in that small list that I just mentioned. Within each one of these lists, if you look in here and you scroll within that, you'll see all of the permissions that they have. All of these permissions over here were picked from the list over here.
Each one of these has a default setting. You can add and take away stuff. So let's say, for example, let's look at Viewer. Like I said, viewers have very basic functionality. They can't remove or change anything. So if you look here in the permissions list, if you look at the last wording of each word, you see add, there's query, subscription, remove, which is only for their own user. But other than that it's pretty much add, update. They really can't change anything. But let's say, for example, they can't delete exports on their own, they can't remove exports of their own. Let's say, for example, everybody is using the system, everybody is making exports, and only the manager or the admin can delete those exports and it's getting a little overwhelming. You can give your viewers the ability to remove exports. So what you would want to do is.
In here you can do.
You wouldn't want to read each one of these permissions and see which ones you'd want to give them. So for example, if you wanted to.
Go back over to exports real quick. So if you want them to add an export server, which they wouldn't want to use.
We don't want them to export server remove exports. This is essentially what you'd want them to do. So you would drag and drop that over here. I'm not going to, but you drag and drop that in there, it automatically saves it. And then once they log out and log back in, they'll have the ability to remove exports.
Pretty basic watered down example. And so for each one of these permissions they're pretty self explanatory in the wording. I know when they tried creating these they tried to make it as obvious as possible like device remove device update. This is essentially for adding and changing cameras, device removal, removing the camera groups. So if you wanted somebody specific, if you wanted to create a new user. Looks like we have an admin specific for Cedar Fair. So whoever has this permissions over here is able to add cameras, add all these other things without having full admin rights. So it gives them a little bit more over what viewer can do.
And basic viewer permissions. There's other permission groups out there that I've seen where people only want to have a user not to view cameras, not to make any cases, not to make queries, but specifically just the admin system. Add users, remove users, add cameras, take away cameras, stuff like that.
If you wanted to create your own, you could just change the group name down here, hit add and what that finishes it's going to create a blank default with whatever you named it as. You can name it as back of house admin or something of that sort of. And then give them permissions that you want and have them login and test it out and see where it goes from there. Again, this is something that takes a little bit of practice, but once you get it it's really easy. There's just a lot of options in here as well.
Moving on to logical groups.
This is something that was requested by a lot of people. Kind of going back to where we had the access control list where I took the cameras away from Travis. This is how you take plug ins away from people. So let's say for example I'm going to use a casino environment as an.
And that's been very helpful and very cool to play with and work with.
So just to let everybody know, at.
The park level.
If I scroll this back up to the top, you'll notice that this is where you'll be able. Because last year a lot of people were asking, hey, Merch. Just wants to see Merch Terminals. Food and beverage. Just wants to see food and beverage. And as you can see across the top, I've started to, to divvy them up for Cedar Point. If anybody from the parks, if they, if they have a list of which locations they want to go for which employees, you can send that to me and I could create and build a logical group for you or I could show on the IT side or your admin side, whoever, whoever going to take care of it. How, how, how to set it up basically. So it's just out there. And again, you can reach me at investigationsconnect TV or you can reach me at Marcus Kelly K E L L E Y Connect tv.
Moving on. Almost finished here, actually. So let's say you wanted to add a plugin for somebody. Somebody.
Got promoted or somebody wants to help out with something, you can add plugins to them. And pretty much so it's saying here, add plugin to Kings island only for Marcus. I only want him to see ki Cameras again, I was just kidding. And I want him to see cameras. And now he has camera permissions back. So.
Pretty basic on this. You can select multiple employees, so you can just click and it will keep highlighting employees. Let's say, for example, you know for a fact these six aren't supposed to see anything but cases or anything but cameras, anything of that sort. That's how you do that. You select those and then make your selections down here at the bottom which ones you don't want them to see and hit the plus or minus sign and go about it that way. So the last tab over here under Users is import. So we can import values into our application using CSV files, which is comma separated values. And if you see here it says the form format is username, password, first name, last name, email address, phone number, permissions, blah blah. Some clients have this, some clients don't. If you don't, it's not a big deal if somebody already has something like this created and you want to import the users into the application. Totally cool. And it makes life a lot easier for sure if you have an abundance of users that you want to have. So it's just a cool feature that's added, but it's nothing that's mandatory or required.
So moving on to settings here. So this is for the email settings and kind of going back to email alerts. If you wanted to actually do that, obviously we would need a server address and this is going to be the server that's going to be handling the email requests. What kind of encryption for the smtp, which is a simple mail transfer protocol and all that other stuff. If you guys are interested in getting the email alerts. And your E Connect server does have access to the outside world, obviously through routing and firewalls and security and stuff like that, but it's still possible. This is something we can kind of go through the password setting. This is for those of you that want very, very encrypted passwords.
You can have a lockout count, you can have minimum complexity. Some of the stuff in here is a little tricky. So if this is something that you are very interested in, reach out to us at Support or just E Connect in general, we can help you out with it.
But we can have password expirations, we can put all that stuff on there. So if you don't want to make sure that people just don't have a password as their password and you want to actually make sure if somebody tries to brute force, they think they know a manager's login account or something like that, you can set these settings in here and it will make sure that if they log in too many times, it will lock them out. The minimum length of a password has to be at least 8, 10, 12, 15 characters, whatever you want. How long the lockout is in seconds, and then how many days does it take until you have to reset your password again?
That pretty much covers a chunk of the admin side training as far as when it comes to the application based stuff. Does anybody have any questions or anything, Comments, concerns?
So it doesn't look like anybody has any questions or anything of that sort. So if anybody does have any questions after the webinar, if you guys remember something later on that you can't remember now or something pops up, please don't hesitate to reach out to us again. I don't know if you've worked with me, my name is Zach Whitney. I'm one of the engineers here at E Connect, so go ahead and contact me anytime. Email is Zachary Z A C H A R I WhitneyConnect TV and you can also reach me at SupportConnect TV as well. If you guys are familiar with the Guys here in Loss prevention, go ahead and feel free to reach out to them too and they can get in contact with me. So if you guys have. Oh, we have an email here. Can the email send video loss? Good question. Short answer, no.
So we can't. Depending on what the system is, if it's our own recording system, we do have something that we like to use, it's called Nagios, but that is something that requires Internet access and that essentially it's a system monitoring application that we use.
What it does is it checks to see to make sure the connection to the video is still there and to make sure it's been recording within the last 30 minutes. That is only for using our own. We have our own in house video recording system that we use, it's called a media server.
So if we're using that we can definitely set something like that up. Assuming that the E Connect server has access to the Internet through specific ports that we use for the Nagios application. But if you're asking in regards of something like if you have your own DVR you're using, whether It's Pelco or ExacqVision or Synetics or.
Anything of that sort, that's nothing that we can detect. We don't communicate.
To keep it simple. We don't really work with the application or work with the integration in that sense it's more or less just about video control. So if you are interested in trying to get alerts for video loss and stuff like that, I would say that would probably be more in the hands of whoever your integrator is or whoever does the support for your DDR and see if they have any options like that.
So we have another question.
Can the server be set up to see a time server? Absolutely. So it's a very good question actually. So time is a very important factor of our application. If the time sync is off at all, even by a couple of seconds, it's very obnoxious to try to watch and try to watch a transaction happen if it's time sync is off. So normally how our time sync that we do works is obviously we always want to see if the client has a GPS of some sort that they use for a surveillance room or if they have some sort of an NTP server. So normally what we do is we would point the E Connect server to use that source of the time and we synchronize every five minutes.
Which part would you go to is.
Not within our application server based on that?
I know that. Ok, fair enough.
So for those of you didn't hear, Marcus was curious if there's a way to do it within the application, it's not done within the application, it's done on the actual Windows server itself. So going back. So normally we point the E Connect server to look at the NTP source, whatever that might be, and we synchronize with that every five minutes.
Now that we have that synchronized. Normally what we do after that is we make sure that the DVR system is pointed to the E Connect application, or to make sure that both the E Connect server and the DVR system, or nvr, whatever you have, are synchronizing essentially within milliseconds of each other. And the best way to ensure that, to make sure they are on the same exact time, is to have the DVR look at the E Connect server and have that be the NTP host for the video system. And then have the E Connect server point at the NTP site to the server itself so it gets the synchronous from there. So depending on what your environment is, some surveillance rooms have zero, have no source of ntp and they're still floating in time, if you will. And so normally what E Connect does is they provide a patch kind of into the IT network so we can get access to the IT server, to the NTP server on the IT side, I should say, and then have the surveillance system point to the E Connect and this way the entire property will be on the same exact time.
I hope that makes sense. I know I've watched it up a little bit and then it looks like we have. No, that was the last question.
So if anybody has any other questions, feel free to go ahead and shoot them now. If not, you guys can always reach out to us again afterwards and I can happily oblige you to any questions you guys have.
Just to let you know, next month in June, you can pass it on to everybody in your department. We will be covering just the basics of econnect. If you have anybody else that's interested in seeing a Back of House training, our next back of House training will not be until November. We do it about every six months. So I'm giving you our early warning now and we will also send out reminders as we go through everything. So I thank everybody for who came out today. And like Dax said, if you have any questions that come up maybe later on today or tomorrow or the rest of the week, feel free to shoot us an email at SupportConnect TV and we'll talk to everybody later. Thank you.
Thanks.
Sa.
More from Henry

Skip the line, not the security: Facial Recognition for Guest Experience & Safety



eConnect’s Red Light Green Light – The Most Advanced Facial Recognition Tool for Casino Entry


Skip the line, not the security: Facial Recognition for Guest Experience & Safety