Jeremy Ethier breaks down barbell row setup and form to build back size safely. Start with the bar over your mid-foot, hinge at the hips 15 to 45 degrees, then drive your elbows up and back with a strong scapular squeeze at the top. Wider grip hits your upper back; narrower or underhand emphasizes lats but brings in more biceps.
Questions this video answers
Approximately 15–45 degrees (stop where hamstring flexibility limits a neutral back).
3–4 sets of ~8–12 reps; optionally 10–15 reps with lighter weight for better muscle feel.
A 2018 EMG analysis (general claim that barbell row highly activates back muscles) and a 2010 EMG analysis by Brett Contreras (showing underhand grip increases biceps involvement).
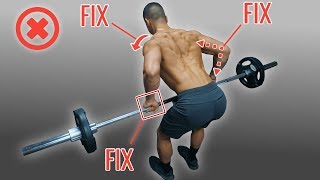
The barbell row is one of the most effective exercises at building a wider, thicker back. In fact, researchers from this 2018 EMG analysis of various back exercises have even gone so far to say that if a person had to choose just one back exercise, the barbell row would be the best option since it activates many of the back muscles to a greater degree than other back exercises do. However, this exercise is also one that many people get wrong, which is not only detrimental to back growth, but also places you at a high risk of injury, especially with a lower back. But luckily in this video, I'll go through a step by step tutorial showing you exactly how to perform the barbell row for maximal back growth. First off, let's take a look at the muscles worked Although the whole back musculature will be worked, the main muscles targeted will be the lats, the mid and lower traps and the rear delts. You want to mainly feel these areas of your back working as you pull the weight, but as you'll see in this video, by tweaking your form you'll be able to emphasize certain back muscles more than others. And do note that the lower back will also be heavily involved as it's going to contract asymmetrically throughout the movement, so you'll feel tension there as well. Now, with that being said, let's get into how exactly to perform the barbell row. First, let's start with how to optimally set up the barbell row, which as you'll see will vary depending on both your individual anatomy and your goals. To begin, get your feet set up right by placing them slightly wider than hip width but narrower than shoulder width. But experiment with this as taller individuals often do better with a wider stance. You can also rotate your feet outwards slightly if this makes the movement more comfortable for you. When looking down, the bar should lay over your mid foot to toe area. Next, it's time to grip the bar. As a general rule, grip the just outside the width of your knees, but you definitely want to experiment with a slightly wider or slightly narrower grip depending on your goals and what feels most comfortable for you. For instance, a wider grip will enable you to both pull the bar higher towards the sternum and flare the elbows out more, which will as a result hit more of the traps, the rear delts and your overall upper back musculature due to the greater transverse extension involved with Whereas the narrower shoulder width grip will enable you to both pull the bar lower towards your belly button and tuck the elbows closer to your sides, which now puts the lats in a more mechanical, advantageous position due to the greater shoulder extension involved and therefore prioritizes its development instead. And similarly, as for whether you should grip overhand or underhand, an underhand grip will enable you to tuck the elbows even closer to your sides and hence prioritize the lats even more, but it does come at the cost of greater greater biceps involvement and as shown in the following graph, this was actually analyzed and confirmed in an extensive 2010 EMG analysis by researcher Brett Contreras. Therefore, what I'd recommend is either perform the variation that targets the muscles you'd like to prioritize the most or simply perform a couple sets of both variations for the most balanced back development. In any case, though, you want to avoid going too narrow as this is going to cause your forearms to come out of proper alignment and lead to increased wrist and elbo stress. And at the same time, you want to also avoid going too wide to the point where your elbows have to excessively flare out. In this video, I'm going to stick to using a wider overhand grip, but just note that the same steps and tips apply for whatever grip variation you choose to use. Next, we want to get into the starting position of the rope and we do so by first deadlifting the weight up into a standing position, making sure to keep the back neutral as you do so. From here, push your hips back out while just very slightly bending the knees. While lowering the barbell down, you want to stop at the point where it feels like your hamstring flexibility limits you from going down any further without rounding your back. For most people this is going to be somewhere around a 15 to 45 degree angle as shown here, but as your flexibility improves and you become more proficient with the movement, you can gradually attempt to get more parallel to the ground for a greater range of motion to more effect. Work the back Some things to avoid when getting into the starting position are to avoid performing the movement too upright as this is going to emphasize more of the upper traps as opposed to the back due to it now resembling more of a shrug movement pattern. And avoid going past your end range of hamstring flexibility by getting too low to the point where your back rounds. As a result, as this is going to place a high amount of stress on your lower back. Instead, stick within your range of flexibility to enable your back to remain neutral. Once you're in the starting position, that's it for the setup and you're now ready for step two. Rowing the Weight first, keep your core tight by contracting your abs as if someone were about to punch your stomach and then row the weight up by thinking about driving your elbows up and slightly back until the bar just about touches your torso. And as mentioned earlier, if you're using a narrower or underhand grip to emphasize the lats more, the bar should touch lower on your body around the area of your belly button and your elbows should be tucked closer to your sides. Whereas if you're using a wider overhand grip to target the upper back more, the bar should instead touch higher on the body around the area of your sternum and your elbows should be at roughly a 45 degree angle. Regardless of what variation you perform though, as you row up, you want to squeeze your shoulder blades together and at the top position, your hips, back and head should all be aligned like so. Some things to avoid as you row are to avoid pulling the bar too high and flaring the elbows out as this shifts some of the tension to the upper traps and rear delts. Instead, avoid excessively rounding your back as you row. Instead, keep your chest up and core engaged to maintain a neutral back. Avoid internally rotating shoulder by letting it roll forward as you pull, as this puts the shoulder in a compromised position. Instead, lighten the weight and focus on pulling the shoulders back and squeezing the shoulder blades together as you row to prevent the shoulders from rolling forward. Once you've successfully rolled the weight up, it's time for the descent back to the starting position. Here you simply want to keep the core engaged and maintain your hip back in head alignment while controlling the weight back down until your arms are straight. As you lower the weight, you want to let your scapula naturally protract outwards like so. Rather than keeping them squatting, squeeze together and at the bottom position before beginning your next rep, contract the triceps to help minimize biceps involvement in the following rep, which will help just increase your back involvement. Some things to avoid during the descent are to again, avoid letting your back round and fall out of proper alignment and avoid simply dropping the weight every rep as opposed to actively controlling the eccentric, as this is a significant contributing factor to muscle growth that you'd otherwise be missing out on. After the descent, you successfully completed one rep of the barbell row and can continue performing the rest of your required reps in a controlled fashion using the tips previously outlined. So now that you've learned how to properly execute the barbell row, here's some additional tips that you should also be aware of. First off, to implement the exercise into your routine, I'd suggest adding three to four sets of the exercise with a rep range of around 8 to 12 reps, using moderately heavy weight, but feel free to use a high rep range of 1015 reps instead and lighter weight if this enables you to better feel your back muscles working. If you find that the bar blob row is too straining on your lower back, a modification you can make is performing it off of a rack instead and letting it rest on the rack after each rep. This simply helps reduce the demands placed on your lower back and can often help you better work your upper back muscles as well. A result, I hope you enjoyed the.
Video guys, and just remember that it's key exercises like the barbell row that are great for building muscle, but its effectiveness relies completely on how you perform it as this is going to prevent you from injury and enable you to build muscle faster and in the right areas. And this is exactly why within my Built With Science programs, we've not only carefully selected each and every exercise included in your step by step routines, but we've also taken the time to create in depth tutorials for each exercise such that you can build muscle with these exercises as effectively as possible while avoiding injury in the process. To join today, simply head on over to builtwithscience.com and take the Starting point quiz to determine what program is best for you. Anyways, please let me know how you like this tutorial and comment down below what other exercises you'd like to see me cover in this fashion. And I'll do just that. And don't forget to show your support by giving the video a like subscribing to the channel and turning on notifications for the channel as well as this all truly does help me out.
Thank you so much everyone.
I really appreciate the support and I'll see you next time.