A step-by-step spoken tutorial (YouTube) on performing barbell squats to maximize muscle growth and avoid injury. It presents four actionable steps—Setup, Creating whole-body tension, the Descent, and the Ascent—covering foot stance, bar placement, grip width, muscle activation, breathing/bracing, depth recommendations (advocating at least near-parallel/deep squats), troubleshooting (ankle mobility, weak core/glutes), and breathing technique for spine protection. The presenter references a 2019 study showing greater glute and adductor growth with deep squats versus half squats and closes with a CTA to a program quiz.
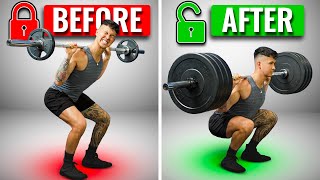
Squats are the king of poorly performed exercises. Do them wrong, and instead of growing nice quads and glutes, you'll feel aches.
And pains in your knees, your hips.
And even your shoulders. But follow these four easy steps, and I guarantee your squats will feel better and grow your muscles far better than.
They ever have before. Step one Setup. Your anatomy will determine what your perfect squat looks like, so it's important to find the right setup for you and your body before you even get under the bar. Lets start with your foot stance. Hold a light weight at your chest, set your feet hip width apart and squat down. See how that feels and make note of how low you could get. Then widen it by an inch or two and compare.
Even the slightest modification can make a world of difference for knee and hip pain, so keep going until you find what feels best and enables you to squat the lowest.
As for your foot angle, most people's joints will feel better with their toes pointed out slightly, so don't force yourself to keep them straight. And the wider the stance you use, the more your toes will have to turn out. Once you've found the right stance, it's time to grab the bar. Set your feet under the bar, bend your knees to get under it, and then place the bar on your upper back. But avoid placing it too high on the little bony bump at the base of your neck. It should be placed right onto the meat of your traps. Next, grip the bar with your hands as narrow as you can without feeling pain in your wrists, shoulders or elbows. The narrower the are, the more upper back tightness and stability you'll have when you squat. But if you have really tight shoulders or chest muscles, you may have to widen this. Once you grab the bar, walk it out by extending your legs to lift it out of the rack and then taking three careful steps. Take a little step back with one foot, a little step back with your second foot, and then use the third step to widen or adjust your feet to your ideal squat stance. Lastly, to keep you balanced as you squat, spread your weight evenly over your foot by making sure each foot has three solid points of contact with the ground. Your big toe, your pinky toe and your heel. You're now ready for step two, Creating whole body tension.
Now, at this point, you do not want to just squat down. You need to first activate several key muscles that will protect your back and.
Keep you strong as you squat down.
Failure to do this is why so many people have a really strong leg press that have a much weaker and unstable squat.
What The Start with the lower body. Screw your feet into the ground as if you were trying to touch your heels together. Then level your pelvis with the floor by tilting it back as if it was a bowl of water and you were trying to prevent it from spilling. Once adjusted, lock this in by squeezing your inner thighs, glutes and quads. For the upper body, avoid pointing your elbows back and losing tightness in your upper back. Instead, pull your elbows forward under the bar and pull the down into your meaty upper traps as if you were trying to bend the bar in half. This helps activate your lats and keeps your upper back stable. Finally, take a deep 360 breath into your waist as if you were trying to expand all sides of a weight belt, and then brace your core as if you just hopped really hard. At this point, you should feel your legs, core and lats all working.
You're ready for step three, the descent.
Pull yourself down into the squat using your hamstrings. Let your butt drop down between your heels and push your knees out in the same direction as your toes. Keep your upper back tight by pulling the bar down and continue lowering as deep as you comfortably can. As for how deep you should go, a 2019 study assigned one group of subjects to half squats and another group to deep squats twice a week for 10 weeks. Although both groups had similar growth in the quads, the glutes and adductors grew significantly more in the deep squat group. So your goal should be to squat down to at least somewhere close to parallel. If you use a narrower stance, you should be able to get a little bit deeper. If you use a wider stance, it'll be closer to parallel. But if towards the bottom of your squat, your upper body falls forward or your heels come off the ground or your lower back rounds excessively into butt wink. These are all signs that you're not yet ready to go that deep, and there's two main reasons for this. The most common reason is limited ankle mobility. In this case, try elevating your heels onto weight plates and see if that helps. The other reason is a weak core and glutes. In this case, you can try out a more stable exercise like Smith Machine Squats before progressing to the barbell.
But once you can get deep enough, you may notice that your knees end.
Up over your toes.
This is commonly believed to be harmful on the knees.
One study tested this by using a wooden barrier to prevent the knees from going over the toes. While there was a bit less pressure on the knees when compared to letting them travel over the toes, the stress on the hips and lower back significantly increased. So as long as your knees don't cave in or out and instead push out in the same direction as your toes, letting your knees go over your toes is perfectly fine.
Now, once you reach that bottom position, do not just let gravity drop you into that Last inch or 2. Research suggests this is the most important part of the movement for growth. So force your muscles to work by controlling the weight down and pausing at.
That bottom position for half a second.
Before moving on to step four, the Ascent. But first, just keep in mind that everyone's bodies are different. To maximize growth and prevent injury. It's important that you find the right exercises and the right form for your.
Individual structure and for a step by.
Step plan that takes care of all the guesswork for you. After this video, just head on over to builtwithscience.com and take our free analysis quiz to find the best program for you and your body. But for now, let's move on to step four, the Ascent.
The most common mistake people make here is shooting their hips back and letting their upper body fall forward. This puts a lot of pressure on the lower back. We want the chest and hips to rise at the same rate. To do this, drive up out of the bottom by pushing the floor away and thinking about driving your traps up against the bar. Keep your glutes engaged by keeping your knees in line with your toes rather than keeping them in. Continue pushing down against the floor and getting tall until your legs are fully extended, but as you come to the top, avoid letting out a big exhale. Instead, we want to maximize the pressure in your abdomen to protect your back, and you can do this by keeping your lips held tighter together as you breathe out to gradually let air out. Once you've let all the air out, take another deep360 breath in, brace and.
Repeat for another rep. Congrats, my friend. You have just done the perfect squat. You can give this video a watch.
Next to learn how to properly deadlift.
Without hurting your back and I'll see you next time.