How To Unf*ck Your Hips In 10 Minutes | Corrective Routine
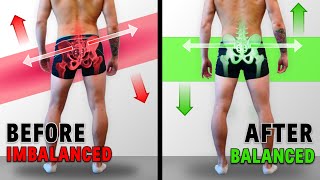
Sam walks through three tests to find hip imbalances, then shows a 10-minute routine combining mobility drills like the 90/90 and teapot with progressive strengthening moves. Do it 2-3 times a week and retest to track progress.
Are your hips tight? Do they ache or just feel off? When you squat, do you shift more to the left or right? Or when standing, have you noticed that one of your hips is higher than the other? If you said yes to any of those things, then you may have a hip asymmetry. Sometimes hip asymmetry happens because of the way that you're built, like if one of your legs is longer than the other. But in most cases, hip asymmetry occurs when you have muscular imbalances that you've developed from lifting or doing any kind of repetitive task, like simply sitting a certain way. Is this problematic? Well, although various asymmetries in the body are expected and perfectly normal, when it starts to cause pain, discomfort or affect your lifts is when it can start to be a problem and worth addressing. Today, I'm going to show you three tests you can perform to see if you currently have asymmetries in your hips. If you test positive in any of these three tests, I'll give you a home exercise program that focuses on strengthening weak structures and mobilizing tight structures to restore balance in your hips. Perfectly balanced, as all things should be. Test 1 stand in front of a mirror and palpate the top of your hip bones and orient your hands flat to the floor. Compare the level of your hands. If one hand sits higher than the other, then you may be positive for an unevenness in hip height. Again, this isn't necessarily problematic and in many cases this is normal, but for some individuals is a good thing to adjust for the reasons discussed earlier. However, this test is a static test and your deficits may only reveal themselves when you're moving, which is where Test 2 comes in. So Test 2 is looking for a phenomenon called the Trendelenburg sign. For this test, again, stand in front of the mirror or take a video from behind you. Level with your hips, then raise one leg so that your foot is off the ground. Hold this position for 30 seconds. Repeat this test on the other side. If you struggle to balance when doing this test, then you can lightly hold onto a wall for support. Now, normally, the pelvis of the raised leg should rise a little bit, as shown here, which would indicate a negative test. If the pelvis of the raised leg drops, however, and the trunk muscles flex towards your planted leg, then that would indicate a positive test. As for why this happens, whenever you get into a single leg stance, the hip muscles, like the glute medius of the grounded leg, have to work to stabilize your upper body over your pelvis. If these muscles are weak, then they're unable to stabilize the pelvis. In this case, the trunk muscles, like the abdominals, will take over their jaw by contracting and flexing your upper body to the side of their planted leg, which is why we see that hip drop towards the lifted leg in a positive test. So, for example, if you tested positive when raising your right leg, then that's an indication of weakness in the glute medius of your left leg and vice versa. Strengthening this muscle can help restore balance. For Test 3, we're going to take this one step further and assess your hip symmetry when lifting. Next time you squat, look in the mirror and pay attention to your hips as they come up from the bottom. Better yet, film yourself from the front and back during your next hold hard working set of squats. Ideally, your hips should rise symmetrically and in parallel. What some of you may notice, however, is that you preferentially favor squatting through one side more than the other, causing a subtle shift to the left or right as you squat. Sometimes this is caused by strength imbalance, where you preferentially shift towards your stronger hip, which may have been revealed for you in our previous test. In other cases, this is caused by a side to side hip mobility imbalance, specifically with external rotation, both of which will be addressed in our corrective routine. So now that we've run through the test, we're ready for the fix, which is going to involve a simple yet effective two step plan that anybody who tested positive for any of those previous tests can start incorporating right away to help improve any potential asymmetries. Step one is all about mobility. The first exercise focuses on the hips with what's known as a 9090 drill. To perform it, sit on the ground with one leg bent in front of the other, like so. Then, while keeping your torso stacked over your hips, transition from one side to the other by opening up your hips. Some of you may find that your front leg on one side has a more difficult time keeping its knee on the floor, which is a good indication that it's limited in that hip's ability to externally rotate. You can spend more time on that tighter side and if needed, you can support your body up with your arms. As your mobility improves, you can progress this move by bending your upper body over your front leg to get an even deeper stretch. Do this for three sets of 10 reps each side. The second exercise is called the teapot. This exercise is used to mobilize two muscles that can lead to a hip being elevated or depressed. For example, a tight Ql can pull up the iliac crest and cause it to be elevated. Whereas a tight TFL can pull down on the iliac crest and cause it to depress. This exercise will target both of these muscles. To perform it, stand with your back against the wall for support and cross your target leg behind the other one. Put one hand on your pelvis and reach the other hand overhead. You want to bend away from the target side. As you do so, you should feel a gentle stretch in your lower back and hips opposite to the side that you're reaching towards. Hold the end position for 1 to 2 seconds and then return to neutral. Do this for 3 sets of 10 reps each side foreign. Now we're ready to move on to step two, strengthening, which is arguably the most important step. Mobilizing is a great way to help with short term pain and mobility improvements, but gains from strengthening last much longer, which is why a combination of both is great. To get both short term and long lasting gains to do so, we'll use a progression going from two easier exercises in level one to two more difficult exercises in level two for you to move on to once you're ready. The first exercise in level one is the hip drop, which is going to work your glute medius isometrically as they stabilize the hips. For this exercise, find a small step or hop on a stable stack of books. You'll proceed to place one leg firmly on the step while the other leg hovers over the edge. Place your hands on your hips and begin to slowly lower your foot to the ground by letting the hip of that side drop towards the floor. Your planted leg should be kept straight at the bottom position. The hand of your drop leg should be lower than the hand of your planted leg. Hold this for one to two seconds and then raise back up to neutral in a controlled manner. Thinking about using the outer hip muscles on the side of the planted leg. When we drop the hip, we're strengthening the opposite glute medius which is isometrically contracting and that's where you want to feel it. So repeat this exercise on both sides for about three sets of 8 to 10 reps. The next exercise of this level is the sideline hip abduction, or what I like to call the Jane Fonda. For this exercise, lay down on your side with your hips stacked on top of each other, bottom leg bent, and think about driving that bottom knee into the ground for stability. Then, keeping your top leg straight, raise it not just up, but slightly backwards as well, as this is key to engaging the glute medius rather than other muscles. When done properly, you should feel this in the outer butt of the top leg. Hold the top for 1 second and slowly lower. Repeat on both sides for 3 sets of 8 to 10 reps. And for these exercises, it's also a good idea to train your weaker side first, just to help prioritize it a little bit more. So once you've mastered level one and your strength improves, you can move on to level two. The first exercise in Level two is what's called Hip Airplanes, an excellent move that was first brought to my attention by renowned researcher Dr. Stuart McGill. The great thing about this exercise is that it not only helps improve the hip strength of your planted leg, but it also works on your overall hip mobility at the same time. To perform these, I'd recommend starting out with assistance by holding onto a table or any fixture for balance. Keep one leg planted on the ground, grip the floor with your planted foot and then rotate your torso forward while keeping kicking your back leg behind you. Keep your back leg completely straight and the knee of your planted leg in a slightly bent position. Next, slowly rotate your hips in towards your planted leg and then away from it by opening up your hips. A cue that may help is to think about simply moving your belly button towards your planted leg and then away to the side. You want the movement to come from your hips as opposed to simply twisting your upper body. When done properly, you should feel a stretch in your upper groin and you should also feel the glute medius of your planted leg kicking in. To stabilize you. Aim for about three sets of just three to five slow and controlled reps on each side. Many of you will find that one side is much harder to stabilize or more restricted than the other, in which case you want to spend just a little bit more time working on that side. Once you're capable, you can then progress this move by using less assistance, for example, just one arm instead of two. And then eventually you can progress to no assistance by keeping your hands on your hip bones or out to your sides like so. The second exercise of this level is the RT squat, which helps tie everything together functionally and is especially helpful if you tested positive for hip shift when squatted. To perform these, wrap a light resistance band around a fixture and loop it around your knee such that it's placed pulling in towards your hip shift. For example, if you hip shift to the left one squatting, you'd want to wrap it around your right knee such that it pulls in towards the left and vice versa. If your hip shift was to the right. Instead, after you set this up, squat down and pause for two seconds of the bottom position while avoiding letting your banded knee collapse inwards. By pulling your body into the hip shift, your body will learn to reflexively pull out of that dysfunction by activating the weaker glute and and getting you back to where you want it to go. Aim for about three sets of six to eight reps. Now let's put this all together for you into a simple yet effective 10 minute corrective routine. Start out with the mobility exercises and level one strengthening exercises. Once you feel that level one becomes too easy, then progress to level two. You want to perform the four exercises for whatever level that you're on, in order and as a routine at least two to three times a week. This can be done at any time of the day or as part of your warm up routine before a lower body workout, for example, and then after you've used this routine for a little while. It's important to retest your hip balance using whichever test you failed on just to see if there's been any improvements. Then, once your asymmetries have been significantly improved, you won't need to do these exercises as often, but you should still consider incorporating some of them into your weekly routine while just making an effort to get off your butt and move more in general, as this is what's going to be key for long lasting results. But overall, it's important to pay attention to often neglected muscles like the ones I went through in this video to prevent potential imbalances and injuries from creeping up later on down the road. And for step by step, all in one program that shows you week by week exactly how to train to build muscle and strength without leaving any important muscles behind. Then simply head on over to builtwithscience.com and take our analysis quiz to discover the best approach for you and your specific body. Anyways, that is it for today guys. I hope you enjoyed this one. Please don't forget to show support by giving the video a like Leave me a comment down below as to what you'd like to see me cover next subscribe to the channel and turning on notifications for the channel as well as this all really does help me out. Thank you so much everyone. I'll see you next time. Sam.