This is an instructional YouTube video that teaches a 10-minute corrective routine to relieve and protect knees. The presenter shows two self-tests (an ankle dorsiflexion wall test and a hip internal-rotation test) to identify the limiting joint, prescribes specific mobility drills (combat ankle stretch; seated/banded hip internal-rotation stretches) based on the tests, then a set of stability/strength exercises (hip-airplane-style rotator with glute activation, slow 5-second-eccentric squats for 5 reps, and isometric wall squats). The video gives concrete prescriptions (reps, holds, sets, frequency) and suggests using the routine 2–3 times per week or as a warm-up; the presenter also promotes builtwithscience.com.
Questions this video answers
Within 1 inch of the wall.
The heel must not lift off the ground.
Differences between sides should be no more than 1 inch.
Lie on your back with knees bent at 90 degrees and feet elevated.
Drive forward, hold end position for about 5 seconds; repeat 5–10 reps per side.
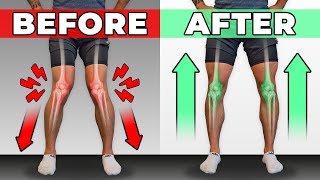
I'm going to show you how to fix your knee issues and protect your knees for good with a 10 minute corrective routine. We're going to go through two tests to figure out what causes your knee discomfort. Use those test results to determine the appropriate knee mobility and stability exercises for your body. And then combine this all into a 10 minute corrective routine with instructions on how and when to implement it. By the end of this video, you should feel immediate relief in your knee, have much better knee alignment when you move and squat, and will have a 10 minute routine to keep them protected long term. The most common type of knee pain is at the front of the knee. It's a warning sign that something is wrong, but we don't know exactly where. Typically, it's in the muscles and joints above and below the knee. As a result of our lifestyle, the increased time that we spend sitting leads to our glutes becoming weak and hips imbalanced on one side compared to the other. The time that we spend standing or walking in shoes that nowadays often come with a heel lift can lead to our ankles becoming stiff. The knee caught in between the hip and ankles and has to compensate to fill in these gaps. This leads to excessive stress on the knee whenever we then run, jump or squat. And over time, this can develop into pain or discomfort. So let's now do some ankle and hip tests to reveal where these problems lie. So the first test is going to look for ankle stiffness. What you're going to do is you're going to find a wall, take your shoes off, and you're going to make a thumb and fist with your hand. That's the distance that you want between the wall and your big toe. Once you get that down, you're just going to drive your knee forward. See how close you can get to the wall. In order to pass this test, there's four things that must happen. Number one is your knee must come at least within an inch of the wall, so mine's close enough. Number two is your heel must not lift off the ground. Number three is that your knee and hips need to travel directly straight. They can't rotate excessively inward or outwards as you do so. And number four is you're going to repeat this on both sides. And, and the differences between the sides shouldn't be more than 1 inch. Typically, the more restricted side is where you're going to be experiencing knee problems. And we're going to show you the ankle mobility exercise to fix this after we finish the next test. All right, so now let's test your hips to determine if you need to add the hip mobility exercise to your 10 minute routine. We're going to look for internal rotation. You're going to lie on your back, get legs up, knees bent at 90 degrees, and from here you're just going to kick your feet out to the sides as far as you can. And the main thing we're looking for here are differences between the two sides. So if one leg is like this and the other leg you can get this far, then this hip is clearly lacking in internal rotation. Once you finish those two tests, note down your results. Okay, so before we move on to mobilizing based on these tests, I want to emphasize the importance of doing tests like this because everyone's bodies are different. That's exactly what I've applied within my built with science programs. By developing a system that uses science to transform your specific body into a lean, muscular, pain free physique. It's worked for tens of thousands of people of all different body types, genetics and lifestyles. So if you head over to builtwithscience.com, you can do a really quick 60 second quiz. I'm gonna do it right now. So I'm gonna go with male Age range, 20s, fitness goal. Honestly, I'm gonna say lean and tone right now and fitness experience. I am experience. Then it's gonna guide you based on your goals and body type. So for me it was intermediate shred program. It's that simple guys. And once you get into it, it's a one time payment for lifetime access. Home workouts are included as a temporary free bonus and a 30 day money back guarantee. There is nothing to lose. But now let's move on to mobilizing. We're now going to use your test results to determine what mobility exercises you should focus on. This is going to help temporarily improve your restrictions. The stability exercises that we're going to add afterwards will be essential to help you keep those improvements long term. So if you failed the ankle mobility test, you're going to add the combat stretch. You're going to come down into a half kneeling lunge position, straighten up your hips, and from here you're going to drive your knee forward over your toes. But as you do so, you want to think about pulling yourself forward by driving your toes up towards your shins. This is going to activate your shin muscles to make the stretch more effective. So you're going to drive forward as far as you can, hold the end position for about 5 seconds, come back off and then repeat. For about 5 to 10 reps on each side. You want to start with a more restricted side before you then move on to the other side. So what you can do if you have a band to make the stretch even more effective is wrap it around the top of your foot just above your ankle there. And you're going to elevate your foot just onto a small elevated platform and make sure the band is pulling you back. And then you're just going to repeat the same stretch. But now you'll notice that you're able to get just a little bit more mobility if you found an imbalance in the hips. Internal rotation test, Add the following stretch Sit on your butt with your arms supporting you upright and legs out in a wide stance. Point your toes up to activate muscles that will help avoid aggravating your knee during the stretch. From here, drive your knee towards the floor until you feel a stretch. Hold that for a few seconds and then switch from side to side to get about 5 to 10 reps on each side. Now, if you have a band available, we can do an even more effective stretch. Wrap the band around a low fixture and loop it around the hip of your more restricted side so it's pulling you back. Get down on your hands and knees, kick the foot of your banded leg out and then sit your butt back into your heels. From here, if you can, come down to your forearms, rock back and forth for about 5 to 10 reps and gradually kick your leg further out for a deeper stretch. Repeat on the other side. Now your body is ready for the stability exercises. After we run through these, we're going to show you the full 10 minute routine and the best way to use it. The first move will help further open up your hips, but now while at the same time strengthening your weak glutes. Glute muscles with both arms, lightly grab onto a fixture like a table for support. Extend one leg back off the ground. Rotate your belly button towards the side of the planted leg to stretch your glute. Don't let your knee cave in as you do so. Then squeeze your glutes together hard as if you're trying to stop your friend from poking your butt. Keep them squeeze while you. Now rotate your belly button out to open up your hips. Hold this top position for about five seconds. You should feel a deep stretch in your groin and your glutes working hard to hold this position. Then rotate back in to complete one full rep. As you do these, think of a pole attached from your head to foot, rotating inwards and outwards Your whole body should rotate as one to make it easier. You can start with your leg just slightly off the ground and then gradually kick it back further to progress it. Aim to complete a slow and controlled 10 reps on each side. So for a lot of people, I find that the standard hip airplanes, they're hard to first get used to. And this is a great way to get that movement down if you have it handy. So you just grab a plate that can spin onto a squat rack and basically it's like you're driving a big steering wheel and you're going to use that to kind of guide you through the movement. This is a really effective way to learn how you should actually be doing the movement. So give it a shot if you have it available to you. So the next move is going to work your glutes as well, but by slowing the downward part of the movement, we're also going to start incorporating some knee tendon health work. So you're going to grab a weighted dumbbell, kettlebell, or even a book or weighted bag if you're at home, hold that at your chest, get into a squat stance, and we're going to take a total of 5 seconds to perform the downward part of a squat. But every second you're going to stop and squeeze your glutes hard and then you're going to continue stop, squeeze your glutes hard as you come down. You want to make sure that your knees are staying in line with your toes and go only as deep as you can without experiencing any pain or discomfort. And then you're going to come back up pushing through your midfoot. And then you're going to repeat for a total of 5 reps. So the last exercise is called an isometric. This is where the body doesn't move, but the muscles around the knees are contracting. It's going to help both provide instant relief to your knee pain or discomfort so that you can actually train afterwards. And it's also going to thicken the tendons around your knees to keep them healthy. The exercise we're going to use is the simple yet really effective wall squat. So you're going to sit into a squat with your back completely flat against the wall and your legs bent at about 90 degrees or whatever depth that is pain free for you. For maximum benefit, research suggests you want to hold this position for about 20 seconds at a time with a one minute rest in between. We're going to repeat this for a total of two sets to implement this 10 minute routine. For the best results, perform it consistently two to three times a week. You can even use it as a warm up routine right before your lower body workouts, although eventually the mobility exercises may not be necessary. Once your imbalances are fixed, the stability exercises are great moves to permanently integrate into your routine to protect your knee long term. Alright, so I've showed you how to un your knees, but odds are you could probably use some help. Unfin your shoulders and un your hips too. You can click somewhere here to view those videos. To check out my training programs, you can head to builtwithscience.com take our free quiz to find the best plan for your body. Thanks so much for watching watching. I'll see you next time.