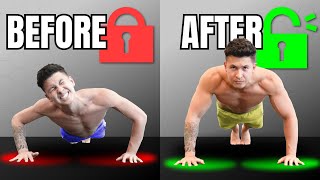
Learn proper push up form: hands under shoulders with elbows tucked 45-60 degrees, shoulders depressed, lats engaged, core braced. Use band assistance or incline if you can't do 10 strict reps, or add tempo and resistance if you can do 20 or more.
Questions this video answers
Approximately 45–60° (elbows tucked into an 'arrow' shape).
Slow the lowering to ~3 seconds (and 3 seconds up); later add a 1–2 second pause at the bottom.
If you cannot do more than 10 good push-ups in a row, use assistance (band or incline); if you can perform more than 20 good reps, use harder progressions (slower tempo, pauses, or banded resistance).
Loop a band around two fixtures so the band sits at about waist level when in start position; there should be about a foot of space between the bottom of the band and the floor (higher band = easier).
I'm going to take your push ups to the next level. In a few easy to follow steps. We're going to show you how to optimally set up your body position, how to stabilize that position during your push up by activating the right muscles, and finally combine it with a few modifications to unlock its maximum potential. After this video, your push up strength and the muscle growth you get from performing it will be taken to a whole new level. First setup, we'll start with hand placement. Set up your hands so that at the bottom of your pushup, two things happen. First, your forearms should end up on top of your wrists in a straight line. Avoid having your forearms bent at an angle. If your wrists aren't very flexible, you may need to hold onto dumbbells to accomplish this. The second thing that should happen is your elbows should tuck to roughly a 4560 degree angle. If you were to look down from an overhead view, this means your elbows should make an arrow shape. Flaring your elbows out will turn this into a T shape. We want to avoid this as it'll weaken our push up, make it more difficult to properly stabilize this exercise and put our shoulders in a riskier position for injury. Having these two things occur during your push up will help unlock several muscles that'll help maximize your strength as you push. Something we'll continue doing in steps two and three. Now to actually find your sweet spot. Hand position. Lie down on the floor with your hands at the level of your mid chest. Take a look at your forearm and elbows. Move your hands wider or narrower until you find the hand width where the forearm is positioned directly over the wrist and the elbows are tucked into that arrow position that we talked about earlier. Most of you will end up with a hand placement at the mid chest level and placed just outside the shoulders. So once you get your hand position nailed down, you're going to come up onto all fours on your hands and knees like so, with your knees under your hips. And once you're in this position, you're ready for step two. This step is where we're going to focus on turning on several muscles that'll help better stabilize your body as you perform your pushup. It's something that we teach our members how to do for all the exercises in our Built with Science programs, which I'm going to talk more about at the end of the video. This step is going to improve your push up strength dramatically because we avoid what's called energy leaks and maximize your push up potentials. Start by pushing your knuckle down into the floor and spreading your hands such that there's space between each of your fingers. Then this will help us incorporate more of our powerful chest muscles. Next, slide your shoulders down and away from your ears. You should feel your lats turn on as you do this. The lats are a powerful stabilizer muscle that'll help contribute to your push and strength, so we want to get them involved as much as possible. Then, while maintaining this activation in your lats, push the floor away to open up your shoulder blades. This is going to help integrate an important muscle to help further improve our stabilization and pushing strength. At this point, your head will likely be protruding forward. Adjust this by pulling your chin back to draw your head back in line with your body. This helps avoid stress in the neck and also puts our mid back muscles into a better position to help stabilize our bodies as we do the push up. At this point, we're done stabilizing the upper body and are ready to move to the lower body. After we stabilize our lower body, we'll be ready to finally perform our first perfect pushup. So we're going to start with the lower body. By setting your hips in the right position. To do so, think about tucking your tailbone like so. Once you've made it here, you're ready to step back, take a breath in, engage your core and then extend one leg back, dig your toes into the floor and squeeze your thigh really tight to fully extend your leg. Hold that. Then step the other leg back and squeeze the other thigh tight. Now you're ready to do a pushup. Don't forget, if a standard push up is too difficult, or on the other hand, too easy for you, I am going to show you how to modify them in the final step. But for now, let's look at the execution of a standard pushup. To perform your pushup, we're actually going to start by pulling and then pushing. So from the top position we established in step two, do not just let gravity flop you to the floor. This will cause you to lose all the stability that we worked so hard to create in the previous steps. Instead, think about using your back muscles to pull yourself to the floor as if you were performing a row. And your body will have to travel forward slightly as you do so in order to keep those elbows directly over the wrist like we talk about in step one. Then, once you reach the bottom position, while squeezing your butt and thighs, push away from the floor to the top to open up your shoulder blades again, as we did during our setup at this top position, your Head, hips and feet should make one straight line. Maintain this as you proceed to your next reps. Now that we've nailed down your perfect push up, it's time to modify it based on your current strength level and body typ. If you struggle with push ups and you can't do more than 10 good push ups in a row with the form that we previously covered, then here are some good options to build that strength up. This exercise is my personal favorite and something I've found to be more effective than the common modification of knee pushups. To perform it, loop a band around two fixtures such as in between a squat rack. There should be about a foot of space between the bottom band of the floor. The higher the height, the easier your pushup will be, so just adjust the height based on your strength level. Get into your starting push up position such that the band is at waist level and then proceed into your push up. The band is going to help provide more and more assistance the lower you go. The area of the push up where people have the most difficulty. So if you guys are unable to do the previous setup, then one alternative is just come on over here. You can go to a squat rack or any Smith machine, or even any table or elevated surface at home and just do your push ups on there, right? So that inclines it helps unload the upper body, makes the movement a lot easier and gradually over time to make it harder and harder as your strength improves. Just lower the amount of incline that you're doing and then eventually you'll be able to do the standard full pushup. Now, for those who have instead mastered the standard push up and can perform more than 20 good reps with them, it's time to increase the difficulty. This will be more effective for strength improvements and gains as opposed to just aiming to do more and more reps. And you have a few options to do so. The most convenient way is just to slow down the reps. Instead of taking one second to go down, extend it to three seconds. Do the same on the way up. Once that becomes too Easy, incorporate a 1 to 2 second pause at the bottom position as well. This is going to help apply more tension to the target muscles and result in more growth for the same number of reps. My personal favorite however, is something called banded push ups. And it's something that we incorporate in our build science programs because of how effective they are. They've actually been shown in the research to improve upper body strength as much as a weighted bench press does. So what you're going to do is you're just going to wrap a band around your back like so. Put the band in each hand and then you're going to come down into your proper push up position like we explained earlier. And then you're just going to perform a push up. It's going to add a lot more resistance throughout the push up, make it a lot more harder and just give you a little bit more to progress on with your push ups. By peaking the push up that's perfect for your level, you'll be challenging your body with the right difficulty rather than doing something that's too easy or too difficult for your body. If you want to maximize your growth and strength, then it's important to apply the same level of detail and execution with all of your exercises, not just your pushup. To do so, take our free 60 second analysis quiz over at builtwithscience.com and you'll find out which of our programs are best suited for you and your specific goals. Anyways, I hope you enjoyed this one. You can click somewhere here to watch some of my more videos and I'll see you next time.