The Best Science-Based PUSH Workout For Growth (Chest/Shoulders/Triceps)
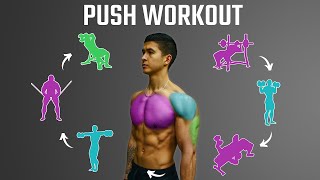
A YouTube tutorial (Jeremy Ethier) explaining a science-backed push workout within a Push–Pull–Legs split focused on chest, shoulders, and triceps. The video explains exercise selection, rationale from research (EMG and activation studies), recommended set/rep ranges, bench angles, grip cues, and a downloadable PDF program. It emphasizes progressive overload, optimal frequency (twice/week per muscle), and exercise-specific technique details to maximize hypertrophy.
One of the most effective workout routines you can use to build muscle is the Push Pull Leg split, in which your major muscle groups are split into three different workouts. In the push workout you train all of your upper body pushing muscles so your chest, your shoulders and your triceps. In the pull workout, you then train all of your upper body pulling muscles so your back, your biceps and your rear delts. And then finally in the legs workout, you train your entire lower body. These workouts are then typically performed for a total of six days per week, with a rest day in between every three consecutive days, but can easily be adjusted in a variety of ways to best fit your schedule. And the reason why the split is so effective for muscle growth is is because it trains each major muscle group at the optimal training frequency of two times per week, which we know is most effective for growth. It allows plenty of recovery time for each muscle and it can easily be tailored to fit different schedules, goals and your level of training experience. And in this video I'll show you how to get started with the Push Pull legs routine by going through exactly how to optimally set up one of your push workouts for the week based on the recommendations of some scientific literature and our anatomical understanding of the various pushing muscles. And do make sure to stick around to the end of this video where I'll be providing you with a free mobile friendly downloadable PDF of the workout for your convenience. The first exercise we're going to use is the incline barbell bench press, which is going to be used to target the clavicular head of the pecs, which makes up the mass of the upper chest and is often a weak point for most people. Yet it's key to achieving a well developed chest, and there's a couple of reasons as to why this exercise was chosen to do so. First off, we note that the bench press is highly effective at growing the chest, as recent papers have shown a strong positive correlation between bench press strength and chest size, which is probably not only due to the high amount of chest activation that we see with a bench press, but also because barbell presses in general are typically the most effective to incrementally add weight to and progressively overload over time if in order to continuously drive growth as you get stronger. And secondly, by implementing an inclined bench angle, we'll now be adding slightly more shoulder flexion to the bench press, which will as a result emphasize the upper chest to a greater degree given that this is one of its main movement functions. But with that being said, research has indicated that setting the appropriate incline angle is key when it comes to maximizing the effectiveness of this exercise for upper chest growth, and is therefore vital that you do so correctly. And although the optimal bench ankle does vary between studies, research generally shows a trend where we see increased upper chest activation when going from a bench angle of 0 degrees to 30 degrees, and then another slight boost in activation when we bump it up to 45 degrees. However, at the same time, we also see a resulting increase in anterior deltoid activity during each successive increase in bench angle, with 45 degrees eliciting the highest activation. Therefore, in order to maximize the activation of the upper chest and prevent the front delts from taking over, it does seem that an angle of 30 degrees is optimal, which is typically two notches above the bottom position for most benches. Regardless, though, it would still be a good idea for you to experiment with lower and higher bench angles just to see what best activates your upper chest, as this is going to vary for many individuals. And I would also recommend experimenting with a slightly narrower grip during this movement, as one paper from the Journal of Strength and Conditioning Research found that this not only boosted upper chest activation, but it also helped minimize the activation of the front delts during the movement as well. But when implementing this, ensure that your forearms still remain stacked vertically at the bottom position by adjusting your elbow angle during the press accordingly. And aside from that, we'll use a full range of motion here, coming all the way down to the upper region of your chest and and a rep range of 68 reps with relatively heavier weight. Next, we'll be moving onto the standing dumbbell shoulder press, which will be used to target the shoulders, but with most of the emphasis being placed on the front and lateral regions. And the reason for using the standing double press as opposed to its barbell or seated counterparts is based on the findings of a 2013 EMG analysis where the researchers found that the standing double press elicited significant significantly greater front, side and rear delt activation when compared to the other three shoulder pressing options shown here, which is likely due to the greater stability requirements of this movement. The only downside with this exercise, though, is that not only will overloading with heavier weight over time be much more difficult due to getting the dumbbells up in position, but the paper also indicated that you'll have to lift around 10% less weight than the other versions. But this really isn't much of a downside given that with exercise one we've already utilized a heavy compound movement that also stresses the front delts. It just makes sense to utilize the standing dumbbell press now in order to focus a little more on activating the side and rear delts. But in order to still ensure that you're adequately working the shoulders despite having to use a lighter weight, we'll slightly bump up the rep range for this exercise to a relatively higher 10 to 15 reps per set. Next, we'll be using the flat dumbbell press to now emphasize the sternocostal head of the pecs, more specifically the mid chest, which is important we do since we instead prioritize the upper chest by using an incline earlier on in this workout. And flat dumbbell presses are a great option for this since they're very effective at activating the mid chest. Illustrating this is an extensive EMG analysis by researcher Brett Contreras, where he analyzed the chest activity within 15 different chest exercises and flat dumbbell press was most effective at activating the mid chest. In addition, one of the unique benefits about using dumbbells here is that we're now able to use a greater range of motion for the chest than we could when compared to using a barbell like we did earlier. And for this exercise I would also recommend, at least periodically in your sessions to incorporate a slight 1 to 2 second pause at the bottom position of each rep. This will in effect not only add some more variety to your chest pressing movements, but but it's also going to help you build more strength out of the bottom position where most people are weakest in, by preventing your muscles from receiving any assistance from the stretch shortening reflex that you typically get at this bottom position. In addition, brief pauses in this position will also help strengthen you isometrically, which will in turn better help you perfect your form for the movement. Since you're now forced to maintain tightness without breaking down your form at this bottom position before you proceed to the next rep. And for this exercise we'll use moderately heavy weight for a rep range of 8 to 12 reps per set. Next, it's time to move on to lateral raises to now prioritize the side delts. Although they were worked to an extent during the standing shoulder press that we did earlier, lateral raises have been shown to elicit far greater activation of the side delts, and it is therefore a good idea to include in this routine given the importance of developing this muscle for a wider, more powerful looking physique. And as I've stated in past videos, to potentially make the lateral raise even more effective for the side delts, you can slightly lean in the direction of the raise like so. The reasoning for this is based on a recent paper which showed that one of our rotator cuff muscles, the supraspinatus, is most active during the beginning of the raise, whereas the side delts only start to become more active at around halfway up. So by leaning away, you're actually able to remove the beginning portion of the raise and as a result shifts slightly more tension onto the delts and away from the supraspinatus. And for this exercise, we'll want to focus on form and activation here by using relatively lighter weight for high rep range of 1015 reps. Next, it's time to revisit the chest with a seated decline cable fly that'll be used to target the lower region of the chest, which has yet to receive much emphasis, but is important to develop in order to sculpt that lower and outer chest region. So what you'll want to do here is set up a high incline bench and move the cables up such that they're slightly above the height of your shoulders when you're seated. Next, you want to perform a high to low fly motion and supinate your wrists at the end position by rotating your palms up and driving your elbows in. The high to low motion implemented here enables us to apply tension in direct line with the lower fibers of the chest, and the supination of the wrists at the end will simply heighten the lower chest contraction that you experience by enabling the elbows to travel inward to a greater degree. And for these, we'll again focus on maximizing activation of the lower chest by using relatively lighter weight and a higher rep range of 1015 reps. Lastly, we're going to move on to incline dumbbell overhead extensions to target the triceps. More specifically, though, given the added shoulder flexion of this exercise, we'll be able to effectively emphasize the long head of the triceps, which is important that we do in this workout given that it's responsible for most of the mass of your triceps and has yet to receive much attention from our previous pushing exercises compared to the other triceps heads. And for these, we'll use relatively lighter weight here and a higher rep range of 1015 reps, as this is generally just easier on the elbows. So, to sum everything up for you, here's what your push workout could look like. I'd recommend that novice lifters stay on the lower end of the volume requirements, whereas more experienced lifters can opt for the high recommendations of sets. And as for your second push workout, during the week, you want to simply stick to the same general outline and target muscles or but switch up the exercises accordingly. And for your convenience, I've compiled all of this information into an easy to follow, completely free, mobile friendly PDF for you to download and use for reference while you're at the gym performing this push workout. It'll show you the full workout, the rest times, step by step tutorials for each exercise and more. So to get a copy of it, just simply head over to builtwithscience.com pushworkout PDF and I'll send it right over to you. And I'll leave a link to that in the description box down below as well. So I hope you're able to see.
That when it comes to maximizing your time in the gym and building muscle most effectively, it's crucial that you not only have a reason behind each and every exercise that you perform in your workouts, but that you also pay close attention to how exactly you then go about executing them as the devil really is in the details. And for a step by step program that takes care of all the all of the guesswork for you and shows you exactly how and what to work out week after week in order to build muscle most effectively with science. Just like Michael over here was able to do in just eight months. Then simply head on over to builtwithscience.com to take the analysis quiz to discover which science based program will be best for you and where your body is currently at. Anyways guys, I hope you enjoyed this one. I put a ton of effort into this this video, so please return the favor by giving the video a like leaving a comment on the video as to what you'd like to see me cover next, subscribing to the channel and turning on notifications for the channel as well as this all really does help me out. Thank you so much for the support everyone and I'll see you next time.