The CHEAPEST Meal Plan to Lose Fat (HEALTHY & EASY)
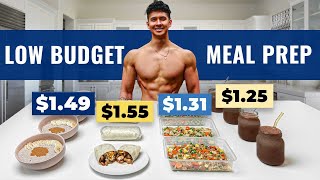
A four-meal daily plan for under $5 that delivers 2,000 calories and 150g protein, with recipes for overnight oats, freezer burritos, fried rice, and a protein smoothie. Jeff lost 1.8 lb on it in a week.
Questions this video answers
Just over $5 per day.
About 2,000 calories and over 150 grams of protein per day.
Each meal contains a minimum of 20 grams of protein.
Aldi (presenter used Walmart pricing due to local availability).
1.8 pounds lost from day 1 to day 7.
This is the world's cheapest fat loss meal plan. These four meals come up to just over $5 a day. They're absolutely delicious and dead simple to make. Today, I'll show you exactly what to buy, how to prep it, and we'll also see just how much fat my best friend Jeff can lose following this meal plan for seven days. So each meal contains a minimum of 20 grams of protein, with a grand total of around 2,000 calories and over 150 grams of protein. For most of you guys watching that, this might already be the perfect amount of calories and protein for you to start losing fat. But later in the video, I'll show you how to tweak the plan more precisely based on your body weight and gender. Now, before we dive into the first recipe, it's crucial that you buy the cheapest ingredients possible. And this starts by shopping at the right grocery store. And to find the best option, I created a sample healthy food cart across five of the most popular grocers and then ranked them from most to least expensive. Whole Foods came out on top. No surprise there. Trader Joe's was around 20 bucks cheaper, followed by Kroger, Walmart, and then finally, the winner, coming in at less than half the price of the exact same cart at Whole Foods, Aldi. Unfortunately, there's no Aldi close to where I live. So while I will use their pricing, I'll be getting the ingredients from the next best option on the list, Walmart. Speaking of ingredients, I now had to find what healthy foods were the cheapest. And after a ton of searching and crutch of the numbers, here's the protein, carbs, and fat sources I found that give the most bang for your buck and are what I heavily relied on to create today's four meals. Let's start with meal number one. So overnight oats is what I personally eat every single morning for breakfast before my workout. So it's great to see that all the ingredients were budget friendly. It takes less than five minutes to make, and you can make the night before and store it in the fridge. Simply use a mason jar or any container or bowl and first add in the oats. 0% plain Greek yogurt and protein powder. Whoa, whoa, whoa, whoa, Jeremy. Protein powder. That is expensive. So despite its rising costs, if you buy in bulk and calculate the cost per gram of protein, it actually comes out cheaper than salmon, ground beef, and Greek yogurt. It actually ends up around the same price as eggs, milk, and canned tuna. Not to mention it tastes amazing. It's Convenient. And it doesn't come with a ton of extra fat and calories like other protein sources do. Now. Now I'm using chocolate flavored protein here, but you can use any flavor your heart desires. And if you really don't want to use protein powder, then you can simply add a bit more Greek yogurt instead. Next, add about half a cup of water and then mix until everything is well combined. Pop it in the fridge, and in the morning you could top it with a banana, a tablespoon of peanut butter and a pinch of salt. And if you're ballant and you can afford it, feel free to go premium and top it with some sugar free syrup or a bit of honey. So as tasty as these meals are, chances are you're gonna get sick and tired of eating the exact same meals every day. So this is why, for Jeff's opening oats, I actually made a few of them with the original recipe. But for the next few, I switched it up by using a vanilla protein powder instead of chocolate, mixing in a diced apple instead of the banana, and also added in some cinnamon. And don't worry, later in this video, I'll show you guys the exact food swaps you can make within all of your meals for the day to keep them interesting. But for now, let's move on to lunch. So, one thing I've always hated about meal prep is the meals are only good for a few days before they get funky. That's why for lunch, we're having freezer burritos. Not only can these bad boys stay good for months, but I was honestly shocked at how delicious they were even after sitting in the freezer for a week. Here's the ingredients per burrito and here's how to make them. So first, you need the right tortilla. Normally I'd recommend a whole grain tortilla for some extra fiber, but in this case, we've got a compromise. White flour tortillas not only tend to be cheaper, but they will also be easier to roll and stay intact. The one I'm using is a large size and comes in at about 180 calories per tortilla. Now, unfortunately, our budget couldn't quite cover condiments or spices, but I'm assuming you guys have the basics. If you don't, then please make a quick trip to your parents place and snag some salt, garlic powder, pepper and soy sauce. These are key to making pretty much anything taste good. Oh, and don't forget to borrow some cooking spray as well to save you A bunch of calories compared to using oil when you're cooking. Once you got all that, dice up your chicken and cook in a pan with your pinto beans. Transfer that to a plate after it's done. Then chop off the onions and peppers and cook them in the same pan until soft. And don't forget to season both the chicken and veggies with salt, garlic, and a little bit of soy sauce as it's cooking. Once cooked, drain any liquid, mix in your chicken and beans, and then let it cool for about five to ten minutes. This step is crucial to prevent breakage of our beautiful tortillas. Next, toss the tortilla in the microwave for five to 10 seconds to soften it up and prepare to stuffer. Now, how much you stuff her with depends on how many burritos you're prepping for. You can weigh everything out to get exact, but I'd recommend just doing your best to divide the portions by the number of burritos you're making. For example, if you're prepping four burritos, cook four portions worth of ingredients and then simply divide the pan into four somewhat even portions. Then you're going to add one portion to the middle lower third of the tortilla, then top it with a serving of Cheddar cheese. Don't worry, the cheese is going to melt real nicely once you thaw the burrito. Now, once everything is added, it's time for the make or break moment. Wrap it. Now, I personally, I get way too anxious doing this step, so my lovely girlfriend will show you how it's done. Don't be nervous, guys. It's actually really simple. All you do is fold up the two sides and then roll it down the middle and you're good to go. Once rolled, wrap an aluminum foil or Saran wrap, toss in the freezer, and then once you're ready to eat, simply unwrap and heat it up in the microwave. Now, in my microwave, I took it straight from the freezer, I hit the defrost button and and after about five minutes it was good to go. But this won't be the same for everyone, so I'd recommend just using a low heat setting. Flip it over at least once, and every couple minutes just check to see if it's heated to your liking. And you can also just take it out of the freezer and bring it to work or school. Let it naturally thaw and then quickly heat it up when you're ready to eat. And if you have the time, feel free to toast it on a Pan to get it nice and crispy. And for you big spenders who can afford it, feel free to make this premium with a side of salsa or hot sauce. All right, so we've just eaten lunch and we're waiting for dinner to come around. Now, for many people, this is the toughest part of the day. You start getting a little peckish, and you end up snacking on pretty much whatever food you can find. So instead, try incorporating a simple, healthy snack like an apple. It will cost you about 77 cents, roughly 80 calories. But if you can afford the extra cost, it can make a huge difference to helping you stick with your plan. All right, it's dinner time. And this one's a childhood favorite. So growing up with a Filipino Chinese mother, fried rice was a staple. The fried rice recipe I have is delicious and super easy to make. And after we cook it up, we're gonna see what my mom has to say. So, in a pan, scramble three whole eggs, then set aside on a plate. Next, dice your carrots and cook them in a pan with your green peas and some garlic. And by the way, green peas are great for fat loss because they contain almost half the calories relative to their volume as rice does. So when you're dieting, you can easily save some calories by using less rice and replacing it with more peas, like we do in this recipe. Anyways, once the veggies are soft, add in your white rice. You can use brown rice if you prefer, but regardless, for the best fried rice, you'll want to use day old leftover rice from the fridge. This makes the rice firmer and prevents it from getting all clumpy when you cook it. Instant rice is also a good option. Next, add some soy sauce to your liking and then stir in your scrambled eggs and you're done. And for your premium members who can afford it, feel free to top it with some sriracha or chili garlic and add a side of steamed broccoli to increase your vegetable intake. All right, now it's time to see what my overly critical Asian mom thinks. Good. Yeah, really good. It's really good. Oh, my God. I think you guys realize, like, how much that means. What? It's just a new recipe. For the next video, I would eat it. Yeah. So I don't know about you guys, but after dinner, once it gets close to bedtime, that's when my sweet tooth comes out. No matter how good I was with my diet earlier in the day, the late night snacking always got the best of me. This is why we're throwing in a dessert to help satisfy your sweet tooth in a healthy budget friendly way. The recipe is super simple but tastes delicious in a blender. Simply add a frozen banana, one scoop of protein powder Chocolate usually works best. One tablespoon of peanut butter, three fourths of a cup of water, and about five to ten ice cubes depending on how thick you like your smoothies. Now if you don't want to use protein powder again, you could just swap it for a serving of Greek yogurt instead, but in that case you'll probably also want to add a sugar free sweetener like stevia to sweeten it up. Now for this one, if you really want to go premium, you could snag yourself one of these Ninja Creamies. With it you can use this exact same recipe and in five minutes it'll come out just like ice cream. Honestly guys, they're not sponsoring me at all, but this has probably been one of the best investments of my life. I make ice cream with it almost every single night. Well worth in my opinion in the description box down below. I'll leave a link to one on Amazon for those who are interested. All right, so we're going to check in on Jeff's results shortly, but as far how to prep these meals, aside from the burritos which you can make a whole week's worth and just put in the freezer, most of the meals you can prep about three to four days worth at a time. And to do so you just multiply the portions of each ingredient and then store it in the fridge. The smoothie though, I would recommend just whipping that up when you're ready to eat it. But as I mentioned earlier, while you can follow the plan as is, I highly suggest tweaking the calories and protein based on your body. For example, Jeff's already pretty lean and he's quite an active guy. And after using our Built with Science calorie calculator, which I'll link the description below, while the protein intake was on target, he actually needed a bit more calories to make sure he wasn't losing weight too fast. So I increased the serving of some of the carbs like the rice in his dinner, as well as some of the fats like peanut butter in his breakfast. And lastly, here's a list of some swaps you can make to each of these meals to keep them interested. To make things easy for you, I put the whole meal plan, instructions, grocery list, food swaps, and more into a free PDF you can download over at builtwithscience.com SL cheap meal plan and I'll leave the link to that in the description box and the comments down below as well. But now it's time to check in on Jeff and see if he got any results after following the meal plan for seven days. So from day one to day seven, Jeff lost a total of 1.8 pounds. Now some of this is probably water weight from just eating better, but some of that was definitely fat and you can actually see some slight differences in his physique. He also didn't follow the meal plan perfectly. He had a few meals out for family birthdays. Just goes to show you that this meal plan and a calorie deficit in general clearly works if you stick to it and you don't need to be perfect. Nutrition is key. So many people look the same year after year simply because they never prioritize their diet. This meal plan is definitely a great start, but if you want a step by step plan with workouts, meals and daily guidance, just head over to BuiltForScience.com and take our quiz to find the best step by step plan for you. I highly recommend giving this video a watch next for the easiest exercise you can pair this meal plan with to help speed up fat loss or give this video a watch next if you're looking for another budget meal plan, but this time focused on building muscle. Thank you so much for watching. I hope this helps and I'll see you next time.