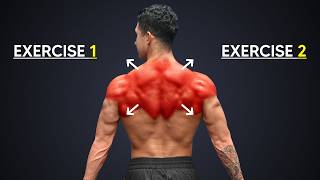
YouTube video (Jeremy Ethier) explaining two primary exercises to build upper-back thickness and definition by targeting six key muscles (mid/lower traps, rhomboids, teres, rear delts, upper traps, lats mentioned as separate). Exercise 1: a stabilized low-to-high row (sweet spot ~45° elbow path, ‘arrow’ shape) to target mid/upper back (mid traps, rhomboids, teres) using cables (preferred lat-pulldown bar wide grip just outside shoulder width; forearms should align behind hands) or a 30° incline chest-supported dumbbell row. Exercise 2: a higher-angle chest-supported row (~60° on bench) with elbows flared to emphasize elevation and rear delts/upper traps. Bonus technique: finish sets by taking the targeted scapular motion (retraction for exercise 1; elevation/shrug for exercise 2) to true failure with straight arms (4–5 partial reps). Programming cues: 3–4 sets of 8–12 reps, perform once or twice weekly; for dumbbells use ~10–15 lb heavier for exercise 2 relative to exercise 1. Mentions biomechanics coach Kassum and Jeremy’s Built With Science app (two-week free trial).
Questions this video answers
Approximately 45° (an 'arrow' shape).
About 30° (two to three notches up from the bottom on many benches).
Around 60° (about two notches down from the top on most benches).
3–4 sets of 8–12 reps, once or twice per week.
About 10–15 pounds heavier.
Did you know there's six key muscles responsible for giving your back a thick, powerful look? But each one has a unique function that most people's back workouts overlook. I know because after years of doing the best back exercises, my back still look flat. But once I learned how to properly target these muscles, my back thickness and definition completely transformed. Today, I'll break down the only two exercises you need to grow these muscles, plus an underrated technique that can help you build the kind of back most guys never achieve. The first exercise will focus on this area right here. The middle and lower traps, rhomboids and teres muscles. Usually, people use wide grip barbell or pen. Lay rows to target this area. Now, while these can build an impressive back, they demand a lot from your lower back to keep you stabilized. Plus, if you have a longer torso like me, the increased lever makes the movement more challenging to recover from, especially as it gets stronger. Nowadays, I've seen much better results by training my lower back separately and isolating my mid and upper back with a stabilized low to high row. Now, I'll show you this on cables first and then show you a version on dumbbells. But there's two things you need to get right with the setup. First is the arm path. If you do a row with your elbows tucked to your sides, you'll hit more of your lats. Go too high and you'll not only limit how far back you can pull, but but you'll also start hitting. Some of the muscles will work with exercise to the sweet spot for this exercise is right around 45 degrees or an arrow shape. Now, most people row using the V grip here. While this can work, it just doesn't let you angle your elbows out quite like we want. And it can get really uncomfortable on your wrist, especially at the end position. A better option is a simple switch. Use a lat pull down bar and a wide grip. You want to grab it just slightly outside of shoulder width. But you can tell if your grip is actually correct based on your body by paying attention to your forearms when you pull. If your forearms angle in, you'll want to go wider. If they angle out, go narrower. They should line up directly behind your hands as you pull. Next, you want to set up your pulling angle. And to hit the most back muscles at once, you'll want a row that goes from low to high. However, there's a sweet spot.
You should choose an angle where it feels like it's mostly back.
I see.
And just a little up. If it starts feeling like it's more of a shrug than it is pulling back. Then, basically, then we're transitioning into the next exercise.
That's coach Kassum, biomechanics expert obsessed with finding the best way to train each muscle. Now, his pulley was adjustable, so we just moved it lower to get the proper angle. But if you're just using the standard pulley like me, you can replicate this by bracing your core and then leaning back slightly. You can see now how the pulling angle is as if the cable was set lower. You can quickly tell if you lean back too far. If it starts to feel like more of a shrug rather than a row. Once you get that angle right, lock your torso and don't let it move. Then you'll want to avoid making the biggest mistake that'll stop your back from growing. So if you sit most of the day, especially if you're slouched over, you're never really using your back muscles. And so when you go to do a row where even if you try to use your back muscles, guess what takes over instead? Your arms. What I call the arm pulling mistake. I know because I was one of them. My biceps basically stole all my back gains until I learned how to actually use my back. They can tell you're an arm puller if when you row, your arms are moving, but your shoulders are staying in the same position or they're actually rolling forward. Now, to fix this, you need to understand that the main role of the muscles we're trying to hit is retraction, pulling your shoulder blade back and in towards your spine. And. And so to get them to do that, when you rope, you want to let them open up fully at the start of each rep. Then start the rep by thinking about pulling back and out with your elbows, and then keep pulling back as far as you can. I've also found it helpful to actually watch my shoulders as I pull, making sure they not only move forward at the beginning of each rep, but actually move backwards as I pull the weight rather than staying in the same place and letting my arms do all the work. A cue that might also help is is rather than thinking about pulling the bar to your chest, think about opening and pulling your chest towards the bar as if you're doing an inverted row. The motion should almost feel like a breaststroke. And when done properly, you should feel your mid back and some of your upper back muscles work it. But what if you don't have cables? Well, even if you just have a bench and dumbbells, if you're smart about what exercises you do, you can still hit the exact same muscles. That's the exact approach that we take with our Built with Science plus app, where where if members don't have access to equipment for whatever reason, one tap of a button, they'll switch to an exercise that hits the same muscles. Now, in this case, you want to set an incline bench to about 30 degree, usually two to three notches up from the bottom. Lay your chest on it and hang your arms down. Notice how this now replicates the same low to high pull that we did on cables. From here, pull your elbows back in that arrow shape I mentioned earlier. Now, in this case, your arms might try to take over your back, but bending your forearms in as you pull, maintain tension in your back by keeping your forearms directly below your elbows. It can also be helpful if, rather than thinking about pulling the weight, you think about pulling your chest through the bench. Now, if you have longer arms or you just find this awkward with your female pillows against the bench, you can do a single arm version by bending over with a wide stance and supporting one hand on an incline bench. Just keep your body angled up slightly to replicate that low to high pulling motion, and then simply pull your elbow back while keeping it angled out. But although this first exercise is great for building thickness in your mid back, we need exercise two to make sure your upper back muscles don't get left behind, mainly the rear delts and the upper fibers of the traps. When well developed, these muscles pop not just from the back, but from the front as well. Now, unlike in exercise one, where the mid traps and rhomboids are mainly responsible for retraction, the upper fibers of the traps lift the shoulder blade up in what's called elevation. So we still want to do a row, but one that involves more of an upward shrug motion. Now, you could simply perform the cable row from exercise one, but with a steeper lean back. A better option though, is to use the same bench and dumbbell setup from earlier, but this time use a higher angle. Around 60 degrees is the sweet spot, which on most benches is two notches down from the very top position. Once you have that set while standing, rest your chest on the bench and then pull your elbows back, but this time keep them flared out wider than we did in exercise one. It's not quite an upright row. It's essentially a very low to high row with the elbows going up and slightly back. Basically, if you can imagine a reverse dip motion, that's exactly what we're going for. Now, if you do this properly, after you Do a set and the blood starts flowing into your muscles. You should still feel this in your mid back, but most of the pump and tension should be higher in your upper traps. Now, as for weight, if you use dumbbells for exercise one, you should be able to go about 10 to 15 pounds heavier here. But even with these two exercises, your back's not going to grow as fast as it could without the bonus technique that I promised from earlier. Here is exactly how it works.
Your traps are not likely to be the thing that fails in that exercise. Your rhomboids are not likely to be the thing that fails in the other exercise. So these are good candidates to finish with just the elevation or just the.
Retraction motion for the first exercise after you can't do any more full reps, rather than trying to bust out more reps by using your arms or momentum, take your back to true failure. By keeping your arms straight and focusing on simply opening up your shoulder blades and then using your mid back muscles to squeeze them together, you should be able to bang out at least four or five reps like this. And then for exercise two, you want to do the same thing, but this time focus more on shrugging the weight up using your upper traps.
And it's probably going to feel natural to let the elbows flare a little bit on these. But as long as you're just emphasizing the shrug motion and not trying to really pull on the dumbbells, then whatever, whatever elbow flexion happens is, is fine.
Now, I personally do this after every single set, but start out with just trying this on your last set. This, or you could even do a four set where you focus just on this motion and then consider ramping it up from there. But guys, remember, this video focuses on back thickness and definition. And if you do these two exercises for three to four sets of eight to 12 reps once or twice a week, that's going to do the job. But you can't forget about back width, which is where the lats come in. And for the two best exercises to help you grow the lats, give this video watch next. But if you need some more help and you want me to take care of all, all the guesswork for you for both your workouts and your nutrition, then try two weeks free of my new app over@built science.com it's transformed thousands of people and I guarantee if you follow the plan, it'll work for you too. Thank you so much for watching and see you next time.