The PERFECT 5 Minute Posture Routine To Increase Your Height
A five-minute routine of exercises targeting your back, shoulders, and neck to improve posture and reverse the effects of sitting. The speaker explains the science behind posture issues and shows you how to implement the routine.
Questions this video answers
146 of 200 students
Less than 53 degrees (craniovertebral angle)
One minute per exercise
One to two times per day
builtwithscience.com PosturePDF
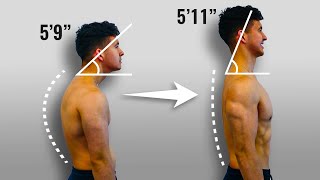
Can we do exercises to make ourselves taller? Yes, but anything we do will only reveal our natural height. In fact, many people who have applied my past posture routines have noticed significant height improvements. Here's Alex and Abdullah, who both grew by 3 centimeters. Here's Aljoshka, whose parents even noticed this height increase. And here's Gotan, who instantly gained one and a half inches after doing the exercises. How does this work? Well, well, many of us sit for most of the day, and when we do, we sit like this at work or like this when driving, even when we're eating. Over time, our bodies will learn to become extremely efficient sitters and will lock us up into this hunched over, head forward position. This can not only reduce our height, but can also create feelings of stiffness and negatively impact our mobility. There is, however, a five minute solution that can help improve your posture and undo the damages of prolonged sitting and maybe even give you an extra inch or two of height as a bonus. Today, I'll show you what exactly that is and how to use it. First, let's do a quick overview of the routine and the science behind it. If we take a look at the most common sitting posture, you can see how certain joints get locked up in poor positions. To improve our posture and relieve stiffness, we want to look for exercises that not only move these joints in the opposite way, but also strengthen the weakened muscles needed to keep the joints in the proper position for good. For example, if our head is stuck forward in extension most of the time, we'll benefit from an exercise that reverses this motion and trains the deep neck flexors that pull the head back. We'll apply this concept to the three most common problem areas and the areas that affect your height the most. The back, the shoulders and the neck. Let's start by focusing on your back. The first exercise is going to help improve your ability to rotate your mid back. Based on how you sit, though, you may be more stiff higher up in your back or lower in your back. I'll show you how to adjust your form to find your most problematic area. First, get on all fours and sit your hips back towards your heels. Place one hand extended out in front of you and the other held behind your neck. Then bring your elbow down towards the floor and while following your elbow with your eyes, rotate your elbow up towards the ceiling as far as you can exhale as you rotate your elbow up and push down into the floor with your planted hand. Hold the top position briefly and then come back down for more reps before moving over to the next set. Over time, try to rotate your elbow further and further. Now, the closer your butt is to your heels, the lower in your spine you'll feel the movement. So first try it with your hips on your heels like we just did. But then try it with your knees semi flexed and then your knees at 90 degrees to work higher and higher on your back. You'll want to focus on the area that feels the tightest. And as for how many reps and sets to do, don't worry, we're going to cover all of that in the full routine at the end of this video. For now, just focus on the form. Next, we're going to focus on extending your back out of its rounded position and strengthening some of your back muscles. This exercise is a great option to do so because if you go joint by joint, the entire body is almost completely reversed in this stretch position when compared to a typical sitting posture. But it's important that you pay close attention to form. To avoid aggravating your back. Lay on your stomach with your feet about hip width apart. Point your toes down and place your hands by your sides, positioned directly under your shoulders. Next, contract your quads so that your knees are off the ground. And then bring your shoulder blades down and back. From here, think about bringing your upper body forward and up by using your mid back muscles. You want to try to at least get your chest to the floor, but but go up only as far as is comfortable for you and without any pain. Hold that top position for a second or two and then come back down. And note that you are not muscling your way up by pushing your arms. Your arms are simply there for stability. When done properly, you should feel the muscles in your mid and low back activating to lift your upper body over time. Try to extend higher and higher. Now guys, before we move on to the shoulders, I want to emphasize that while these exercises may look easy when I do them, and it took me a long time to improve my mobility to get to this point, and many of you will find them quite challenging when you actually try it. So don't worry if your form doesn't quite look like mine yet. Go with your eyes and go as far as you can. Bloody hell. Let's go. Nice. Don't use your arms. Good. Breathe. Come back down. All right, so now that we've unlocked the spine, we'll be better able to work on your stairs. Stiff shoulders that are rounding your forward into a locked up position and also contributing to your forward head posture. The first exercise will focus on Loosening up the shoulders Grab a band, towel or broomstick and hold it with a wide overhead grip. Pull your hands apart to create tension and then raise the band or stick over and behind your back as if you were making a big circle. Try to go as far back as you comfortably can and aim to go lower and lower to make a bigger circle over time. But avoid arching your low back and keep keep your core braced and once that becomes easy, you can make it harder by using a narrower grip. So the previous exercise helped us loosen up our shoulders, but now we want to strengthen our weakened back and shoulder muscles. To do so, we're going to use what I call reverse wall angels. Kneel in front of a wall with your knees, chest and forehead in contact with the wall. Brace your core and then, while keeping your arms straight, move them in a big circle overhead as high as you can and then back down. As you do so, try to keep your arms and hands a couple inches away from the wall and think about pushing your arms out away from you. To better engage your back muscles, avoid leaning back and arching your low back. Instead, keep your back straight. The only movement should come from your arms. When done properly, you should feel this in the muscles of your mid back and shoulders. If, however, you feel this more in your upper traps, try performing it on the floor or on a bench instead, as your mid back muscles may not yet be strong enough to perform this upright. If, on the other hand, you find it too easy, you can add pulses to each part of the movement and even add a bit of weight in your hands. Finally, we're ready for the last piece of the puzzle, the neck nerd. Neck, forward head posture, whatever you want to call it, is extremely common nowadays. In fact, in a 2020 cross sectional study, researchers took 200 university students and assessed their cranial vertebral angle, which is typically the angle used to assess forward head posture. They found that 146 of the 200 students exhibited a craniovertebral angle less than 53 degrees, which the researchers used as a criteria for testing positive for forward head posture. Odds are you have some degree of this as well. In fact, your head is probably sticking out right now watching this video, and I bet you probably just corrected yourself as well. That's great. But to fix this for good, what we need to do is actually pretty simple. We just need to strengthen the deep muscles in your neck that have become weak and are failing to do its job of keeping keeping your head in its upright position. In fact, in a 2021 review every single study that focused on strengthening these deep neck muscles helped the participants successfully reverse their forward head posture. As for the strengthening exercise we're going to use, although it may not look pretty, it's extremely effective and can be done anywhere. Sit down on a chair and while gazing straight forward, pull your chin straight back. You're not trying to jam your head as far back as you can. It's a very small motion of only a few inches, but as you perform it, you do want to make sure that you aren't leaning back or tilting your head up. Your head should move in a straight line directly back. You can also perform this against a wall. To prevent you from cheating and to have a goal of touching the back of your head against the wall, try to hold the end position for one second. Once that becomes easy, you can add a chin tuck to the end position by tucking your chin down as if you were trying to give yourself a double chin and holding that for a second or two before returning to the start position. When done properly, you should feel the deep muscles under your chin really working. Alright, so now that we've gone through the exercises, let's cover how to implement them. For the best results. You're going to do each exercise for one minute. Within that minute, take it slow and try to do as many quality reps as you can. Quality is far more important than quantity here and to help you guys out, I've also created a completely free downloadable PDF that contains the full routine and and step by step tutorials to guide you through each exercise as you perform it. To download it, just head on over to builtwithscience.com PosturePDF implement this one to two times a day. Make an effort to get up and move more and you'll very quickly feel and see a difference. And don't forget to measure your height before and after as well and leave a comment below if you managed to gain an inch or two. If you didn't, don't worry about it. Embrace your height, ignore anyone who puts you down about it and enjoy the many other benefits that this routine has to offer. Now, this routine does heavily focus on the upper body, but odds are most of you have tight hips as well as glutes that could use some awakening from while you're sitting. So here's a video to help work on your hips and here's a video to help work on your glutes. And if you want to take things a step further to look and feel great, you can check out my step by step programs over@builtwithscience.com thanks so much for watching. Don't forget to subscribe and I'll see you next time.