BRAND NEW - Abelo 6 Frame Nuc - Unboxing and Review
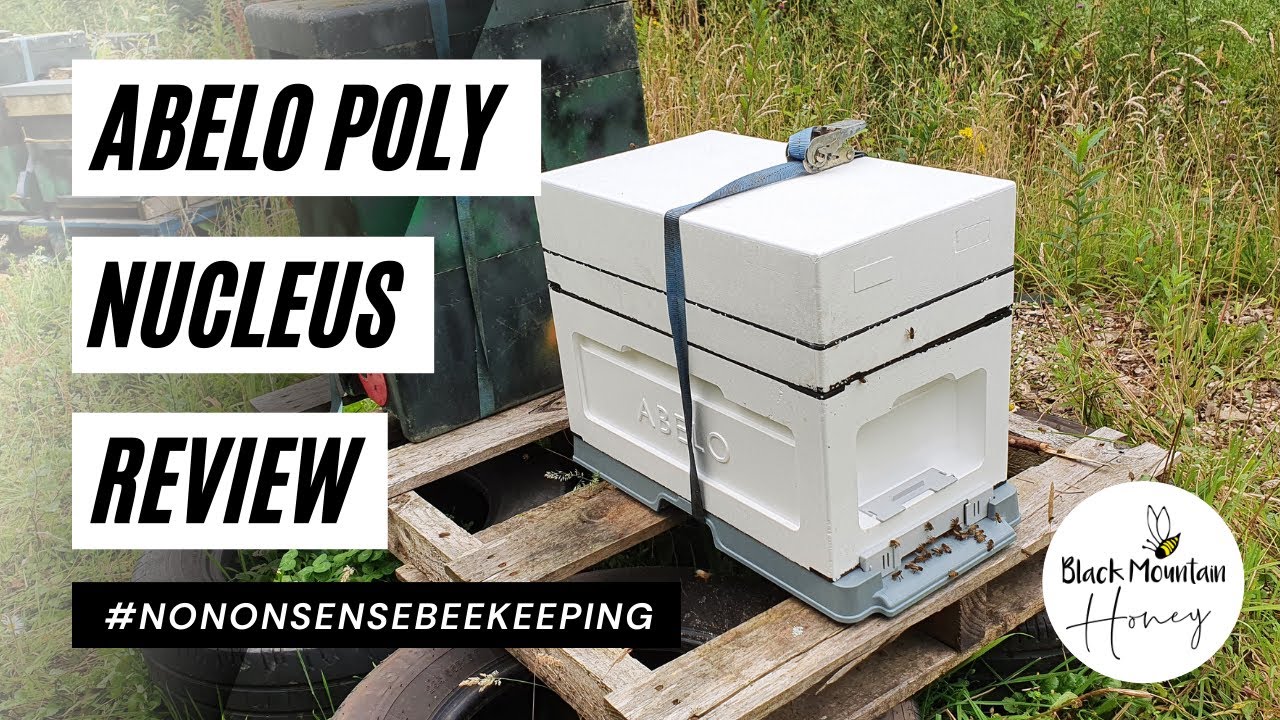
In this episode of No Nonsense Beekeeping, Laurence Edwards of Black Mountain Honey unboxes and reviews the new Abelo 6‑frame poly nuc. He discloses that the nuc was supplied free by Damien at Abelo and emphasizes that his opinion is unbiased. Laurence walks through each component – the roof, Ashford feeder, crown board, brood box, and injection‑molded floor – describing materials, dimensions, and functional features such as dual entrances, deep fondant cavity, heavy insulation, removable plastic inserts, and built‑in ventilation and drainage. He evaluates cost (£54.99 unpainted, £59.99 painted) and argues that the higher price is justified by the robust construction and flexibility, including the ability to run two queens or a vertical split, and to overwinter with shared heat. After the detailed unboxing, he demonstrates moving the nuc to the apiary, transferring frames and a queen, and explains hive orientation and entrance sizing. He promises regular seasonal updates on colony performance, queen‑rearing experiments, and overwintering outcomes. The video concludes with a brief note on prior reviews, a call to action for subscribers, and a link to Abelo’s website.
Chapters
Hi, I'm Laurence Edwards from Black Mountain Honey. Welcome to another episode of No Nonsense Beekeeping. Today we're going to take a look at the Abello 6-frame poly nuc, the new edition. So as soon as I saw these on the website, I was really, really keen to get my hands on a copy of this and to do a review for you guys so you can see what the new Abello 6-frame polynuc is like. Full disclosure, Damien from Abello has sent me this one free of charge so I can give it a review and give you my honest opinion of it. So I'm not paid for the review, I've just been sent the nuc for free. So there we have it, full disclosure. I have to say though, it looks like a really, really good, well-built polynuc. So in this video, I'm going to give you my full honest opinion, do a little bit of a review in terms of the features and how it looks straight out of the box, We'll then cut to me in the apiary. We're going to put some bees in it, and then we'll give you regular updates throughout the rest of the season and then early into next year to show you how the bees fare in the Abelo 6-frame poly nuc. So this video though, we're going to start from the top, go through the, the roof, the crown board, the brood box, and the floor, give you some kind of like up-close detailed shots of how, um, the hive is put together, and then let you make your own opinions. Right, so we'll start off with the roof then. And as always with Abello polyhives and polynucs, it's absolutely rock solid. Looks very, very generic. I mean, I've got the unpainted version here, that's going to set you back about £54.99, and then the painted version is £59.99. So where I've kind of previously advised to go with the unpainted version because it's quite a lot cheaper in the big Abello Polyhive. I think I'm kind of leaning more towards the painted version of this, like for £5 extra, the quality of the paint that Abello give you— I've got a blue one as well— um, the quality of the paint that they give you is a really good quality paint. It's hard wearing, and I mean, there's quite a few bits to paint on here. I think for an extra fiver, I just go ahead and just order the painted one. Um, but I suppose the first thing to say while you're talking about cost is This is not a cheap Poly Nuke. Um, it's, it's quite expensive. It's definitely like way at the more expensive end of the market, but there's so many features and so many things that you can do with this Poly Nuke that you can't do with other Poly Nukes. And also the fact that it's kind of so solid, I really do think that it maybe warrants the additional cost. So I'm going to reserve judgment on that just for now. I mean, wait till I get it out into the field. It is a lot of money. But on first impressions, I mean, it's a really, really solid product. So I think you're getting okay value for money buying one of these Polynucs. So first of all, we'll start off with the roof. And like I say, the first thing you notice is it's weighty, it's heavy, in a good way that is. There's a lot of polystyrene in here. Got a nice smooth surface there. Obviously, if you're going to go with the unpainted, you need to paint these, give them a good coating. On the inside, you've got a full rebate all the way around the edge, which is nice. So it locks together with all of the rebates on the various components. Something that it does have, and something that I really, really like, 'cause it gives you additional flexibility, you've got entrances. They pop out like that. Good catch. So you've got 2 entrances on that side. And 2 entrances on that side. And that means that you've got the ability to run these as a top entrance nuc. Um, now that might seem like, okay, you can run it from a top entrance or a bottom entrance, does it make a huge difference? But the ability you have here, um, is you can run this as a 2-queen nuc. And that's really, really handy if you're running multiple kind of queen cell colonies and you want to add cells, you want to get queens mated. you can run this one as a 2-queen colony, and I'll show you how to do that on a later video. But that's a really, really nice touch, something that I like very much. So also this roof, you've got a very deep cavity, something similar to the new Maysmoor roofs. You've got a nice deep 50mm cavity in there, and you can use that for feeding fondant. So you can imagine, I mean, if you get one of those big 12.5 kilogram blocks of fondant, and you cut it in half kind of thickness-wise, you could get half a block in there. So you can get about 6 kilos of fondant in on your nucs. I love being able to feed a lot of fondant at once, and with this hive, with this roof, you can do that. So yeah, really, really like the roof. Very solid, got the rebate, got the additional entrances. It's thick and it's got the ability to feed a lot of fondant. So I like the roof. Next thing to look at then is the Ashford feeder, and we've seen this before. You get your little ventilated blocks. So as with all Abello hives, you get loads of little bits. Um, and like I said with the previous review I did on the Abello poly hive, I thought maybe the feeder was a bit small for the hive, whereas with the nuc, I think the Abello little Ashforth feeder is a perfect fit for it. It's a good size, you know what I mean? Probably kind of like across the rest of the competition in terms of poly nucs, it's about average in terms of amount of feed that it can hold. Um, but yeah, it works well. It's a good solid feeder and it comes included with the nuc, I think. I'll double-check on that and I'll put it up on the video. Right, so then the big difference on these nucs is you get this crown board. Um, now I can't believe how solid this crown board is. It really is like genuinely quite weighty. Um, and again, weighty in a good way because it means you've got lots of solid insulation All the way throughout all of this poly here, and then that sits directly on the top of the cluster. And that's how you get good overwintering performance, by putting a lot of polystyrene above the cluster. So what I would do in an overwintering setup is I would close everything up. So you've got all of these little gubbins again that you can take out, but on an overwintering setup, I would block all of those off with polystyrene. I would then take my roof and I would cut some 50mm insulation and fit that into the void there, and then I would invert it and put it on like that. And ultimately what that leaves you with is about 100mm of incredible insulation directly above the nuc, and that's what gives you the strong overwintering performance. So that's a really, really nice design that will work very well for overwintering nucs. which is what a lot of people use these nucs for, getting small colonies through the winter so you can turn them into production colonies in the following year. Right, so more on the crown board then. So it follows the same that you have the positive plastic rebate. So you've got the male version here, solid plastic, all embedded within the poly, um, and then you've got all of these little kind of poly inserts. So you've got 6 Circular poly inserts, and then you've got one strip poly insert, and that's where they come up through the feeder. So it leaves you with that— that's your crown board. And then you've got the removable plastic inserts as well, so they come out and you can have them completely removed. So what that does is it gives you the ability to run 2 colonies in one double poly nuc over winter with 2 queens. It's a really, really nice idea and something that I potentially will look at in terms of colony management throughout the year. So you buy one of these, okay, it's £59, it's a lot of money, but then if you add another brood box on top— I'm not sure how much the separate brood boxes are yet, but say, say they're £20 or £25— you're taking the price up to maybe £85, but you've got the ability to run 2 6-frame nucs in it. So it's kind of bringing the cost right down. And if that's possible with this hive, which I think it is, it's a really, really nice way of kind of maximizing, um, the economy of the hive. So what you could do with this hive is you could take your standard floor and brood box, and we'll move on to these in a little bit. Imagine you've got a standard floor and brood box there, we'll fill it up, so 6 frames of bees, and then you can take your crown board, put that on top. So you've got, do you know what I mean, the bees underneath can't get up. You mean to swear? And then you put another brood box on top, and then you have your roof on top of that with one of these entrances. And what that gives you the ability to do, so imagine there's another brood box there, is you've got one colony sitting here with the bees flying out in that direction, And another colony sitting down here with the bees flying out in that direction. But the massive benefit to that is that you've got these ventilation holes in the middle. These aren't queen excluders, these are bee excluders, so the bees can't move between the 2 colonies, but they can share the heat. So I really like that idea, um, definitely something that I'll look at. Maybe I'll have a go at taking 2 of these through the winter, colony below, colony above, and look at that as a process. But I think there's real, real scope for kind of adopting that. But anyway, we'll continue with the crown board. So you've got these 6 holes, you've got the female plastic rebate at the bottom, and then in the middle you've got lots and lots of thick 160 grams per liter steam molded polystyrene. So even just as a single hive, that's got loads of insulation just where you want it. It fits really nice because of the rebate. It's A little bit of wobble in it, but that's fine. You don't need it as a perfect fit. As soon as the bees start to propolise these things up, if it was a perfect fit, it would become difficult to get it on. So that little bit of wobble there is absolutely fine, but it can't— you can't push it off. So if I push there, I mean, I can't move that because it's fully rebated. I like this rebated system. I didn't like rebated systems kind of when I first started beekeeping, and I looked away from them. But I think these rebated systems, although they're not compatible with any other hives, as a standalone unit, I do think they work quite well. So yeah, so that's the crown board. So then moving on to the brood box, and when you pick up this brood box, like, wow, it is so thick, dense, and heavy. And not in a bad way, not in like a, oh, that's going to be really, really kind of laborious to lift, although it's not going to be quite as light as some of the other Polys. Um, but I think the performance in this is going to be really superior. There's so much poly in here, but you can just feel it. It's heavy, it's weighty, it really kind of screams good quality to me. So you've got a handheld on that and a handheld on that end, but then also you've got kind of narrower handhelds on these ends as well, so you can pick it up from all angles. Something that I'm really, really fond of. You've got the plastic rebates Positive on this end, and then plastic rebates on that end. What you've got here is that you've got frame lug gaps. So if you were going to double this up, if you didn't have that lip here, do a close-up. Then when you put another brood box on the top and you lift it up, it pulls all the frames up from underneath. Something that really annoys me. Something that I know about very well with Swienti hives. So. don't— we won't start talking about Sorenti hives. But yeah, like, absolutely love this brood box. Nice branding on the side. It's got their kind of standard plastic lip, so the frame— the frames can sit directly on there. It's a bottom bee space hive, so the frames will sit flush on the top like that. A few people have reported kind of pooling of water in here. Doesn't bother me. I literally just let the bees get on with any pooling of water in there. It makes no difference to the colony whatsoever, and in the winter they need a bit of water. So if you're worried about kind of increasing humidity in the hive over winter, I really, really wouldn't worry about that. I mean, they have to go out to forage on water to break down some of the honey or to break down the fondant. So seriously, don't worry about any pooling of water in there. It's only a small amount. It's not going to hurt the colony. If you are fussed about it, you can just cut a tiny little gap there Just to let the water track out. It's as simple as that. But yeah, love this brood box. Really solid, really heavy, really nice design. So then the floor, and the floor is something just, wow, like it's so different to anything else that's on the market. So it's not a poly floor, it's like an injection molded plastic floor. And again, you get your gubbins. So I mean, this, this is where the cost of this hive is coming in. I mean, you get all of these gubbins, so you've got 12 in total, bits of plastic— sorry, bits of poly there. They're for blocking it up or keeping it open. So in the summer, I mean, you've got your nice ventilation in the plastic there, and then in the winter you can block it up. Um, but look at that, like, what an absolutely rock-solid floor that is. That is going to last for 30 or 40 years without a shadow of a doubt. That's going to last so long, there's absolutely no chance anything's going to burrow in or bite in. It's such solid hard plastic. Um, so I think, I think that's a really, really nice design. You can't quite see it on this video, but there's a slope on there and then there's some drainage holes here. So if there is any moisture, it's not going to collect in the plastic, and that could have been a problem with this is that it could have collected water on the base. But no, there's like little drainage holes, drainage holes here, here, here, here, and then little channels to take all the water out. So there's gonna be no standing water on the base at all. I like this. So the front of it here, you've got your entrance. So you've got it down to there to like a full space entrance there. Absolutely fine. But if there's going to be a wasp attack, you can put this little bit in here, take it down to about 6 bee spaces, so it makes it much easier to defend. But then I like this, take that out, just leave it there, fits perfectly. Nice little design touch, that. Um, quite easy to lose your bits and bobs that you get from a bellow, so any bit that you can place on somewhere like that, much appreciated. It's got a landing board. I know people do like their landing boards. I don't mind, but yeah, it's always nice to have so the bees can kind of access straight in like that. Really, really nice. So yeah, so I think that's it in terms of kind of an unboxing and a review. I'm happy with it. Like, I mean, I got this for free. I'm really, really excited about taking it out to the apiary and having a look and seeing how it performs. I'm even more excited about doing some queen rearing in it. I love— I just love the idea. of having those top entrances. I really think they're cool, and I mean, would add so much flexibility there. So if you were just to add that additional brood box— So say for example you've got a colony in here and you've got another brood box on there and it's full, 12 frames of bees. I mean, what I'd like to do is I'd come in, I'd put the crown board on the top like that, I take the other half of the nuc, so the other 6 frames, put it on top I've effectively made a split. I've got a queen underneath, full colony that's going to act as normal, and then I've got a hole here, and I'm going to end up bleeding a lot of the bees down out into the field, and then they're going to come back into their normal slot. And then I'll probably turn that round, and then I'll add a queen cell to this top box, and then I can just— I can get queens mated that way, and then I can recombine them again at a later date. But I've effectively got a complete vertical split in one system. I really, really kind of like the idea of that. We'll do a separate video on it, but I think it would work really, really well. And then you've got the ability to overwinter them in that format as well, and that's probably what I'm most excited about— the ability to overwinter them and to share the heat between the 2 colonies. So I think that's something cool, something I'd definitely look into. Right, so that's enough of me blabbing on about the box. You want to see some bees, so let's get out into the field. I'll take one of the boxes out with me, I'm going to transfer some bees over to it, talk a little bit more about it, and then we'll see how the colonies fare going through the winter. So might as well do a little bit of an instructional as to kind of replacing hives while we're at it. As always, what's important isn't the box, the old one or the new one, it's the location. The bees know to come in here and they know to go out of here. So really, really quick and simple manipulation. All we do is we move the old box away and we place the new box in the position where the entrance was facing. So all of the bees now, they'll come out of there and they'll try and get in here. When you're reorientating to a hive, best to keep the entrance a little bit more open and allow those bees in. So we're going to take out this entrance just to give it the bigger entrance, then take off the feeder, the roof, and then you just want to transfer the frames over into there. Just a quick closeup of the bees. Doesn't look like there's many bees in there. They're all kind of at the bottom clustering. Got the queen in the queen cage. We got our Apivar strips in, um, I mean, bottom bee space. These sit nice and flush. Got a little bit of room either side, so I think either side of the frames they'll kind of draw that out and you'll get big chubby frames. Um, it's quite, quite a big space there, so we'll see how they adapt No doubt they'll draw it out and fill it with something. You can see all the bees there at the front of the entrance fanning away, making sure all of the other bees know where to go. But yeah, that's the hive, and we'll give you regular updates and let you know how that's going throughout the season. So there we have it, that's the new Abelo 6-frame poly nuc. I really, really like it. It's a completely different poly nuc, something that I'm really not kind of used to in the beekeeping world. All of the other poly nucs, they follow a bit of a theme and they're all very similar. Some kind of have slight differences, but they're all kind of pretty much the same with a few little amendments on it. This is something completely different. So I'll reserve judgment on it though. I'm not going to go out and say you must buy this. I've only just had it. It's the first time I've seen it within the last 24 hours. mean, I've unboxed it, I've taken a look at it, I've put some bees in it, and I will reserve judgment in terms of kind of telling you this is my number one nuc from now on. I need to have some kind of real-world experience with it. Give me like 12 to 18 months, see how the bees overwinter in it, maybe get more than kind of 2 colonies worth, and then I'll make an informed judgment at the end of that. So like I say, just to kind of keep you in the loop, I've been given this box for free. So Damien at Abellos gave me a couple of these boxes to review and to give you my honest opinion on. So I'm not paid for the review, I've just been given the boxes for free, so kind of complete honesty with all of the people on YouTube and all of our social media platforms. So if you are interested in it though and you want to get your hands on it, obviously go to www.abello.co.uk. Loads of them on the website and you can see them there. There's some additional technical details on there as well if you need them. But that's it for today's video. I hope you've enjoyed it. You get the premieres here at Black Mountain Honey. I thought I was going to be the first person on YouTube to kind of review the Polynuc, and then I looked on there and there's some guy called Mark who I, you know, I know Mark from kind of near to Damien, and he did a video on this about 6 months ago. So my idea of an amazing kind of premiere for the Abello Polynuc went straight out the window because he did it 6 months ahead of me. So a bit gutted about that, but hey ho, hope you've enjoyed the video. Please hit the subscribe button, Please hit the bell so you're notified of every video, and I'll see you next time.