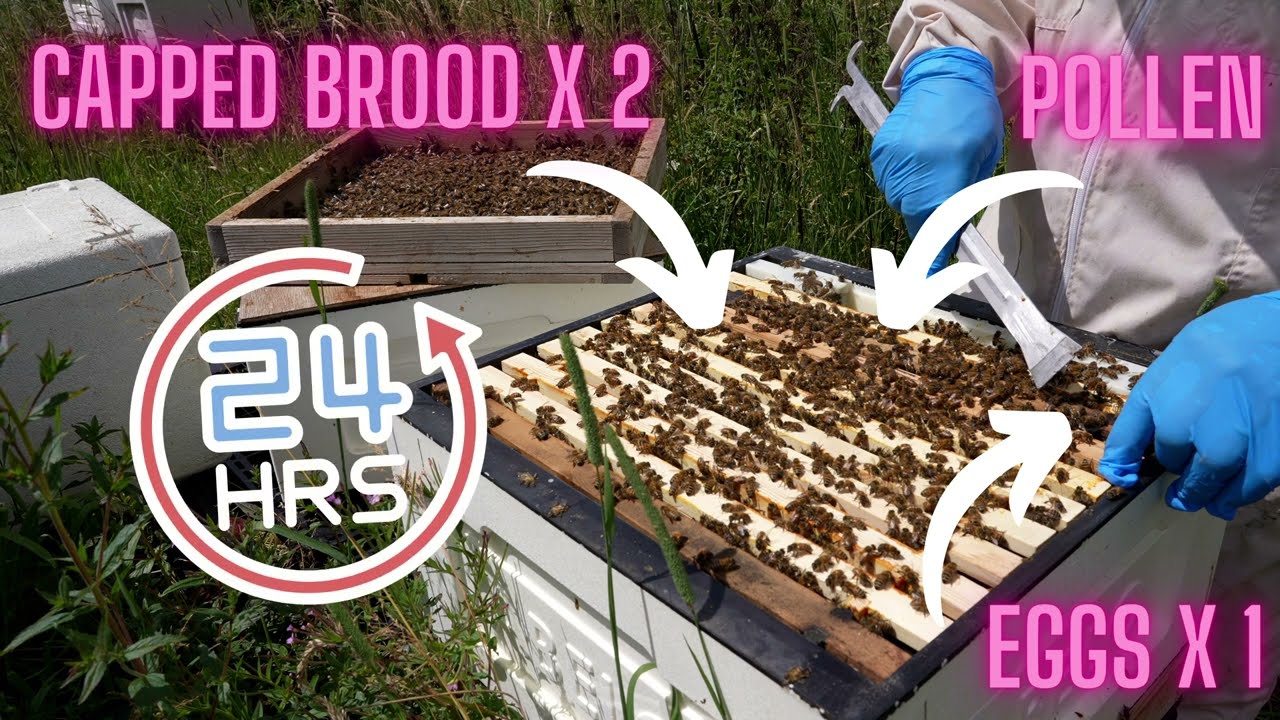
In this instructional video, Laurence Edwards, with partner Richard, demonstrates a queen-right double‑brood starter‑finisher method used to produce high‑quality, UK‑mated queens for overwintered nucleus colonies. The method starts with a double‑brood colony where a mesh board splits the hive into a top queen‑right half and a bottom queenless half. The top half contains abundant emerging brood and the queen, while the bottom half holds frames of eggs, a premium pollen frame, and a few frames of brood. A mesh screen with a 180‑degree‑rotated entrance allows bees in the top half to move freely. After 24 hours, 18 grafts (up to 36 per frame) of very young larvae are placed in the egg slot, attracting nurse bees that are tricked into thinking they are queenless. Acceptance rates reach 100 % (36/36). The grafts are left until day 12‑13, then the mature queen cells are transferred directly into a BS Honeybees 2‑in‑1 nuc box (three frames) without using mini‑mating nucs. The method yields large, well‑fed queens with a high success rate and can be scaled from a few to dozens of queens by repeating the split on different colonies. Laurence emphasizes the simplicity, speed, and reliability of the technique, and promises a follow‑up video on cell insertion and virgin queen handling.
Chapters
Today I'm going to show you the queen rearing method that is used to rear all of the Black Mountain Honey UK-mated queens that go into our overwintered nucleus colonies. Again, this is the best video ever because I don't have to do any of the work. I've got my partner Richard who looks after all of our nucs showing us the process, and we're going to give you a real start-to-finish snapshot of how we rear the queens that go into our nucs. Right, so with Richard working in the background, I'm going to tell you exactly how he sets up this method. And unlike some of the other methods that I've used, the 10-on-10 method, which is a queenless method, this method here is a queen-right method. Richard starts off with a double brood colony with a queen across as many frames of brood as you like in a double brood configuration. He then, in the middle of that, inserts a double mesh board that I'll show you one in a little bit. So you're effectively splitting the top half of the colony and the bottom half of the colony. In the top half of the colony, arrange the brood so you have as many capped and as close to emerging frames as you can possibly get up there. Ideally, you want 10 full frames of emerging brood, and you're going to take your queen and you're going to put her upstairs in that top box. I'll just butt in at this point as well to say, how calm are these bees? Again, I'm just doing this without a veil on. I wouldn't even need my bee suit on either. It is a real pleasure to be in this apiary. And you can tell that all of the queens that are getting mated here are going to be so influenced by the drones that are coming out of these super calm colonies. So once you've taken your queen and you've popped her upstairs into that top brood box and you've put on a mesh screen in between, so on the mesh screen there is an entrance, and this is really important for this method. You need to give the bees in that top box, the queen right top half of this method, a way of getting in and a way of getting out. You can't just screen them off because obviously they would just die. You take that entrance and you turn it around 180 degrees. So this is such a cool method. I really can't believe how quick it is to set it up, and it means within 24 hours of doing the manipulation, you're ready to graft into it. But the setup at the bottom box is very, very crucial that you get it right. So what you need to do is you need to take down there a couple of frames of brood in all stages, again preferably emerging. You want nice young bees coming down in that bottom box. And then in the slot where you're gonna put your grafts, you wanna put a frame of eggs. One frame completely full of eggs. And then next to that frame of eggs, you're gonna put your best pollen frame that you've got. Doesn't need to be from this colony here. Go across all of your other colonies and find your very best pollen frame. Nutrition and protein, very important when it comes to feeding queen. As always, it's so much easier to see it in practice. I'm going to give you a close-up now of exactly what's going on. So this is the double brood queen right method. As you can see, the original setup here, we've got a double brood box. This down here is the original entrance. And then Richard's taken that top box, as we said, put the queen upstairs into that top box. He's put that top box completely full of brood, capped brood, as emerging as you can get it. And then that little nifty device in the middle, that is a mesh screen. but it's a mesh screen that has an additional entrance. So you can see over here the other side, now we've got that additional entrance. That's how the bees upstairs are getting in and out, and that is the queen right element of this rearing method. So this is the mesh board that you need for this design here. Really simple construction. What you want underneath it effectively is a bit of an eke, maybe 50 or 60 millimeters of eke, and then you need a full mesh, but you need to make sure that you have this entrance here. And as I said before, Rich has turned that entrance around 180 degrees, so the bees are flying out of a completely different entrance. So you can see down here now, this is the business end, and what we've got down here, this is the queenless part of the split. He's put a couple of frames of capped brood down there, he's put his frame of eggs down there, he's got his frame of pollen down there, he's left it 24 hours. That's really important, to leave it 24 hours in the slot where you're going to graft. And then Richard's gone in, taken some grafts, 18 grafts in total, and he's placed it into that slot adjacent to his protein pollen frame. Right, so Richard's going to get out the grafting frame now. We've got 18 grafts per frame, and as you can see, look how many nurse bees have been attracted down there to those grafts. This is the important thing here, 3 key things to remember. One, you need enough nurse bees. 2, you need to make sure that you're giving them sufficient pollen. And 3, you need to trick those nurse bees into thinking that they're queenless. This method here does that by separating the queen a far enough distance from the grafts that are going in. And I think you'll agree there, those nurse bees have been well and truly convinced. Let's get a closer look and see how many takes Richard's got on this batch here. So I know this looks like a complete setup. We planned to do this video about a week and a half ago, and the day that we planned to do it, it poured down with rain, so we didn't have full cells available for you, but what we've got here is 48-hour grafts, and just look at that acceptance rate there. That is 100%, 36 grafts using a queen right method. So it goes without saying, when you're grafting, try and get the absolute smallest larva on day 4 from an egg being laid. You really do want to get the smallest larva that you can possibly Richard now uses this method exclusively in this apiary, and he uses it as a starter-finisher method. So this is a queen-right starter-finisher, one box to do absolutely everything. It's a really nice neat method, and it works to produce a very decent amount of queens. So the difference in using a method like this as opposed to using a separate starter and a finisher is that that setup there is good for one round of grafts. Now I get this question asked to me a lot of times, which is, I don't want to use a starter finisher, I don't want to produce hundreds and hundreds of queens, I just want to do maybe 10 queens or something like that. What is the best setup? And this setup here is perfect for that. As you can see, Richard's done 36 grafts there, got 36 takes. But if he wanted to do another 36, he'd have to leave that colony, put it all back together again, let them build up, and then he'd go again in a couple of weeks and just do the exact same manipulation to get them back to that same Luckily in this apiary Richard's got lots and lots of colonies, so all he does is he just moves it around in terms of using that method on different colonies at different stages of their development. But it's a great method if you just want to raise a few queens, and as you can see, the quality of the queens coming out of this method is really, really good. Huge queens, very well fed, and obviously we're using the very best genetics, so you end up with really top quality queens. Yeah, and it's a great method So as we said, this is a starter-finisher method all in one box, and what Richard does is that he leaves these grafts in the box all the way up to about day 12 or day 13, when he's comfortable that he can move the fully matured queen cell and place it directly into a nuc. Richard doesn't use Apideas, doesn't use little mini mating nucs. We use the BS Honeybees 2-in-1, and we give the colony a full 3 frames. We find that way that it gives the queen the best possible chance once she goes out and gets mated. She's got loads of bees with her, lots of nurse bees, but it means when she comes back into the colony, into the nuc box, she's got lots and lots of space to lay. She's not restricted in any way, and we find that we rarely get any colonies absconding, and we find we get a very high success rate in terms of queens going out and turning into successful laying queens. So when Richard's putting these together, the way that he makes it up is he takes 2 frames of bees and brood, preferably capped brood, preferably brood that's near to emerging, and then within 15 minutes of making up that split, he places the queen cup, the queen cell, directly in between the frames. We use the Easy Beesy cups and they just slot directly on top of the frames. Really nice, neat, simple method. And again, there's no faffing, there's no making the colony go hopelessly queenless. You're using a queen right method, start to finish, you're all in one, and then you're placing that mature queen cell into a nuc within 15 minutes of making it up. And then Richard just leaves it alone, comes back in 2 or 3 weeks, hopes for the best, and generally gets a very, very high percentage success rate. So I hope you enjoyed that video. Thanks to Richard for showing us exactly how he uses that method. I'm going to put this together as a little bit of a mini series, and in the next video I'm going to give you a closer of how those cells are added into these splits, and we're going to go inside hunting for some virgins.