In this YouTube tutorial, Laurence Edwards demonstrates how to treat and paint cedar beehives using Osmo’s Garden Colors and related products. He begins by explaining his long‑term experience with Osmo oils and paints, emphasizing that the products are made from natural vegetable oils, are EN 73.1 child‑safe once fully cured, and therefore safe for bees. Edwards describes the preparation of cedar wood, warning against using fresh, resinous cedar and recommending a 12‑to‑16‑week weathering period, as well as banding the boards to prevent cupping. He then walks through the application process, noting the thin yet deep‑toned coverage, the possibility of achieving good results with a single coat (though two coats are ideal), and a “splashy” technique for visual effect. Key product performance points are highlighted: the pigments are made from natural oxides that do not fade, and the finish does not peel, blister, or flake. Edwards compares cedar to pine, advising against pine beehives in wet climates like the UK and recommending Osmo Wood Protector 4006 for pine if used. He also mentions the paint’s ability to tolerate light scorching and advises against applying the product in winter, specifying a 24‑36 hour drying time at 25 °C and a 2‑3 week full cure period. The video concludes with a brief product disclosure (products provided free, no payment) and a call to subscribe for more beekeeping content.
Chapters
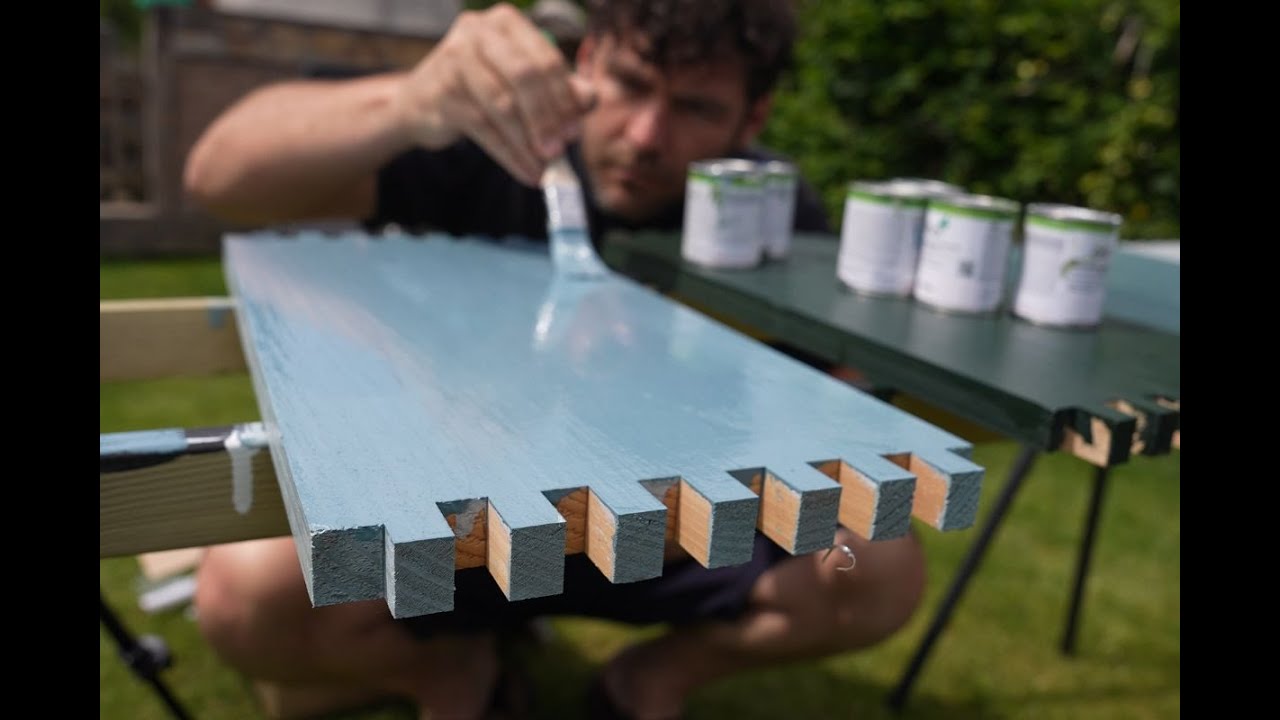
Today I'm painting my beehive with Garden Colors from Osmo. Now I've used loads of different treatments, loads of different oils and paints on wood and poly over the years, and this Garden Colors from Osmo, kindly provided by Osmo I might add, is a really nice treatment for wood. Now I've got loads of experience using Osmo. I've used Osmo oil all around my house for years. Brilliant for bringing the color out on the oak, but it lasts forever. Completely natural vegetable oils. A lot of the products are actually child safe as well, conforming to EN 73.1. Definitely didn't look at my notes for that bit there, but that means they're child safe. So once they're fully cured, and this treatment here can take about 2 or 3 weeks to actually become fully cured, it means that it's safe to go into a child's mouth. So for me, that's the best endorsement that you can ever get for a beehive. If it's safe to go into a child's mouth, definitely going to be safe for insects. So why Osmo Oil and why Osmo Paints for a beehive? So believe it or not, the head of technical for Osmo contacted me, and he is actually a member of the channel and a beekeeping enthusiast and subscribes to Black Mountain Honey. He said that he's been using these different products from Osmo for years, and he thought, why not give them a go on some nice cedar beehives for me to see how they come out? And I have to say, I'm really, really pleased with how these have come out. I've got experience with the Osmo Oil, but I've never used the Osmo Paint before. And just painting these hives, putting these together, I've had real fun with it, and the coverage is excellent. Super thin coats but really nice deep tones and excellent coverage. So I've gone for a slightly fancy look on this beehive here. One of the ones at the bottom was completely cupped, so I've had to kind of like put that off at a slanty angle because I completely messed that one up. The cedar had cupped like that, so putting it together Just didn't work whatsoever. If you're doing this, make sure you keep your cedar nice and flat and banded down together so it won't cup. But a really important thing to say is when you're treating cedar, don't use fresh cedar. Cedar, very, very resinous, very high in oils, and what you wanna do is you wanna weather it for about 12 to 16 weeks first and then come back and then paint it or then oil it. And what you're doing there is you're letting the oils evaporate so that the oils in the product here, the vegetable oils, can seep deep into the product to give you really good long-lasting protection. You can do it on fresh cedar. It's not gonna be anywhere near as effective in terms of the coverage and in terms of how well it seeps in and the overall protection that you're gonna get. So Osmo products, including Garden Colors and Garden Shades here, they're made with natural oxides, which means that they will not fade over time. So you look at these colors here now, they're nice and vibrant. They will remain vibrant for a long, long time. But even better than that, they don't peel, they don't blister, they don't flake. I've used cheap products before, and putting cheap products on an expensive beehive is definitely a false economy. You want to put the very best paint on your beehive that you can afford. Now when you're weighing up your options for Osmo paint, this sounds so much like an advertorial. It's not. I'm not paid by Osmo. Osmo just gave me the products for free, but I'm a massive fan of these products. The coverage on the tin is a huge amount. And with most products it says, you know, you get 20 square meters and you put it on the fence and you only get 5 square meters. I can vouch for the coverage of these products here. It goes on so thin, but it doesn't go on thin that you look at it and think, oh, it needs another coat. Ideally you'll do 2 coats, but you could definitely get away with 1 coat of these and you still get that vibrant colour. These ones here, I've given them 2 coats and then I've kind of used a splashy effect to make it look quite cool. And I've painted each of the individual slabs of wood before I put it all together. That's how you get this really cool effect on the corners here where you get the different colours interlocking. So if you're painting cedar, you could just let it weather and go straight on with the Garden Colours or Garden Shades. If you're doing it with pine, Osmo recommend a product called Wood Protector 4006. Again, I know it sounds like an advert, but it's a really good product. Just seeps in, gives you amazing protection underneath that layer. If you want my recommendation, don't buy pine beehives. I know people in the US are gonna say, but that's all we use. Cedar is so much better, lasts so much longer, and it just really stands up to the weather that we get in the UK. You get away with it in America 'cause the weather's nice and dry and sunny. In the UK, it's 11 months of rain, especially in Wales, and pine beehives just don't cope with it, and they become extremely heavy when they get wet as well. Cedar is the one that you definitely want. So a final benefit of using this paint, it can cope with a light scorching as well. So if you're thinking, well, I don't want to paint my beehives because I want to scorch them, I've left the inside of these there unpainted so I can scorch heavily on the inside. And then if you wanted to scorch on the outside as well, you can just give them a really light going over with a torch, and because they're vegetable oils, they will be able to cope with that and it won't just kind of go up in flames. So a few final tips when you're using these products: don't use them in winter. Really not a good time to be using these products, which I know is a little bit awkward because you tend to paint your beehives in winter. But if you've got a nice indoor, well-ventilated, reasonably warm, dry space— make sure it's all of those things— then you can use it. But the recommended drying time is about 24 hours, I think, when it's 25 degrees Celsius. I came out the next day when I was doing these splashes and they were Still a little bit wet, and you can see from my sweat, it is very, very warm here today. So it takes 24 hours, maybe 24 to 36 hours to dry, but it takes 2 to 3 weeks to fully cure. So just take that into consideration. You need to leave these off to one side for them to really build up that strength, and it's the long-lasting strength that's gonna give you the all-round protection. So there we go, 3 boxes using garden colors from Osmo. Really nice effect. I hope you like it. If you enjoyed that video, definitely hit the subscribe button. We've got loads more information about beekeeping on our YouTube channel.