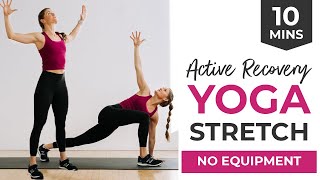
In this 10‑minute guided yoga session, Lindsey Baumgren of NourishMove Love leads an active recovery flow designed to improve hip mobility and promote overall recovery after a workout or on a rest day. The sequence consists of eight to nine poses, each described with detailed alignment cues, breathing instructions, and optional modifications for pregnant practitioners or those unable to perform certain movements (e.g., down‑dog alternatives, use of a towel for knee padding, wall‑based stretches). The flow progresses from a standing forward fold with thoracic rotation, to down‑dog or quadruped hip‑circles, a puppy‑dog stretch, low lunges with hip rocks and knife‑edge foot work, half‑kneeling hip‑flexor/quad stretches, child’s pose, and concludes with a legs‑up‑the‑wall or wall‑squat position. Throughout, Lindsey emphasizes creating space in the hips, lengthening the posterior chain, and using breath to enhance mobility. She also highlights the benefits for athletes, pregnant individuals, and anyone seeking gentle movement to aid circulation and nervous‑system calming. The video ends with a call‑to‑action to subscribe and explore additional pregnancy, postpartum, strength, HIIT, and cardio‑barre content.
Chapters
Hi, I'm Lindsey Baumgren of NourishMove Love, and today we're walking through a recovery flow yoga. I'm really excited. I just finished my workout and this is a great way to recover. After a workout or even just on a day that you're having an active recovery or rest day, we're gonna flow through eight to nine recovery poses to just create some mobility, focusing specifically on opening up the hips. I actually wrote this recovery flow when I was pregnant. It's a flow I used to run through all the time when I was pregnant. So there'll be options to make this pregnancy friendly. I'll give options. If an inversion like a down dog doesn't good for you while you're pregnant, I'll give you options to modify that too. Okay, so let's go ahead and we're just going to jump right into these eight to nine poses. Okay, so we're going to go ahead and start with feet shoulder width, distance apart. Just give me a big inhale. Reach up nice and tall. And on the exhale, let's just do a baby back bend. Pull those elbows out to the side. Goal posted. Pinching the shoulder blades down and back. Nice. Reach up nice and tall. Big inhale. And now exhale. Give me a forward fold. You can widen your stance as you need to. If you're pregnant, make room for baby. Okay, Just letting the neck and shoulders hang heavy. I'm going to keep my right hand on the ground to support me, and left arm is just going to open up a nice little thoracic spine rotation. Okay. So gaze follows fingertips. If that feels comfortable for you. You can softly bend into that right standing leg if that feels comfortable. Awesome. Bring it back down to center. Plant that left hand by the left foot. And same thing. Right hand goes to the sky. You can soft bend in that left standing leg. Nice. Gaze follows fingertips on the right. Back to center. Same thing. One more each way. Opening up. Soft bend in that standing right leg. Opening up nice. Creating some mobility throughout your back. Opening up the chest and shoulders. And one more other way. Opening up that posterior chain, which is the back side of my body. Nice. Go ahead, bring it back down to center. From here, I'm going to turn to the side. You're actually just going to step back to down dog, so. So plant your hands on the ground. Step your feet back. Finding down dog. Pushing your chest towards your shoulders now. And if an aversion like down dog doesn't feel good for you, go ahead and just drop down to a Quadruped position. So that's where tabletop shoulders are stacked over wrist. So option A, you're going to do heel pedals in down dog. Option B, you're going to do some hip circles so you can just sit those hips back side to side in this quadruped position. So you can just go right here. Create nice space throughout the hips. Or option you can be in down dog, just pedaling out those heels. Nice. Pressing the chest towards the thighs. Awesome. Just creating some mobility. Opening up the back. Nice. Pedal it out. Or take those hip circles for 4, 3, 2, and 1. We're all going to meet in that quadruped position. So on all fours, and you're going to keep your hips high, creating enough space between your hips as you need to while you walk your hands away from your body. Finding a puppy dog stretch. So just think about creating as much length as you can between your fingertips and your tailbone. So just reaching those fingers away. Sometimes it feels good for me to just change that hand position and go thumbs up towards the ceiling. Opening up through the lats right here. Opening up through the side body. Hips stay high. Nice. Big inhale. Forehead to the mat. Big exhale. As you exhale, can you walk those fingertips just a little bit farther away from you, creating as much length and extension throughout the body as you can? A really great stretch if you're sitting hunched over a desk, a computer, or a baby all day. Really great way to just create some length and extension. Take one more big breath here. One more exhale. Nice. Slowly walk back up to all fours. From here, I'm going to come back to facing you. Okay, we're going to go for a low lunge position. I'm going to bring a towel next to me in case I need to use it to place my knee on. Okay. I'm going to step my right foot outside my right hand. Okay. And right here, I'm just going to kind of rock gently forward and gently back. I can come up onto that heel. So right here I'm hitting my hips, opening up my hips, and then I'm getting a little bit of a hamstring stretch right there. You can pop to that heel if you need to. Just a couple gentle hip rocks here. Nice. That should feel really good. Awesome. Now I'm going to hold it here. I'm just going to hold here and tucking my tailbone towards. Just going to come up and gently push onto the knife edge of my foot. This is just going to open up my hips and also hit this outer glute right here. Just gently pushing onto that knife edge of the foot, maybe creating a couple hip circles here. If that feels good for you, add any movement or, you know, mobility that feels good for you and your body. And just trying to open up those tight hips. Nice. From here, bring it back to center. I'm actually going to take a towel and I'm going to set my rear knee on it. It's just going to create some more padding. You're going to come up and just right here, tuck your tailbone towards me. Okay. So a lot of times when we think about stretching our hip flexor, we think about leaning forward as far as we can. Actually, it's more about that anterior pelvic tilt. So just tiny little tilt of your pelvic bones and your pelvic muscles is going to create and open that hip flexor. So. So just holding here. If you want to increase that, you just take this arm overhead and you're going to grab it and that's going to intensify that stretch a little bit. Right? Nice. You're just going to hold right here for 3, 2, 1 option to stay here option. If it feels good for you. This is why I added the pad. I'm just going to reach around and grab this foot right here. Maybe I'll turn to the side so I can show you as well. And you're just going to take a nice quad stretch. So keeping that tailbone tucked, I'm reaching right here. Woo. Find that balance and stability. You could always grab a chair or a countertop if you need something a little bit more stable. And keeping that hip tucked, just grabbing that foot if that's available to you. Okay. And that's going to open up this quad and this hip flexor right here. If that's not available to you, just go ahead and stick with the hip flexor stretch. Take out those wobbles. Nice. Hold it here for 3, 2 and 1. Awesome job. We're just going to go ahead and do that same thing on the other side. So I'm going to step my left foot outside to meet my left hand right here. And again I can lean forward and rock back. Just taking a couple small hip rocks. Awesome. Opening up that hip flexor. Hitting a little bit of hamstring here. Whatever feels good for you. Just a couple hip rocks and then bring it back to center. And then again, I'm just going to push onto the knife edge of this foot. It's going to open up the hips. Feel really good. Just pushing into the hip or the knife edge of my foot. And again, you can add a little hip mobility if it feels good for you. Add some wobbles, add some wiggles, Whatever feels good for you. This is really just to stretch through kind of those tight, sticky muscles you might have. Nice. Bring it back to center again, I'm going to add this towel for a little padded support underneath my rear knee. I'm going to come up to this half kneeling position, and I'm going to tuck my tailbone. So tuck your tailbone towards me instantly. You should feel that stretch through this hip flexor Again, to intensify it, I'm going to reach up and over. Adding a little side body stretch is just really going to intensify that hip flexor stretch. Nice. Awesome job. Again, you have the option to stay right here, or you have the option to reach around and and find that quad stretch where I'm pulling the heel towards the glute, keeping that anterior pelvic tilt just stretching through the quad right here. You can always keep this opposing arm up for balance and support, or go ahead and find a chair or a tabletop or a counter for more stability. Nice work. Awesome job, you guys. Just a couple stretches left. We're going to go into a nice child's pose after this. So just like that puppy dog stretch, we're going to come back to that quadruped position. All right. That nice tabletop position. And now can you bring your big toes to touch and maybe even widen your knees out a little bit? And this time, hips are going to go back, so. And you're going to reach those fingertips away. Puppy dog hips, stay up. Child's pose. Hips go down. This is really just to open the hips again. Think about creating that length from fingertips down to tailbone. Big inhale forward to the mat. On the exhale, can you walk those fingertips just a little bit farther away from you? Nice. Really just sitting here, opening up the hips. A really great position to sit in if it feels good for you. Now, if your belly's hitting the ground, if you are pregnant, you can always find a chair or something. And you could just sit with your hands on the chair. Still thinking about pushing those hips back, but just adding a little bit of incline to make more room and more space for your belly. Big inhale, big exhale. Awesome job. Bring it back up. We're going to finish with two final stretches, and we're actually going to take it back to a wall. So if you have a wall available to you, you're going to walk back To a wall. You and I'm going to bring my butt as close to the wall as I possibly can and I'm going to go legs up the wall. So I'm just scooching my hips and my butt close to the wall and then I'm going to go to my back and my legs are just going to go straight up the wall. I want my butt to kind of touch the wall if I can, if that's available to me. Nice. Just wiggle, wiggle. Might take a couple seconds to get into what feels good for you here, but this is just an awesome legs up the wall stretch. You can flex your toes down towards your face and just letting that circulation kind of transition from your feet and flow back down towards the heart. A good little way to just let your legs relax and recover. A lot of athletes use this as a recovery tool between games or between matches to just let their legs kind of circulate and regenerate. Also really great. I used to do this when I was pregnant. If you have pregnancy insomnia, a really great way to calm your nervous system before bed. And so option A, you can just stay right here with this stretch. Option B, bring your feet flat to the wall and slide down into a squat position. So just opening up the hips by sliding your feet down the wall. And again, now you're just holding this position, but holding a squat position, a really great way to open up the hips. A really great way to imagine and maybe go through that birth process if you're in that position. It's a really great way to kind of create some visualization for you. Nice. Awesome. And you can hold this stretch, hold legs up the wall or hold this recline squat position against a wall for as long as feels good to you. And when you're ready, you can go ahead and roll out of that again. If being on your back doesn't feel good for you, just go ahead and skip those ending stretches. But that is our recovery flow. Rounding out around 10 minutes of just flowing through some movements, creating some relaxing movement through your body. I hope you enjoyed this. Great way to end a workout. Great way to create some movement on a recovery day. If you enjoyed this, go ahead hit subscribe to our channel I you hope of course we have more pregnancy workouts, postpartum workouts and just good old strength training and hiit workouts, cardio barre, everything you want@nourishmovelove.com thanks so much for joining me and I look forward to working out with you again soon. Have a great day.