In this instructional video, the creator walks viewers through a comprehensive dual‑monitor workstation designed for content creation, remote work, and livestreaming. The setup centers on a 63‑inch Neat Desk, a budget $70 Staples chair, and an Alienware R11 desktop paired with two 27‑inch 1080p Alienware monitors positioned at eye level for ergonomic comfort. Peripheral choices include a silent Amazon mouse, an iRocks wired keyboard with built‑in USB ports, and inexpensive Sony headphones on a stand. For video capture, the presenter uses a Panasonic Lumix GH5 with a Leica 12‑60 mm lens, connected via HDMI to an Elgato Cam Link 4K, allowing direct recording into OBS Studio and eliminating SD‑card workflow. An AC adapter powers the camera continuously, and a Parrot teleprompter (paired with a phone and Splashtop Wired X Display) offers script display. Lighting is built around an Aputure 120D Mark II with a soft‑box, supplemented by two GVM 1500D RGB lights for background color, and blackout curtains to control ambient light. Audio is captured with a $20 Sony lavalier mic routed through a Zoom H1 recorder into the computer, emphasizing cheap yet high‑quality sound. Acoustic treatment involves cutting a hypoallergenic carpet to floor size and installing eight 2‑inch acoustic foam panels on Velcro‑mounted boards to eliminate echo. Productivity hacks include a single‑button power switch (Velcro‑mounted) that powers all lights and the camera, and OBS hotkeys for one‑click recording. Cable management uses Velcro ties, sleeves, and a black raceway. Data storage relies on three 10 TB WD Easystore drives (two for redundancy, one active) and Google Drive backup via Google Workspace. Networking advice recommends a wired Cat 8 Ethernet connection for maximum speed. Background aesthetics feature a Walmart bookshelf with awards, an RGB lamp, and a second desk lamp with True Dark bulbs to reduce blue light, complemented by software (Iris) for night‑time screen tinting. The total cost is roughly $7,000, with suggestions for cheaper alternatives (e.g., Canon M50 camera, Neewer lights). The creator explains the benefits of dual monitors for script‑viewing and live‑stream monitoring, and ends with a call‑to‑action for a related video on online jobs.
Chapters
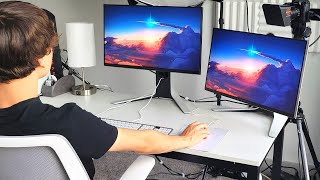
What if you could streamline your setup to become 3 times more productive than you currently are? Well, in this video, I'm gonna show you exactly how I did that with a dual monitor setup that's absolutely perfect for recording videos in an insanely streamlined fashion, working from home, or doing anything else at a computer. Links to all products will be in the description, and now let's get into it. To start off, this setup is built around a 63-inch Neat Desk from Amazon, and the chair I use is nothing fancy. It's literally just a $70 chair bought from Staples, which works great, and it goes with kind of the black and white theme theme of this setup. And for the main desktop computer, I use an Alienware R11. Now you can find tons of great computers at a cheaper price point, I just thought this one looked cool. Some people think it looks like a Dyson vacuum, but that's up to you. And then I plug this into two 27-inch 1080p Alienware monitors, and I make sure to have the height of the top of the monitor screen level with my eyes, and this is just really good for ergonomics. And then for a mouse, I use this cheap silent mouse from Amazon on top of a white mousepad. And then the keyboard is an iRocks wired keyboard, And what I really love about this keyboard is that not only does it feel great to type on, but it also has 2 USB ports so I can plug the mouse right into it. And then the headphones are just some $12 Sony headphones on top of a headphone stand from Amazon. And now let's talk about the camera equipment that this studio is really built for. First of all, starting with the camera, I use a Panasonic Lumix GH5 with a Leica 12-60mm lens. And here's a trick you can use to use incredibly nice cameras like this as webcams. So you can have the best quality at the Zoom meeting you're doing, or do what I do and be able to record videos directly onto your computer without having to deal with SD cards or anything like that. I use an HDMI cable to plug into this little adapter right here, which is called a Cam Link 4K. This plugs in via USB directly to the computer, and this way I can record directly onto the computer using a program called OBS Studio, and I don't have to deal with SD cards, file transferring, or anything like that. And another really good tip is to get an AC adapter for your camera. This basically just lets you plug your camera into the wall, so you'll literally never run out of battery, and you can theoretically record forever. Now, if you're on a budget when it comes to cameras, the Canon M50 is a really good option that's a bit cheaper. You might notice there's something on top of my camera as well, and it's a Parrot teleprompter, and basically you can just put your phone in there, and then I connect my phone via USB cable into the computer, and I use an app called Splashtop Wired X Display in order to sometimes put scripts onto the teleprompter to read what I'm saying. I don't always use it, I think it kinda looks unnatural sometimes. So usually what I do is I just read the script on my computer, memorize it, look at the screen, and then just read it out. Now lighting is incredibly important for YouTube videos, Zoom calls, or anything like that. And for the main key light of my setup, I use an Aputure 120D Mark II with a 35-inch light dome on top of it. It's not a cheap light, there are cheaper ones out there, like I used to use some Neewer lights for a long time, which worked great. But decided to make the upgrade because I think this looks just a little bit better. And a great option if you don't have access to an expensive light, you can literally just put your setup in front of a window, get tons of great natural light like that. But if you are using artificial lights like I am, then sometimes you want to block out the external light sources. So I use these two blackout curtains bought off of Amazon, and they're hung on top of some tension rods I bought from Target. And then for background lights to get cool colored backgrounds like this, I use 2 GVM 1500D lights on top of these mini tripods. And if you have a white or a gray wall in your house, you can literally make your wall any color, and you can basically take one studio, make it into dozens of other studios. And audio is super important as well. In fact, I'd argue it's the most important aspect of creating videos, or if you're on Zoom calls, it's great to have great audio too. And the cool thing is that you can actually have amazing audio for super cheap. Using a setup similar to what I do. So basically what I do is I bought this cheap $20 Sony microphone from Amazon, and then I plug that into a Zoom H1 recorder, and then I plug the Zoom H1 into a computer using a USB cable. And when I'm ready to record, I literally just clip on the mic to my shirt and I'm good to go. And now let's talk about a couple productivity hacks that I use to keep this workspace incredibly efficient. You see, the more things that come between you and creating videos, or you from doing your work from home job, the higher the chance is that you don't to actually get those things done. So what I've done with this studio is I figured out a couple little hacks that I hope you can use too to make your own studios way more efficient so you can actually spend time working instead of getting ready to work. So one of the best ones is having this one-button switch that I Velcroed on the bottom of my desk. And basically I plugged all of the different lights within this studio into that switch. So all I have to do is just tap that button once and the lights, the camera, and everything turn on so it's all ready to record just like that. And I don't have to manually turn on the camera, turn on each light one by one, just that one button press, it's all ready to go. And then I open up that software I mentioned to you called OBS Studio, and basically I have keyboard shortcuts set up, so I just have to hit one key within there, and boom, I'm recording. So it's literally just tapping two buttons, and just like that, I'm recording a video. And then when I'm done, I just hit those same two buttons, and I'm done. Like, you literally can't get any easier than that. And then due to the fact that the camera's connected directly to the computer, This takes out a ton of the friction when it usually comes to recording videos, like transferring files or setting up the lights, turning them on, setting up the camera. Everything's just all set up and ready to go. Now when it comes to sound, one of the worst things you can have in a studio is a ton of echo. In this room I'm in, naturally had a ton of echo, and you might have that issue as well within your studio. So what I did to combat it is, first of all, the room originally had hardwood floors, which kind of makes the sound bounce in all these random directions. and the room itself is 11 by 11 feet, so I got some carpet cut to the exact dimensions and just placed it on the floor, and that alone reduced maybe 90% of the echo. And the carpet is called an Air Dot O carpet, and the reason I picked this one is due to the fact that I tried out some other rugs and carpets and stuff, and all of them just smelled super toxic, and it was really hard to get work done, but this carpet is supposedly hypoallergenic and it doesn't smell bad. And then to reduce the final 10% of the echo, I bought 8 of these white 2-inch acoustic foam panels. Panels, and then I used Gorilla Glue to attach them to this thin plastic board from Home Depot, and then I connected this to the wall using 3M Velcro strips. And this effectively reduced all of the echo within this room. And when it comes to general organization, it's always nice to have a trash can next to your workspace, so I just use this little Simple Human trash can, keep it under the desk, it's white, it looks good. And then I also have some remotes for things like the lights and other things, so I have this little remote organizer from Amazon, Keeps all the remotes nice and organized. And now let's talk about cable organization. In my opinion, organizing your cables is pretty important. It makes your workspace look just so much more clean, and it makes it more likely that you'll get more work done. And I use these little Velcro white cable organizers just to tie off cables everywhere that I can. And then I also use some cable sleeves in a few different places. And then this black cable raceway, which you just lay out on the ground, and it keeps you from tripping over cables. For file storage, I back up all of the different videos that I produce for this channel and that all of my different YouTube channels produce. I run a bunch of different ones. And in order to do that, I use a hard drive called a WD Easystore 10TB hard drive, and I actually have 3 of them, and 2 of them are simply duplicates of the same information, and then the 3rd hard drive is like current recordings and stuff I'm currently working on. And then I also back up all my videos onto Google Drive using Google Workspace. And when you're working from home or recording videos or anything else, it's super important in my opinion also to have fast internet. And a lot of people make the mistake of using Wi-Fi for their home internet. You can get way faster internet by using a wired connection with something like an Ethernet cable and plug that directly into your modem or router. And I got this Cat 8 Ethernet cable that I just thread through, plug it in the router, makes the internet so much faster. For the background, it's sometimes nice to have some things in the background instead of just having a completely plain white wall. So I got this bookshelf from Walmart, which I think looks pretty nice. And then on top of that, I put some of my different awards that have gone from YouTube and ClickFunnels and stuff. And then at the bottom of the bookshelf, I put a small lamp from Amazon with an RGB bulb in it. And this way you can also change the color of the background a little bit easier also. And then on my main desk, I have a second lamp as well. And within that lamp, I use some True Dark light bulbs. And essentially what these do is they turn red at night. So if you're ever working at night, you don't have a bunch of blue light. It doesn't disrupt your melatonin. You can also use a program called Iris on your computers as well if you're ever working at night, and it basically just turns your whole computer screen red so you don't have a bunch of blue light. And the total cost of this setup was around $7,000. Now, that sounds like a lot, but that is including, like, literally every single part of this setup, and you can put together something very similar for much cheaper if you get, for example, like, a cheaper computer, camera, stuff like that. And when it comes to having dual monitors, I do personally really like it for certain applications, A lot of times I just use one monitor just to focus on a singular task, like writing a script or something like that. But sometimes it is really nice to have two monitors. For example, if I'm recording videos like I am right now, I can have a preview of the video I'm recording on one monitor and then the script on the other one, and it just really helps to be able to see both of them right there. Same thing if you're doing livestreams, if you're doing Zoom calls and so forth. It is sometimes really nice to have two monitors. And remember, this is just my personal setup. I hope you can at least get some inspiration from it when it comes to building your own setup. But feel free to use different stuff, and you you don't have to buy anything when it comes to putting this together. I'll still leave links below if you wanna check out any of the stuff that I used within this setup. And all that really matters at the end of the day is providing value to your end audience if you're a content creator. So just keep that in mind that it doesn't necessarily matter so much about the equipment you use, and you can always improve it as you go. And now that you have a good setup for working from home, do you wanna discover the top 9.5 best online jobs for making money from home? If so, just check out this video next to me right here. It'll show you those 9.5 jobs, and it's exactly how I've made millions of dollars online working from home with this setup right here. So just check it out right there, and I'll see you there.