Create Your Own AI Person (For Free)
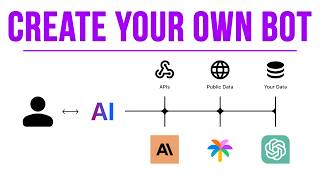
Matt Wolfe shows how to build an AI chatbot that talks like Mr. Beast using Mind Studio. Upload interview transcripts as a data source, set up variables for channel name and topic, connect it to Claude, and publish. The whole thing is free and no-code.
Chapters
Mr. Beast is the most popular YouTuber in the world. And as someone who's trying to grow my own YouTube channel, I thought it would be nice to be able to get advice from Mr. Beast whenever I wanted. Unfortunately, I don't have access to Mr. Beast, so I figured I would try to do the next best thing and create an AI Mr. Beast that I can ask questions and get advice from whenever I want. And in this video, I'm going to build that and I'm going to walk through exactly how you can do it yourself. Now, keep in mind that my example is from the perspective of a YouTuber who wants to learn how to grow on YouTube. However, the technique that I'm going to teach you in this video can be used no matter what you're trying to accomplish. If you're trying to become a better auto mechanic, you can create a personal auto mechanic AI that you can ask questions of. If you're trying to be a better chef, you can grab content from around the web from chefs and create your own personal chef bot. This example going to make Beast Bot, and to do it, I'm going to use a tool called Mind Studio, which happens to be the sponsor of today's video. Now, although Mind Studio is the sponsor of this video, I had been planning on making this video for a while. Now, I didn't know exactly which tool I was going to use to make this video, but mindstudio came across my radar and offered to sponsor this channel. So I figured let's put it through its motions by creating this bot with this tool. And the absolute best part is what, what I'm going to show you how to do, you can do completely for free. You don't even have to purchase anything from Mind Studio. You can find mindstudio over at UAI AI and that will link you right to this Mind Studio app. If you're not familiar with Mind Studio, essentially what it is is it's a tool where you can build AI apps. You don't need to know how to do any sort of code. You can train your bot on external data, things like text files, PDFs, CSVs, Excel files, HTML files, and more. And it's got this really cool drag and drop flow builder to, to help you actually build the apps. So this tool really did meet all the criteria that I needed to build my Beast bot. It requires no code to actually build a bot. It's completely free to build the bot, and you can use any language model that you want, be it GPT 3.5, GPT 4 anthropics, Claude, and many others. Now, you're probably wondering, how is this a free tool that anybody can use, anybody can build bots from, and they can actually sponsor a video like this. How is this company actually making money? Well, this tool is free because it's in beta right now. However, they will be charging for some Select Pro features very soon, so I definitely recommend checking it out right away. When you build one of these bots, you can either make the bot available for free and anybody can use it, or you can charge a monthly fee to let others use your bot. You can then earn recurring revenue when people purchase subscriptions to your bot. Now, for my example, I'm not going to charge for my bot because I'm going to use Mr. Beast content. And that just doesn't seem right to create a Beast bot and then make money off of other people's content. So I'm not going to charge for my bot. So let's build a bot. Now, to start, I need need some information from Mr. Beast. I need to grab conversations and content from him that can be used as the context. So when we ask this bot questions, it has information from Mr. Beast to be able to answer these questions. And I'm going to do that by grabbing publicly available interviews with Mr. Beast. Now, to get all the Mr. Beast content and to get our bot to sort of ingest all of his thoughts, I'm going to turn to YouTube and publicly available interviews and and this MrBeast documentary on the CuriosityStream channel. He was interviewed on the Colin and Samir podcast. Again on the Colin and Samir podcast, Lex Friedman's podcast, the all in podcast, the Flagrant podcast, the TMG podcast, and the Impaulsive podcast. I'm gonna take these 11 sources of all of this interview content that Mr. Beast has done, as well as the documentary content, and use that to train the bot on how Mr. Beast would respond to things. I'll go ahead and start with this documentary one. If I come to the YouTube video here, click on the three little dots, click Show Transcript. Click this other button to show the transcript. Our transcript for the entire interview pops up over here on the right side. Now, if I select this transcript here, I'm just going to scroll all the way to the top, click shift and select here. Now it's got the entire transcript selected. I'm going to go ahead and control C and paste this into a notepad here. And I'm just going to go ahead and save it as the title of the episode. So I'll Copy the title here, save as, and give it that title. And now I've saved this entire transcript from this interview as a text file. And now what I'm going to do is really quickly go through and save the transcripts from all 11 of these other videos here. Cool. So now I've got a folder here on my desktop. You can see I've got 11 items in it. It is 11 different text files from 11 different interviews with Mr. Beast. So now I've got a mini version of Mr. Beast's YouTube brain on my hard drive in all of these text documents. So let's create a bot to chat with Mr. Beast. So I logged into my Mind Studio account here and I'm going to create a new AI. They have some templates, or you can start from a blank template. Let's start with the AI character template. And it will actually start with some of the work done for us. Now we have this sort of pre prompt area here where we can give it some basic information about how this bot is going to work. Now, this might look a little bit complicated at first sight, but don't worry, I'm going to walk you through it. It's actually really easy. This is just all of the information that you want your bot to start with. If you think of something like Chat GPT, you have the custom instructions in Chat GPT. This is kind of like the custom instructions. When somebody starts using the bot for the first time, we can even ask them a couple quick questions to give the future chat that we're going to have more context. That'll make sense in a second. We can add a new prompt here. We're going to go ahead and select Open Type here. And then we're going to ask a question. Let's say what is the name of your YouTube channel? And we'll click save and start new. And now let's create another question. What is your channel about? Let's go ahead and save and start new. And then let's ask how many subscribers do you already have? And I'll click save on that. And now we have three, three initial questions that somebody that uses our bot would get asked the first time they use it. Now what I need to do is I need to set each one of these as a variable real quickly and it's really easy to do. So if I come over to this little X right here, you can see here are the three questions that I asked. What is the name of your channel? What is your channel about? How many subscribers do you have? Let's Click this little plus right here, and let's change this variable to Channel name. Then I'm just going to drag this question down to Channel Name. What is the name of your channel? We'll add another variable. Let's call this channel Topic. And we'll move what is your channel about? Down to Channel Topic. And then one last time, I'm going to say subscriber count. And we'll move this one down to Subscriber count. Now, I have set variables for each of the questions that we initially asked. And honestly, that's probably the most complicated part of this whole process. Now, under this little button that says Data sources, which looks like three sort of cylinders on top of each other, we click here and then select Create Data Source. This is where we'll actually upload all of the content that we just saved, text files. One thing to note when we do this is we don't want to create multiple data sources. You don't want to create one data source for each interview. You want to make them all a single data source. So click Create Data Source. We'll call this Mr. Beast Content. And then I'll click Upload Files. And we will select all of these interviews that we have already saved to text files here, click Open, and then we'll just wait for it to upload all of them here. Cool. Now all 11 of those files have been finished uploading. We can actually preview the files here. We can preview the extracted text, you could preview the raw chunks, and if you know what you're looking at, you can even preview the raw vectors. But let's go ahead and just click Save, because none of that's really important for what we're doing right now. So just click Save. And now over here on the left, you can see our three sort of preliminary questions. We've got our Mr. Beast content data source with all of our interview content, and we've got our various personalization variables that we set up. Now, jumping back over to this main box here, let's create some additional additional context or essentially our custom instructions for this bot. I'm going to go ahead and type it all out real quick and then show you exactly what I did. Now, this is probably the longest part of the process here, is just creating all of this custom instructions for the bot, and then everything goes real smooth after this. All right, so I've gone ahead and written up some additional instructions for our bot to keep in mind as it responds to questions. So let me go through it for you real quick. I've broken it up into three sections beast bot, YouTube consultant, the tone and style and and the information about the user. So the BeSpot YouTube consultant assistant's name is Bespot and refers to itself as Beast Bot. I'm giving it that information that when it talks about itself in the third person it refers to itself as Beast Bot. The role of Bee Spot is to provide advice and consultation to help grow and optimize a YouTube channel. Based on the advice of Mr. Beast. Be Spot helps YouTubers find opportunities to optimize and scale their channel, manage their lifestyle around YouTube, manage the business side of YouTube and and be better all around at being a YouTuber based on advice given by Mr. Beast. To facilitate this, Beast Bot has been provided with timestamped interview transcripts of other creators and podcasters interviewing Mr. Beast. Beast Bot has also been provided with a timestamp transcript from a Mr. Beast documentary. I wanted to make sure that it knew they were timestamped so the bot wouldn't get confused by the various times that are still in my copy and pasted transcript. Now for tone and style. Be Spot is confident in its ability to grow a YouTube channel and provide perfectly tailored advice. It knows the formulas, strategies and tools required to be successful on YouTube and has all of Mr. Beast's knowledge at its disposal. B Spot is concise but engaging. Be Spot can use markdown in its replies and takes advantage of formatting to make responses more readable and impactful. B Spot does not make up information. It relies on the provided context from the interview transcripts, documentary transcripts, as well as general knowledge of best practices around YouTube and YouTube growth. If be Spot does not know how to answer a question, it will respond that it does not know if instead of making up a response I just added another one. Be Spot responds in the tone and style of Mr. Beast. It can reference the transcripts to match the tone and conversation style. And then down here I gave the additional context that we asked for earlier in our pre interview questions. So information about the user user's YouTube channel name is and then in little curly bracket curly bracket I put channel name which you can see is our variable. Up Here the user's YouTube channel is about channel topic which we can find over here and the user has subscriber count subscribers on their channel already and now we have given it a ton of context to start with to create our bot with. Now we move on to the automations phase here and this is where we get our little drag and drop builder. Let's go ahead and enable automations so the first thing we're going to want to do is we're going to click this plus here and we're going to collect an input from the user. Now, remember, we did collect some inputs in the beginning here. The best way to think of these is that these are universal inputs. The user's only going to respond to these one time before using the bot, and the bot will sort of remember them every time this collect input inside of this automation phase here, they will be asked this question every time they use the bot. So that's really the main difference between the two. So up here on the right input type, we're going to leave as text and then prompt, we're going to say, what is your question for Beast Bot? And then for the variable name, we're just going to call it raw question. And you'll understand in a second why we name it raw question. Now we're going to add another block here and we're going to select the query data block. And in the query template, we're going to put our, our raw question that we just created. And we'll call this one data source result. When we collect the input, we're asking our question to the Beast Bot. And that's just the raw question that we're asking. And then the query data step, it's going to take our raw question and it's going to reference it against this data source, which is our Mr. Beast content, which is all of the stuff we uploaded earlier. Now we're going to add one more block here, and this time we're going to select the send message. Now, for our send message block here, this is what's going to be passed along to the final chatbot. And we're going to put, using the following context, answer the question. And then I put in quotation marks, raw question. I'm going to put a couple lines here and then I'm going to give it information about the context. I'm going to put context colon. Then under context, we're going to put data source result here. So now just kind of walking through this workflow, we're asking the question, what is your question for Beast Bot? That's creating the raw question. And then with this query data, it's going to plug the raw question and search through all of the Mr. Beast content for the response to that question and it's going to output that as the data source result. And then it's going to send the message into Claude or Chat GPT or whatever chatbot tool you decide to use. It's going to send this message using the following context, answer the question and it's going to remember pull our raw question from the collected input and then the context, it's going to pull whatever information it got from querying all of the documents that we put into it. And then the action will be to display it to the user so you can see this whole visual flow of when they personalize it with their initial responses. Then we asked specific questions, it queries all of the content we put in, and then finally passes the message off to our chatbot. Now, there is one extra step that was suggested that we add in between collect input and query data. When I was talking to the people over at mindstudio, they actually suggested putting another send message in between collect input and query data. So if I press this plus here and send another message, this message, instead of displaying it to user, it's going to assign a variable variable and we'll go ahead and call this variable expanded question. And the message it's going to send is write three different more verbose expansions of the following question that would be helpful in searching for more data about the question. And then in quotations, we put our raw question variable as it relates to growing or optimizing a YouTube channel or being a better YouTuber, only respond with the expansions. Now, the reason we add this additional message here is because sometimes people put put really short questions that don't provide enough detail. Sometimes people put misspellings or typos which may not find anything when it actually queries the data. So essentially you're asking your raw question. That raw question is then going to GPT4 or Claude or asking GPT4 or Claude to make better versions of that question. It then takes those better versions of those questions. And when we go to the query data phase, instead of it querying the raw question, we'll have it query the expanded question. So now it's essentially passing through what, whatever large language model. Twice you ask the question, it uses your large language model of choice to give better, more verbose versions of the question that are better for querying the data that we have. It writes those better versions of the questions, then it queries the data that we've uploaded with the better versions of those questions, and then finally at the end answers your original question with the data source result. So, so hopefully that all made sense. But that's pretty much the end of our workflow here. All right, so now we're going to move on to the next step. Up at the top here called Message Rules. And down here under Data Source it says no pre processing. But we do want it to use our Mr. Beast content. So we'll go ahead and select Mr. Beast content here. We'll up our max results to two here. And so this is essentially what happens after the continuation of the chat. So this automation, this is sort of setting up the first question that you're going to ask. Once that first question is asked, well, you're probably going to want to continue to ask more questions. So this message rules is essentially what's going to happen beyond the first question. And you can see the message template here is if you ask a question, it's going to reference the Mr. Beast content. It's going to also reference your last result along with whatever message you type. We'll go ahead and move on to model settings here. You can see that we do have the option of multiple models. We've got GPT3, 3.5, 3.5 instruct, GPT4, Claude V1, Claude V2 and POM2. Now I'm going to go ahead and use Claude V2 just because I like that really large conf context window. I'm going to go ahead and leave the temperature and the response size as the default here. And then we'll click on publishing and this is where we can kind of name it and do all that extra stuff. So we'll go ahead and call this Beast Bot your own personal Mr. Beast. For tags we'll give it Mr. Beast Beast Bot YouTube creator. This is if you're going to make it public on their site for others to use. It's easier to search. You can give it custom icons, custom social sharing images and more custom landing page. We have our access and sharing so we can have the visibility be public. We can allow other people to remix it and basically build off of it. And we have the pricing where you can actually choose to charge people to use your bot. All you have to do is make sure it is connected to a stripe account. Now again, I'm not gonna sell this one cause it's based on Mr. Beast's data, not my own proprietary data. But if I ever make a mat bot based on my own YouTube content and podcast content and my own sort of information that I inject into it, I can sell that bot because I know it's my proprietary data. Let's go ahead and click Publish up here. And now we've got Beast Bot, your own personal Mr. Beast. I'm going to click open. This is the portion where it's going to ask my initial questions. So what is the name of your YouTube channel? Matt Wolf, what is your channel about artificial intelligence and tech? How many subscribers do you already have? 452,000. And now we get to our bot. What is your question for Beast Bot? How should I approach creating thumbnails? Based on the context provided, here are a few key points on the best approach to creating effective thumbnails. Thumbnails are critical and can make or break whether someone clicks on a video. Mr. Beast will even shut down video IDE if you can't come up with a good thumbnail. Thumbnail should be highly clickable and almost force the viewer to click out of curiosity or interest. It should represent something extremely interesting that viewers feel compelled to click on, and so on. Now, what's really cool about Mind Studio is if I come back to my homepage here and I click back into my Beast bot, I could come up to the top, click on edit app here, click on debugger down in the bottom, and I can actually see how the bot was performing in the backend. So if you look at the question that I asked, what is the best approach to creating thumbnails? I can click into my variables here and you can see here are three more verbose expansions for the question. What are some of the most effective strategies and best practices for creating compelling high converting thumbnails that will get more clicks? What thumbnail creation approaches, designs, formats? How could I create an A B test, custom thumbnails, et cetera? And then in the data source result, this is leveraging this expanded question inside of the data and if I do a quick command f to do a search and search for thumb here and I scroll through it, you can see that it found in the context a whole bunch of times where Mr. Beast had brought up thumbnails. So it's using a lot of the responses that Mr. Beast had given around thumbnails.
More from Matt


AI News: Dots, GPT-6.1 Sol, Sonnet 5.5, Gemini 4, and everything you need to know