AIUX - Create a MacBook Pro Wireframe with Illustrator
This is a YouTube video titled "AIUX - Create a MacBook Pro Wireframe with Illustrator" created on December 8, 2014. It features an instructional tutorial by Matt D. Smith, who guides viewers through the process of designing a MacBook Pro wireframe using Adobe Illustrator. The content is a detailed step-by-step demonstration focused on UX design techniques and vector drawing tools.
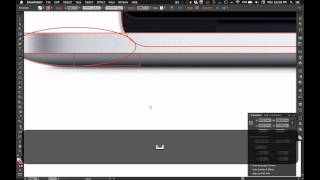
Hey, welcome to AI ux, a series about rapid UX design with Adobe Illustrator. I'm your instructor, Matt D. Smith, and today I'm going to show you how to draw a laptop just like this one. I'm going to base it off of this image that I snagged from Apple, which is a MacBook Pro. And then I'm going to use a screenshot of Safari and we're just going to draw some of these elements the same way we did the iPhone and the iPad a few videos before. All right, so let's get started. First, I'm going to size my laptop to be the same size as my screenshot of my title bar. How to do that? I'm just going to get these lined up and get the top left edge and I'm going to hit the S key and put the anchor right there. And now I'm going to scale it so the screen is the same size as the title bar. All right, so that's pretty close. Now let me move this Safari bar out of the way. I'm going to choose this. I'm going to hit Command two to lock it. All right, so I'm going to hit M to get my Rectangle tool. In all of the previous videos, I have used the Rectangle tool to draw a shape and then I've grabbed the points that need rounding and I've used the Rounded Corner tool to do that. Now I've gotten some feedback and a lot of you don't have Adobe Illustrator cc, so I'm going to show you how to do that in this video without using that tool. Now, if you click and hold the Rectangle tool in the tool panel, you can see Rounded Rectangle Tool is in there and you can click and hold and drag and you can see that there's like a default value set to the corner. Now, there's not really a way to change that once you've. Once you've. Not an easy way to change it once you've made the shape. So what you do is you can measure the radius of that corner using a circle or a square. So if you use the circle tool by hitting the L key and you try to just size it right in there, you can see that that's like right around 90. 90 pixels. A 90 pixel circle. Alright, so if I delete that and I go back to my Rounded Rectangle tool and then I click once, you get the rounded Rectangle palette or dialog box rather. So I'm going to put in. I'm not sure what the Laptop size is, but I know it's going to be pretty large, so I'll just do 1440 by 800 and corner radius. I'm going to change it to 90 pixels based on what we just learned. Alright, so that was twice as big as I needed. So looks like I'm going to need to change that to be 45 pixels. Try that out. Alright, See now you can see that works pretty good. Alright, I'm going to go ahead and change my stroke color so we can see our shapes a little better. Just pick any bright color. Alright, so if you hit Command Y you can see your shape a little more easily. So now you can't transform this with the, with the select tool because what you'll do is you'll stretch your corner and your radius will get all weird. So you can see if I, if I stretch this, I will. Actually I'm using Adobe CC so it's not stretching it. But if you don't have this version of the software, your radius will get all weird. So what you need to do is take your Direct select tool and grab just those sides and then you can pull that into place. And then the same with the bottom, pull that right in there so this radius lines up. Alright, so now back to the rectangle tool. And I know my screen is 1440 by I guess it's 900. Change that to 9. Make sure that's not linked or it'll change your width as well. Move that down a bit. Alright, so my, my screen size is a little bit off. I know that my screen size on my MacBook Air is 1440 by 900, but it's a little bit different for this MacBook Pro. So I will adjust that based on the way it looks later but for now I'm going to leave it at 1440 by 900. All right, so I've got those two main shapes. Now I'm going to draw, I'm going to look at these two shapes here. You can kind of see the, the front edge of this laptop. It's kind of got this shape here and this shape right in here. So I'm going to take these two shapes and again I should have done this to start with, but for good measure, select all of your shapes, open up your transform palette and make sure align to Pixel grid is selected. This will make sure that your shapes stay all nice and crisp. Alright, so with these in place, I'm gonna. Well, actually I forgot I'm not gonna use the Corner palette Corner tool. So delete that and we will delete these. Alright, so let's take a look at that. Well, I think this one. Yeah, we probably need a tiny bit of a radius. I'm just gonna give this one. So I'm gonna drag out the shape so I can see about how big it needs to be. Whatever. Whenever you drag a shape in Adobe cc you can see that there's, it's showing the width and the height. So it's like 70 by 34 or 34? Yeah, 70 by 34. So as soon as if I go to click, it's going to bring that, that measurement back in. So I can Change it to 70 by 34 and then corner, radius, I'm going to do two pixels and that'll just give me a slight little bevel or radius rather. Sorry. So I'm going to drag the direct select tool across those points. Let's try that again. I'm going to grab it and kind of need to be right on an anchor to grab that shape. If you try to pull from the line sometimes I guess the line does work. So zoom out and grab the line and bring it over, zoom back in and you can drag it over or nudge it over, whatever you like. Alright, so that shape is in place. So now for this shape here. Now we could, there's a couple ways we could draw this. You can start with a rectangle and drag this point over here. And then you can use the pen tool to add a point and drag it right into the center of the curve. And then you could hold the option key and drag out these handlebars. You can see that I can change the, the shape. So hold the option key and then drag it like right in there. That's one way to do it. Another way I'm gonna go back here. Before you add that point, you could also use the pen tool and hold option and drag out just straight from that point a radius like that. That's probably a better way to do it instead of putting one on the curve. Should have more control over this. These two points. Now that is definitely one way you can do it. Another way is hit your oval tool and just draw, draw an oval to kind of match that curve. And I'm mainly looking at this section right in here. Alright. So once you've got that, I can. I'm gonna draw a rectangle starting from this point and I'm gonna go up to here and just drag this out. Alright. And so now I'm gonna grab these two shapes and bring them down here. Alright. With these two shapes here, I essentially want to get rid of the top portion of this circle. So I'm going to draw a rectangle above it, select the two shapes and hit the path finder and subtract that shape. So now I've got the two pieces that I want. But if you go in here, you can see they're slightly misaligned. So I'm going to select those two again, make sure that align to pixel grid is selected. And now you can see that there's a little bit of a discrepancy between those lines matching each other. We really want them to be right with each other. And if I try to nudge up one pixel, they're still off. So when that happens, you can just select one of those shapes and look in the transform and there's typically even though it's aligned to pixel grid, you're going to have these weird decimals sometimes. So if you get rid of all of those decimals 20, then it'll change your shape into what you need it. So let's do. There we go. So now if I nudge that point and this point up one, then it should be perfectly aligned there. That's what we want right there. And what we really want is this rectangle here to be aligned with the point, the very bottom portion of that crescent shape. So I'm just going to drag that over until it kind of snaps right on that point. Because if it was, if we left it over here, it would have been just above and we would have had a weird little fuzzy, fuzzy line. Alright, so now that we have those two shapes together, open the pathfinder and combine those shapes or unite. You can see we have a couple of extra points up here. It's not really that big of a deal, but if you know there's extra points that you don't need, you can select those and just remove those points. I've got a shortcut set to command E to erase those points. Alright, so I'm going to drag this back into place. Alright, so now I can grab this piece option, drag it over here or right click reflect and we're going to reflect vertical and drag this piece over here. Alright, so now we just need to join them. So I'm going to grab these two points and make them overlap. And then once they overlap, I can select both of them and hit combine or unite in the pathfinder. Again, I've got these two points here on the top and two points on the bottom that I don't need. So I'm going to get rid of those. And lastly we just need to draw this little wedge shape. Alright, so what we're going to do is draw a circle here for the edge. One more way to get a rounded shape. So we'll go 45 by 45, line the Pixel grid and then we're going to duplicate the shape to come over here. Just option drag. Now I'm going to select the top point in both of these shapes and delete it. And then I'm going to select that point and that point and delete it. And now I'm going to choose this one and this one and hit command J to join them and this one and this one, Command J to join them as well. And then I'm just going to drag this down a bit to line it up. Now we made it a little bit too tall, so I'm just going to use the transform, just the regular selection, to slide it up a bit. Alright, so that's all of the pieces. I'm just going to move these down. And what we want to do is we want to get rid of this piece in here because that's below the base of the laptop. So I'm going to draw a rectangle here and select both of these. The pathfinder I'm going to do minus front. There we go. And make sure align to pixel grid is selected. So I'm going to change my stroke back to this gray color and I can make, if you want to make the screen a light gray or something. So if I go to 100%, you can see that these are all nice and crisp. The only thing I need to add now is my little camera dot. Now when you hit command Y, you can see the center point and it just helps you align it. I'll just kind of visually center that. Once that's done, you can group it and that's it, you're done. In the next video I will go over how to create these icons here in the same technique and then you'll end up with something like this. Alright, well, that's it. Thanks for watching. If you have any questions or comments, leave them below or hit me up on Twitter imds and thank you very much for watching.










