AIUX - How to Create an iPhone Wireframe
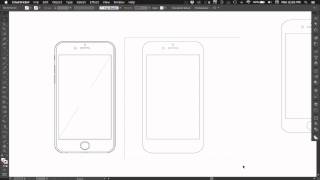
This is a YouTube video titled "AIUX - How to Create an iPhone Wireframe" created in December 2014. It features a tutorial by Matt D. Smith explaining step-by-step how to design a basic iPhone wireframe using Adobe Illustrator, including tips on scaling, aligning, and creating reusable symbols for wireframing purposes. The content is instructional and focused on mobile-first design techniques.
Hey, what's going on? Welcome to the very first post in the AI UX series. My name is Matt D. Smith and I'm going to be showing you how to create an iPhone wireframe. Just a simple basic outline of an iPhone to be used for iPhone app design or responsive mobile first design, as you can see here, something like this. Now these can be downloaded on dribbble. You can Google search this and you can find plenty of these around, but it's always best to know how to do something yourself just in case you can't find it or if you just, you know, want to create your own. So I've got one here. You can see that there's a couple of shapes drawn and I'm going to show you how to do that. First of all, we want it to be correct. So on apple.com iPhone compare you can see there's some different little wireframe versions already, you know, in existence. You can either take a screenshot of this by hitting Command Shift 4 and doing that, or we can get even fancier and go to inspect elements. Grab this iPhone6, they've got it set as a background in the CSS, copy that URL and then grab this little image. We can just drag it straight from Safari into our Illustrator document and that'll place it right in here. Alright, so now that we've got that, let me just move this reference over. Alright, so we know that this my plan for this is going to be for a mobile first website. So most of the mobile first designs that I create, I start at 320 pixels wide as the kind of minimum size. So I'm going to go ahead and create 320 by 320 rectangle. I just hit the M key to bring up the rectangle tool, click on the canvas and then enter 320 by 320. All right, I entered the height is 320 because I can't remember what the height of the iPhone 6 is and that's not really important at this stage. So I'm going to do is move this iPhone and zoom in using command and the plus bar together to change my cursor into a zoom arrow. So I'm going to line up the top left edge of this 320 square with the top left edge of that phone. Going to choose the phone, hit the S key to activate the scale option and I'm going to click here as the anchor point for the scaling tool command option. Space bar will turn your cursor into a zoom out tool and just the spacebar makes it the hand tool. So when you see me doing stuff like this, it's a combination of command, space, bar, command option, spacebar, then spacebar by itself again to use the hand tool. So now that I've got my scale anchor set right there, now I'm going to scale up this phone because I want the phone reference to be the same size as my 320 box there. So I'm just going to go a little bit more and maybe down a hair and make sure you hold shift when you're doing this to maintain the proportion. Otherwise you might do that to your phone and that's no good. All right, I think that'll work. So I'm hitting. I hit the V key to get away from the scale tool and choose the selection tool. So now that my phone is about the same size, I'm going to click on this rectangle and, and I'm just going to drag it down to the full size here. So you can see it's 320 by 564 or so. Now I'm going to draw the outer border of the phone. So I'm going to hit the M key again. I'm going to go up here to the top left and just draw, click and drag a rectangle that's the same shape as that phone right there. Now I'm going to choose the rectangle with the selection tool. I'm going to hit the A key to go to the direct selection tool, which allows you to adjust the corners of your shape. Now, you can do it manually by dragging these little dots here that show up. Those show up after you've hit the A key. Or you can go to this corners dialog and just kind of start changing the value. If you hold Shift, it'll, it'll change in increments of 10. So I've just, I held down shift and Change it to 60. And you can see that's roughly the same shape that we need. So now we've got our outer shape and our screen. So now I'm just going to zoom in and I'm going to hit the L key, which will bring up the shortcut for the ellipse tool. And I'm going to hold shift to draw this out. Now I'm looking at the, the pixel dimensions and it looks like it's right at say 13 by 13. So sometimes you can get it to lock on 13 by 13. And if you can't, you can just click and, and type in 13 by 13. And that will give you the same dimensions. And again I'm hitting the V tool, the V key to change to the selection tool to move it around. Same for this little speaker, 10 by 10. And then I'm going to draw, hit the M key for the rectangle tool for this which is about 60 by 8. So I'm going to click instead of having 60.66667 by 8.3333, I'm going to do 60 by 8 because round, round numbers are more fun. So because this one I just need it rounded on both ends, I'm just going to grab the corner and pull it in. Do that again so you can see, you can just grab it and pull it and it does all of these together. All right, so now I'm going to scale down, scroll down here, hit the L again, do the ellipse tool and each time I'm dragging, I'm holding the shift key so I don't get an oval, I get a perfect circle. So that's about 60 by 60. So I'm going to type that in to get my perfect shape. Alright, so I'm going to zoom out here. Now I can click on this background photograph that I pulled off of Apple. I'm going to just hold shift and move it over here. Alright, so you can see that my home button some reason did not get a stroke, but it's still there. Sometimes, depending on what you've selected, it will change the default value of your stroke and your fill right there. But it is there and a way that you can see all of those shapes is go to View Outline or Command Y which is the quicker way to do it. So the easiest way to fix that is just click that shape, hit the Eye tool to change to your eyedropper, change it to one of the one of the other shapes and that will just give it the same properties that the other one has. Now to make sure this is all, this could be finished right here as it is. But to make sure this is all lined up, I want to make sure that the background body, the speaker and whatever these two little things are as well as the screen and the home button are all aligned vertically. So I'm going to just hit the V key to select all of them. And then I'm going to go up here to the align palette which is also located here if you want to grab it from Window Align to make it show up. And there's an align to option here that says Align to selection. So all of this selected items is what I want to align. So I'M going to click that. They all stay the same, so that means that they're all aligned. So I'm going to hit command G to group that. And you can see now these are a group. But I still need my camera. So I'm going to hit command Z to move it back and I'm going to select that again, hit command G. So now I have a group for this iPhone. So just like the one that I showed at the very beginning. Now we have a nice little iPhone wireframe. Now, one cool thing you can do beyond this, select this entire shape and I'm going to hit command one. That will make my view to be 100%. You can see how some of these lines look sharp and some of these look a little bit kind of faded, almost like they're rendering on a. Like, not a whole pixel. You have to be mindful of snapping to a pixel. So one way you can prevent that is when you first create your document, you can make sure that align new objects to pixel grid is selected. And then if that gets changed for some reason, you can go to your transform palette here and you can see under align to pixel, it's. It's just got a line through it. That means that some of them are, some of them aren't. So if I check it and then click it and check again. Now that if this is selected, that means that all of them are now aligned. So now you can see that they're nice and sharp all the way through. And this is still in a group, so I can just drag it anywhere and it's going to be all rendered nicely. Now the next thing you can do is open your symbols palette, which can. If you don't have this in your tool palette, you can just go to window symbols to open it right there and then select this thing and then drag it just into here. You can see the plus show up. And then it'll say symbol options. You just want to name it, whatever. We'll say iPhone6. And then you also have the option to align to pixel grid here. Anytime I'm doing wireframing, I will always do align to pixel grid. Okay, so now this is a symbol and we can. We can duplicate the symbol. I'm gonna delete the reference. So now I can. If I select this symbol and I click it and then hold option shift to drag a copy. Now if I go in and edit this, say I wanted to, I'm just double clicking to go into the group. So now if I wanted to change the screen and then I double click to go out. It changes every instance of that. So this is really good when you're doing wireframing and you want to reuse a global footer or something like that. And it works well for these little iPhone wireframes. All right, that is it. Now you know how to create your own little iPhone wireframe. Thanks for watching and let me know if you have any questions about this or if there's anything else you'd like to see a video on. Thanks.










