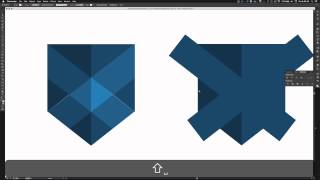
This is a YouTube video titled "AIUX - Simple Complex Shapes in Illustrator" created in January 2015. It features Matt D. Smith presenting a tutorial on using Adobe Illustrator's Pathfinder tool and shape techniques to solve a common design problem involving seams when resizing shapes. The content is a single-speaker instructional video focused on rapid UX design tips in Illustrator.
Hey everybody. Welcome to AI ux, a series about rapid UX design in Adobe Illustrator. Today I'm gonna take a little bit of a break from our normal wireframing and UX endeavors to show you some tricks in Illustrator with the Pathfinder and some shapes. So I was on Twitter this morning and Mike Beachum has a problem here. He says, hey guys, created this shape from individual segments, but this happens when sizing down. You can see it's got some seams in here. And what he was doing was creating each one of these shapes individually and then sizing it down and then would get these white seams that would show up because the pixels would align misalign ever so slightly. So here's a quick video showing Mike how he can recreate that and get.
Rid of his seam problem.
Enjoy.
Alright, so I've got your shape here. Open it up in Illustrator. Alright, so I'm gonna lock yours and we're just gonna redraw this. I'm gonna make a square here or a rectangle. Rather than get the pen tool and add a point, pull it down to about right there. Slide it over here. Use the eyedropper tool to get your color. I'm going to make a copy of that. Pull this point over there and remove that point. Now I'm going to put this in place beside that one. I'm going to select your color right there. Alright, so now I'm going to get this rectangle for your stripe pieces here. I'm going to just start off with a single shape. I'm going to use a rotate tool to bring that right in there and I'm going to transform it like that and just pull it down. Have plenty of overlap. Now copy that shape, reflect it and. Okay, pull that into place. Now draw. Pull these over here. Right in there. Alright, so now I don't need these pieces here. So I'm going to copy all three of these shapes. Whoops. Copy.
And I'm going to bring this shape.
To the front and I'm going to use my Pathfinder to take those sides off. So I'm going to pull my shape over here so I can get rid of that section. I basically just want this shape to overlay what I don't want there. So now I can select these two and hit minus front and then. Oh wait, let me make sure I copy that shape to my clipboard first. Paste it in place using Command Shift V and I do the same thing for all of these. All right, now I can get rid of these. Slide these back up here you can. I can do a line to top. There we go. Now I'm going to take these two shapes and I'm going to hit this thing here. This is divide. That way I can get just this shape in the middle and remove that point to get my triangle going to use your color there. And then for these background shapes, I'm going to use that color and then set this opacity for those. You could tweak the colors of that, but that's essentially how I did it. And then you can group those and then scale it down and you won't get much. You might get a little bit, but it looks like for the most part there's not many seams. So because you have this base, you have this base shape and since these are full pieces, you know, it kind of scales a little more fluidly and that's it. Alright, so if you enjoyed that, you.
Can check out other videos at aiux Co and if you have any questions or comments, let me know. You can hit me up on Twitter. I'm MDs and thanks for watching.