Create a Settings Icon in Illustrator CC
This is a YouTube video titled "Create a Settings Icon in Illustrator CC" created on June 3, 2014. The content is a detailed tutorial by a single speaker explaining step-by-step how to design a settings icon using Adobe Illustrator CC, covering tools, shortcuts, and techniques for precise icon creation.
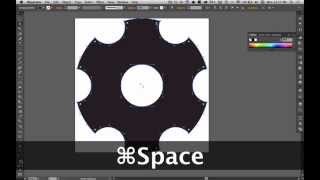
Hey, what's going on everybody? Today I'm going to show you how to create a simple settings icon in Adobe Illustrator. So the first thing that we're going to do is go to file new or hit command N to create a new document. We're going to do this icon at 32 pixels by 32 pixels. The reason I'm choosing that size is because that's roughly the dimensions for an icon in the title bar of an iOS app. It can definitely be a little wider than that for some icons, but it's a good starting point I'm going to hit. Alright, so I'm going to hit F to toggle the view mode. I like to kind of maximize the space. So if you just hit F while you're in Illustrator over and over, you can get some good screen mode toggling going. Also the space bar is going to help us turn the cursor into the hand and we can kind of drag around. And then also you can go command space bar to zoom in and kind of pull around. So you might see me doing that a good bit. Command option, spacebar zooms out. You can also do the Command plus and the Command minus, but then your hand has to leave the mouse if you are right handed like myself. All right, so to create the settings icon, the first thing we're going to do is choose the Ellipse tool by hitting the L key. All right, so there's two different ways I can draw the shape. I can go ahead and click and drag while holding the shift key to maintain a one to one ratio. But you can see that I've got some kind of half pixel number showing up there, like 22.56, 23.06. Sometimes kind of hard to land right on a hard pixel. So what I like to do is just click once anywhere on the canvas and then you can enter in your dimensions right there. So we're going to do 32 by 32 hit. OK, so I hit the V key to change back to my regular selection tool. It's kind of a standard for Adobe products. Hit the V key to return back to any other to return to your selection tool from any of the other tools you're using. Alright, so I've drug my circle to the, to the center of the canvas. You can also use this align palette up here. Right here under Align to Artboard. You can see that you can do Align to Selection, Align to Artboard. If Align to Artboard is selected, then any of these keys will align obviously to your artboard, whereas if you have another shape like this and you go align to selection, then those two will just kind of align to each other. And you can just kind of click around and play with these to see what they do. It's kind of the easiest way to figure out all of that. So I'm going to go back to align the artboard, set this up straight, and you'll notice that this stroke, by default, this thing has. Oh, wait a second, is that aligned? There we go. So we've got a white fill and a black stroke. Any shape that you create will automatically take on these properties that are existing kind of in your tool palette. And because we have a one pixel stroke default, it's kind of defaulting to the center of the, of the path there. So we can view our stroke palette and you can see where Align Stroke is. There's three options. One is Align Stroke to Center, which is the default Align Stroke to Inside, which will change it to be, you know, 100% on the other side of the path, inside of the path and then out align to the outside. So it kind of depends on what you're doing in terms of how you prefer this. But for our purposes, I'm going to go align to the inside of the stroke just to kind of keep it within the bounds of the artboard for now. All right, I'm going to go command one to. To view this at full screen or actually 100%. And then I'm going to kind of zoom back in using command and space bar to. To change to my magnification glass, kind of get in a little bit more. All right, so I'm going to. I just hit M to select the Rectangle tool and I'm going to create these little notches for each indentation of the settings icon. So a lot of times what I'll do is, is just drag a shape to a certain size and I can see, okay, this is roughly 8 pixels by 7 pixels. Or if I want it a little bit smaller, I can go maybe seven by seven. I'll go eight by eight and then hit ok. And now I'm going to align that shape there and I'm going to drag that until it clicks right there. And you'll notice that, like, while I'm hovering these paths, you can see these little kind of helper texts pop up the little guide. You can see the green guide lining up right there. If you're, if you're not seeing that on your Illustrator, you can go to view Smart Guides. And another quick way to turn those on and off is Command U. Sometimes it can be annoying if you're doing certain types of work, if you're hovering over every shape, they're popping up. But in this case, I want to see them. Most of the time, I want to see them. I'm going to go back in here and align this to the inside as well. All right, so in Adobe cc, they have this new thing called corners. So I just hit a to go to the Direct Selection tool. When you have a shape selected and you choose the Direct Selection tool, you'll see these little corners, manipulation points right there. Now you can drag these in and it'll. It'll apply that to every corner and then you. Or you could also manipulate that through the tool panel up here. So what I'm going to do is make. I'm going to, using my Direct Selection tool, I'm going to drag and grab these two anchor points, hold, shift and nudge it. Actually, that's too far. I'll just do a couple of arrow clicks, make it a little bit larger, and then I'm going to drag this in so I can get a kind of a rounded edge there. Now, if you hit Command Y, you can see the path by itself without seeing any of the other stuff. That's basically toggling between preview and outline mode. And I use this a lot to get, get down in there to see exactly where the paths are connecting. So what we want to do here is kind of, we don't want these edges kind of coming too far back around for our settings icon. So we're going to kind of terminate it right in there. Just kind of, kind of playing this out visually. For now. Go back to Command Y. All right, so now I'm going to select this and hit the R key, which is shortcut for rotate. And because my smart guides are on, I can hover the center of this shape and find the center. So if I click right now with the R, it'll set my rotation point and I can pull this around. But that's not exactly what we're going to do. We're going to, I mean, we are going to do that, but I'm going to show you a different way to do it. So with the rotation tool selected, I'm going to option click in the center and then I've got a rotation dialog that appears. So I'm going to. I'm going to move this shape 30 degrees. You can preview it by toggling that button. So I'm just going to hit. Ok, because the way our Settings icon is going to work. It's going to have these notches on the top and the bottom and I want this kind of moved over. So now that I've moved that 30 degrees, I'm going to select it again, hit the R key again and option click on the center again. And now I'm going to type in 60 because I want these evenly spaced all around the perimeter of this initial shape. So instead of hitting OK this time I'm going to hit copy. And that's going to copy it 60 degrees. And so now I can perform the exact same task by hitting Command D again and again. That's essentially the same thing as going to. Where is it? It's called Step and Repeat. Or maybe it's just called Repeat. Let's see real quick. Well, somewhere in there I'll find it after this video and tell you. But anyway, Command D will do that for you. Alright, so now we've got all these independent shapes, so I'm just moving these off so you can see that they're on top of that, hitting command Z to move them back. So what I'm going to do now is select all of this with the selection tool selected and then I'm going to shift select this tool, I mean this shape. So I'm only selecting these guys right here and I'm going to hit command G to group all of these. So now anyone, anyone that I choose will be a full group. And it's easy to manipulate these on their own. You can even, you know, rotate these on your own if you wanted to get a different, you know, feel for it. So you could go back in and hit R option click, say you wanted to rotate that back to the original position. So now you have it a little bit different style. All right, so now all of these are groups, but they're, they're individual shapes. So if I wanted to make all of these one shape, I would go into the Pathfinder here. All of these tools can be found under Window. I just kind of have some pre set up here. So in the Pathfinder under Shape modes there's a unite option which I'm going to click. And you can see when I did that all of the little anchor points for the center of these shapes went away. Because now this is kind of regarded as one shape in Illustrator's eyes and that allows me to do some cool things like set clipping masks and compound paths with these kind of. Now this is one shape on top of the other shape. So I can create some effects using these things. As two shapes. So now in the Pathfinder I can hit this minus front icon and you can see that I've removed where these shapes are overlapping. Now if I go back and you can see now these are grouped but individual. And if I try the same thing while they're not one shape. Oh, it still worked. I thought they wouldn't work. Alright, so if they're not grouped and I selected all of them. Oh, still working. Rad. Sometimes it produces kind of funky results, but it looks like it's working pretty good now, so disregard that. All right, so now I've got this looking almost like a settings icon. So I'm going to hit the L shape again or the L tool again to bring up the Ellipse tool and to find the center and hold option which scales a circle from the center as opposed to the corner. If you hold option, it'll create that shape from the center as opposed to just creating it from the edge. So it looks like a 10 pixel circle would be good. But this is 10:05, so it's not exactly where I want it. So I'm going to remove that click and just type in 10, select all of this again, align it center, vertical and horizontal. So now this is again two shapes on top of each other. So I'm going to select both of these and hit minus front. And now you can see if I move this over the artboard, you can see the white and the gray background coming through, which is a good way to test if your shape is one shape or two on top of each other. So if I go back to this being two shapes on top of each other and I drag it here, you can see that it's really just white on top of white and you can't see through it. But if I go in here, make it one shape, you can test it. And now when this is one shape, you can kind of go in and grab it anywhere. So you can. We can change the fill on this by toggling the stroke and the fill. And you can see that these edges are a little sharp here. So what I'm going to do is just select the direct selection tool by hitting A and then choosing or selecting the whole, the whole layer. And now that I've done that, you see these little corner points are now accessible. So I'm just going to select that. With it selected, I'm going to just kind of bump this up. That's probably a little bit too much. Maybe try two and then select off of it. So there you go. There's your settings icon, you can hit Command Shift H to hide your artboard that's under view. Show Artboards or Hide artboards Command Shift H. So that's kind of a quick way to see your creation. So that wraps up creating a settings icon. I hope this has been helpful. Please let me know if there's anything that was confusing, and I will do my best to provide some clarity. Thanks for watching.










