How to Make a YouTube Thumbnail with Canva
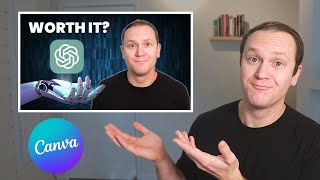
James Allen recreates his most-popular ChatGPT thumbnail in Canva, showing every step from choosing a black background to adding glow effects and the text "Worth it?" He explains why minimal, curiosity-driven text and bright sci-fi visuals drive clicks.
Chapters
If you're trying to grow a YouTube channel, you're going to have to learn the skill set of building great thumbnails. I've been on YouTube since 2019, and my thumbnails have gone through many different iterations, from really weird and not very good to a lot better. And I'm always improving my craft and getting better at creating YouTube thumbnails. Today I thought it would be cool to recreate my most popular thumbnail, at least at the time of this recording, and show you behind the scenes of how I made it, the little nuance, the little touches and things that I did to really make it pop and why that thumbnail is so clickable. Today we're gonna use the tool Canva, which is where I built this thumbnail. It is a free tool, but there is a paid version and I would highly recommend that you invest in the paid version if you do wanna create way better thumbnails. I have no affiliation with Canva, I'm not being paid to say this. I don't even have an affiliate link with Canva. I'm just telling you that it's gonna help you make way better thumbnails, because you will have a lot more resources on the pro version or the paid version than on the free one. I just want you to know that creating a great YouTube thumbnail is only one part of the equation to getting people to actually click on your YouTube videos. Having really awesome titles is what couples the thumbnail and it's the overall package that really makes people want to click on your video and then watch it. 'Cause you could have the best content in the world, but if your thumbnails and titles aren't good, nobody is going to click on your video and actually watch your content. So to help you write better quality content on top of the things you learned in this video, I want to offer you a free guide that I created and it's 50 Catchy Title Formulas. If you focus on just making one quality YouTube video every week, your business would grow and there are 50 different titles which are video ideas inside of this pack that you can use to come up with an entire year's worth of content essentially. And you can reuse these, just change the keywords, whatever you wanna do It's my gift to you, it's totally free, and I know it's gonna help you. There's a link down in the description, or you can always go to profityourknowledge.com/titles. First thing we wanna do is go over to Create a Design and choose YouTube thumbnail. Now the fastest, easiest way to create a YouTube thumbnail in Canva is right here on the side. Automatically, they're gonna give you a bunch of different templates and options, okay? This is a really popular one you probably see all the time, just randomly. This style. Okay, at all that— all that comes from Canva. So I can choose this one, and what you can do is change out your picture. You go to uploads, you can upload a photo of whatever you want. So let's say I wanted to use this one of me, plug that in, and then you can say, you know, got— how I got awesome. Okay, and you can play around with it and change out the text, resize it, all that kind of stuff. This is by far the fastest way to create YouTube thumbnails, but in my opinion, I don't think these YouTube thumbnails are that great. Um, YouTube thumbnails should elicit a certain emotion in people that makes them want to click on it. So for me, for example, I'm going to choose this one, and I want to recreate this thumbnail and show you how I've actually been able to— how I made this, okay? Because I spent a lot of time on this thumbnail, but I'll show you how I did it, the things I did, the ideas behind it, why I did it. So this is about ChatGPT. I tried out ChatGPT-4 and currently this is, at the time of this recording, this is my most popular video, because ChatGPT is very popular right now. Okay, so when you see it, you see a picture of me, I'm like looking at it like I paid for ChatGPT, here's the logo, here's the robot with it kind of hovering over it, worth it? I don't know, it makes you wanna click it. So when you're making thumbnails, the biggest thing that you have at your disposal is curiosity. That is the best tool. I say worth it. And it's only 2 pieces of text, okay? 2 words, that's it. So let's start with the background. What I actually did here was I made the black— the background black. I went over to photos, and what I did, I believe, was typed digital. Okay, so right here is where I found the thumbnail. Now if you do notice, it does say pro. That's because you can only access this with a pro account. Again, it's worth investing in it. I don't get a commission or anything. I'm just telling you it is worth it. And that's how you get better designs, better pictures, and that kind of stuff so you can make better thumbnails. Totally worth it. So this is the image I used. You can see the similarity. And what I did was I actually made this a bit darker. I think I went to about, I don't know, right about there, maybe 75. We'll just go 75. Okay, go to uploads. I used— so this was the photo that I used. Now obviously it's I'm, it's just a picture of me right here. So what we do in terms of this photo is we go over to Edit Photo, Background Remover. Just hang out for a sec. And what's that gonna do? Trim out the entire background. Awesome. We can pull this in so it's a bit more concise. We'll do that. Then we're gonna make it bigger. Okay, and I'm gonna see. So right about there, maybe a little bit bigger. Something like that. Okay, notice there's also this glow around me. Is it necessary? I think it gives it a bit more 3D feel, which looks really cool. So what we do is go over to shadows. Okay, and this is under the same thing as the background remover, effects. Okay, so you just click on the image, go to effects, shadows, and what I did was a glow and I made it white so you can see that. Just a little bit bigger, so we're gonna make the size smaller. We're gonna make it more dense, and the blur amount, we're actually gonna turn to right about there or so. Alright, so we will click off. Now we're set. Alright, notice a couple other things here. This is just the normal picture. This one looks a lot cleaner. It looks like more crisp. So we'll click on this, go to edit photo again, and then we'll go to Adjust. I do this with every single one of my thumbnail photos. Typically I turn up the brightness a bit. I like to play around with the contrast a little bit. All right, and then down here is sharpness. I definitely like to make it— you can see if I make it really sharp, it's a little extreme, and then blurry. So I like to make it to where it's just clear Maybe clarity? No, we'll just leave that. Vibrance. Okay, obviously I don't remember the exact settings that I had, so it's a little bit different. Blacks. Alright, so we'll do that. Maybe we'll make the brightness just a little bit darker. Maybe turn up the warmth a little bit and do that. Okay, and then so we got this half done. That's pretty much it. All right, I could maybe make this a little bit darker, but no worries. So next we'll work from bottom to top. So what I did was I went over to, I believe, photos, and I typed in, um, AI arm. This was the picture. Look at that. Okay, so what I do is go to flip. Horizontal, and then we're gonna make this smaller, bring it down a bit, probably pull it off so it's a little bit bigger. Okay, actually, I'm gonna pull it back a little bit more, make it a little bit bigger, so right about there or so. Roughly. Okay. General, general little spot. And then we also need the ChatGPT logo. So what I did was I just typed in to the internet, I said ChatGPT logo, and I just found a logo and downloaded it. But since I've already gotten this inside of here, here it is. I'm going to click on this. Bring it down, make it about yay big. Okay, right up here. We'll just put it right there. Now notice that this has a little bit of a glow behind it. So again, I'm gonna go to Edit Photo and I'm going to hit Shadows and Glow. Then we'll make it white. All right, and you can see that. So we're gonna play around or make this the size. Right, actually I'm gonna do the angle right behind it. And you can see it's already looking a lot better. Make it a bit bigger. A little bit smaller. There we go. Okay. Cool. So it's already coming along. And then the text obviously is easy. We go to text, we type in heading, and we're going to say worth it? We'll make sure that this is white right here. And then for the, for the font, what I love to use and what I always use is Poppins. I think Poppins is cool. Go pop-ins, and we will say bold. Actually, let's go extra bold. Why not? All right, so we're going to click off. I'm gonna bring it up here a little bit smaller. Okay, right there. See, it already lines it up for me. Looking cool, right? And then there's this cool little detail right here. So we're pretty much done. The last little detail that I added which I think really made this thumbnail really cool. Well, one thing is that actually on this photo, I did make it adjust. I did make it a bit sharper. I just like to sharpen the images. Maybe I can bring up the brightness just a little bit to really make it pop. Bright thumbnails typically perform better. All right. The bright colors. So if you notice the thumbnail, there's a bit of a— it's kind of like it's floating and it's kind of sci-fi. So what I did there was I went here and I typed in, I think it was Spotlight, see all. We can go around, and I chose this one. Again, this is like the pro. It says right there, um, it is on the pro one. This one's not. This one is pro. Okay, so some of these, like the kind of boring ones, they're not on the pro plan, of course. So click on pro, and then we're going to flip it upside down, and we're going to put it right there. Okay, so a little bit higher. Maybe we'll make it a little bit softer, a little transparency. I will very slightly adjust it. All right, and as you can see, that is pretty much how I made this entire thumbnail. Pretty cool, right? Now when I'm building YouTube thumbnails, I'm never just building something completely from scratch. I'm not that creative, okay? I find the things that work on YouTube and then I model those in my own way and add my own twist to things. And if you want to learn more about this strategy that so many people are using on YouTube but not a lot of people are talking about, definitely check out this video and I'm going to show you the entire strategy and your eyes will never look at YouTube the same. So if you're ready to take the internet red pill, then check out this video and I will see you in the next one.