
You only need to learn these 10 nodes to master an n8n
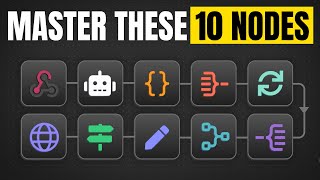
Rory Ridgers breaks down the ten n8n nodes you need to build any workflow: AI Agent and Code for logic, Webhook and Gmail for triggers, Switch and Aggregate for data manipulation, and Google Sheets Append and Edit Fields for storage. He shows concrete examples like using AI Agent to send emails and JavaScript to calculate LinkedIn engagement metrics.
Chapters
In this video, I'm going to be showing you the 10 nodes that you need to learn in order to master NAN. I've built countless workflows in NAN, and through doing that, I've realized that there's only a certain few nodes that you actually need to learn in order to build pretty much anything, because every single workflow is based around a few nodes that are actually doing all of the heavy lifting. So in this video, we're going to run through all of those 10 nodes. They're broken up into 4 different categories, which we're going to go through, and I'll try and keep it brief, but I promise if you stick around till the end of the video, you'll have all of the knowledge that you need on these specific nodes to build pretty much anything inside of NAN. Okay, so these are the nodes split up into their 4 different categories. We have the highest leverage ones, then the triggers, the data manipulation, and the data storage. And I want to start out with the highest leverage ones because these are by far the, like I said, the highest leverage nodes that are going to be doing all of the heavy lifting in your workflows. You can pretty much build workflows around these nodes in order to do absolutely anything. So to kick things off straight away, first of all, we have the AI Agent node, and you may be fairly familiar with this, depends on how much you use NAN or how much you've used it before. Um, but the AI Agent node is essentially just an LLM node that you can add, uh, tools and other different attachments on top of. So you're all going to be familiar with AI if you're watching this video, and this is essentially what this node is. It's an AI node inside of your workflow, so you can use AI inside of your workflow to do pretty much anything. And the reason I'm using specifically the AI Agent node compared to just the basic LLM node in NAN is because it gives you a lot more functionality. So we're just going to take this node out on its own so I can show you it separately to the others, so we can sort of see all the different things you do with this node. So first of all, we have an input and then we have some kind of out. So we're going to link up the input first. And for the input, majority of the time, one of the things that you can do that you can't do with any other node for the input or the trigger is you can have an on chat message. So with on chat message, this will just simulate a conversation. So you can send a message for a chat inside of NAN. You can go to open chat here, and this is now connected up to our AI agent. and you can send the message through, and then the output from the AI agent will come back to us. So it'll be just like having a conversation. So this trigger, the chat message, you can't really use that with any other node inside of N8N, which is one of the reasons that the AI agent is so special. And then you can see down here we have 3 different prongs that we can add things to. So the first one is going to be the chat model. So here we can just pick any LLM that we want. So we've got Anthropic, Deepseek, Google Gemini, Mistral, uh, Groq. But for majority of what I do, I use, uh, the OpenAI model. So if we go to OpenAI here, you can see all of the different options that we have of just the different OpenAI models. Most of the time I'll go with GPT-4.1 Mini. And then here we also have a memory prompt, so we can add a memory to this. So if we click on this, you can see these are all the different memory options. And I do actually have a video going in depth on which memory options to use. So if you want to check that out, I'll leave a link to it. But this just essentially allows our AI agent to act more like a human and kind of like how it acts when you talk to it through ChatGPT, where it can just remember your last message or your last couple messages. So for this, we're going to go for a simple memory. And this is just something that's built directly into N8M. And if we come into here, the input here is 5. And this just means the context window length. It just means that it's going to remember the last 5 messages in your conversation. You can change this to whatever you like. But I would say around 5 to 10 is a nice sweet spot for this, because the more that you start adding up into here, the little slower the model is going to be, the little more confused it's going to be. Say you're doing like 100 messages, it's got to try and remember the last 100 messages. It's just going to be getting a little bit confused and it's going to use more tokens, cost you more money, take a little bit longer. So we can now test this out and just talk to it the same way we talk to ChatGPT. So if we just said something like, hey, and it's going to come back to us, say, hello, how can I assist you today? It's going to remember the last messages in our conversation as well. So we can say, I'm good, and then it's going to know, obviously ask me that question, and come back, glad to hear it. If you need anything or want to chat, let me know. Perfect. So this is just like the most basic version of our AI agent. And then what we can do as well is we can add some tools to this. So if we go to tool, and then here you can do pretty much any kind of tool. So let's just say we're going to make a Gmail agent that can reply to our emails or send emails for us. We can just type up Gmail, go to the Gmail tool, and then in here we can configure it a little bit. So we can go to tool description, set automatically. I would recommend you just leave it like this. The resource is message, the operation is send, and then here we can define who it's going to, the subject, and then also the message. And this button here, really, really cool. Basically what this does is it lets your model define this parameter. So this just means our AI agent can input this on its own. So we're going to flick this on for all of these. This way we can say something to the AI agent like, send an email to Rory@autonomously-ai.com, uh, just saying, are you going to be free for a chat next week? Something like that. And then it can automatically put in that email, put in the message, and then generate a subject line as well. So just by clicking that button, we let our AI agent have control over those inputs. And then if we actually come into our AI agent now, you can see there are a few different things that we can configure. So the first one is going to be the user message, and this is already built into any— and the connected chat trigger node. Um, so that connected chat trigger node, you can see it's connected up, it's just automatically going to take the input from there. You can see our last one was, I'm good, automatically going to take the input from that and use that as the user prompt for our AI agent. If you want to do something else, you absolutely can do. All you do is just go to Define Below, and then you just drag in the input here. So the exact same effect, But of course, if we already have the chat trigger node, it just makes more sense and makes our lives easier to use that input there. And then coming down here, we have a system message, and this is just kind of going to be like the long-term instructions. If you don't know the difference between user and system prompts, user prompts are kind of like the variable messages. So like our messages that we're sending through that chat window is going to be more variable because it's going to be different every single time. But then the system messages are kind of just going to be the long-term instructions of our AI agent. So if we're building an email agent, It might say something like, you know, take from the user input, uh, the email address and the subject line and the email body of this email, and then use the email tool to send off that email, that kind of thing. It's going to be a system prompt, the agent's instructions. And then if you go to add option, there are a couple different, um, other options that you can do. So max iterations, return them at intermediate steps, automatically pass through binary images, and batch process. And I'd recommend not really, um, I'm not going to go into too much depth on any of these, and I'd recommend not really worrying about them. It's something that I rarely ever use with AI agents. So now we have our Gmail agent set up. We're just going to quickly say something like, oh, send an email to Rory@autonomously-ai.com saying what's up. So it's going to use the Gmail tool, send that off. Very, very simple stuff. So you can see I just got this message, um, from my Gmail just saying it's just an email to me that says what's up with the subject line what's up. So perfect. So that is the AI agent. There are a few other things you can do in here. I didn't go into the prompting too much, but if you want a full video on that, let me know. But you can see from here all the different things you can do with this. The main, uh, thing with this is the tool. So there's so many different tools inside of here. You can see if we just scroll through, there's like hundreds and hundreds of different tools and different apps that your AI agent can connect with, and you can just talk to them in natural language and get it to do pretty much anything inside of these apps. Okay, perfect. Then now we look at the code node, and this code node is to use JavaScript inside of NAN. And if JavaScript sounds a little scary Sounds like something you don't really want to do. Don't worry, I'm going to show you. Again, I do have a full video on this, so I will link that as well on how to use this JavaScript. But JavaScript is amazing. It's something that I love. For a long time I avoided it and I was kind of scared of using, but now I'll use it literally all the time. So I'm going to show you some examples of the kind of things you can actually do with this, because it can become difficult sometimes to figure out what you can do with this. So I want to show you through a few examples. So here we have a simple workflow that I actually used in a different video, and essentially what this does is first we use Apify to just get information on social media posts. So you can see we get LinkedIn post data like this. It's like a post URL, the text, the author, the stats, when it was posted, the hashtags, all of this kind of stuff, just like basic information on posts. And then what we do with that is we run this through this JavaScript here. So this is what the JavaScript looks like, and I'm not going to show you how to actually write this because, to be totally honest with you, I don't write any of this myself. I use AI, ChatGPT, to generate all of my JavaScript for me. Essentially what I do is I say to it, I have an input that looks like this, I want to do this with the data, can you generate me the JavaScript? And then it does it pretty much flawlessly every time. So to give you an example of the kind of thing you can do, here you can see we have the exact same output from here, so it's matched it here, but it's added a little bit on the bottom. So if we scroll to the bottom here, you can see it ends at the metadata part here, or the search input, which was AI. So if we scroll up here, search input was AI, so all this additional stuff is generated by the JavaScript. So it's just given us the total reactions, the comments, the shares, the total engagement, the minutes since posted, and then the engagement per minute. So this stuff here, it was obviously just data that was further up in this, uh, big chunk of data because it's not able to find that from LinkedIn. That you'd have to actually go to LinkedIn to find that information. But what it did do was it calculated the minutes since posted and then also the engagement per minute, and then it gave us the ratio. So the likes ratio the comments ratio, and then the shares ratio. So it generated these insights for us completely automatically using this data that it got here. And then we have another JavaScript node here, and essentially what this does is it takes— so we got 200 inputs here, it outputted 33 items, and then this JavaScript code here takes those 33 posts. So you can see total posts analyzed, 33, and it gives us all of the top velocity posts. So it goes through there and looks at all the posts that the engagement is growing the quickest. So it gives us the top velocity posts, as you can see, Very, very cool. And then what it also does is gives us the top evergreen posts, so just the ones that are doing the best overall and just consistently growing. So it gives us all of the top evergreen posts, and then it tells us the best posting hour. Looking at all of that data, seeing all of the best posts, seeing when they're posting, gives us an average of the best posting hour. And then you can see here it gives us the average engagement per hour. So here are all the different hours with the average engagement. You can see 7 AM is by far the best. So this kind of stuff you can do with JavaScript, like all of this analysis, all of this filtering, everything like this you can do with JavaScript. It's very hard to say like every single use case that you can do with JavaScript, but the best way I would describe it is just if you have a large data set, like a large data or lots of pieces of similar kind of data, and you want to just manipulate it in somehow. So it could be filtering, it could be generating insights like, um, you know, the best posting hour, that kind of thing, based on the information that's in there. It could be splitting it up, it could be grouping it together, anything like that. If you want to manipulate the data in any type of way, you all you have to do is just tell ChatGPT your input, get it to generate you the JavaScript, and then it will give you outputs that look like this. And one of the best things about JavaScript compared to some other nodes inside of AnyN, so like for example, you could do the same kind of thing using AI, so just using an LLM, you could do this same kind of thing. But one of the massive benefits of using JavaScript is once you do it once, it's going to be right every single time. So this JavaScript isn't going to change. Once I know that it works, I know that it's going to work a million times, right? But with AI, the outputs are going to be slightly different every time just because we're using AI and not something like JavaScript. And then next we're going to look at the HTTP request, which is also a staple in your workflows. Essentially what the HTTP request does is it allows you to communicate with external sources outside of N8N. In simplest terms, that is what it allows you to do. So it allows you to send data over and get data back from external sources. And if we have a look around in here, I'm going to show you how it kind of works in terms of inputs and then give you a few examples so you can see what I mean. So the method, first of all, most of the time you're only going to be using GET and POST, but there are all these other methods and they're pretty self-explanatory what they do. So GET is going to be getting information from somewhere. So let's say you've got CRM using HubSpot as your CRM, you want to get some information on a contact, you would do a GET request. But then POST, let's say again with the CRM you wanted to add a new contact to your CRM, you do POST because you're sending over data, right? And then you have the endpoint URL and it's just going to be where you're sending that data to. So if we just use the example of the CRM again, it's going to be like a URL that looks like hubspot/api and then maybe /contacts/v1 or something like that. So it's going to be exactly where you're sending this to. And don't worry about finding any of this data, by the way. Whatever you're trying to connect with will have documentation that shows you exactly the method to use, the URL, authentication, everything like that. But yeah, essentially the URL is just going to be where this data is going to. The method is what you're doing with that data. And then here we have headers, and headers are usually just to define what you're sending over. So this could be your API key, for example. Majority of the time it's going to be your API key. So let's say again you're doing this CRM, um, the HTTP request knows what you're trying to do, where you're sending it to. It doesn't know which account is yours because HubSpot obviously is going to have hundreds of thousands or millions of accounts on there. Um, so it needs to know which account is yours. So in the header, you just put your API key, which basically just says I'm sending a request to my HubSpot account. There's also other things that you put in the header, um, but those are the main ones, things like API key and also defining what you're sending over. So all the time you're going to see something called content-type and then application/json. This just means you're sending over a JSON body, which I'm going to show you now. So send body, this is going to be— you wouldn't do this really with GET requests, this is going to be for POST requests. So again, Let's use the example of, um, the CRM. Let's say you wanted to add a contact to your CRM. In this body would be where you put that information on that contact. So it might be their name, their email address, uh, the company they work at, the location, and what they wanted from you. For example, something like that. That would be sent over in the JSON body. So I hope that all makes sense. What I'm going to do is I'm going to show you a quick example. So this is a system that generates UGC style ads using, um, Sora and also Google Gemini. And this, some of this stuff might look a little bit confusing. Don't worry about all of this. I'm not here to show you this kind of stuff. What I want to show you is these two HTTP requests here. Well, actually there's three, but I want to show you these two here. So what do they actually do? This first one, basically the way this system works is it will just generate first, like a first, uh, a photo for the first scene of the video, and then it uses Sora 2 to generate the full video based on that photo. So first of all, here we have an API call. and this is to use the, uh, Geno— Gemini Nano Banana model. So the method is POST, the URL, as you can see here, this is the endpoint URL. This is how they usually kind of look. It's just defining, uh, in this case that we want to talk to a model and then what model we want to talk to. And then with authentication, this is something I didn't touch on, but rather than sending over a header with your API key, what you can do inside of NAN is if you already have your credentials set up, let's say with the CRM, again, you're using HubSpot. Let's say you already have your HubSpot credentials set up inside of NAN. You can just go to authentication, predefined credential type, and then choose the credential type that you're sending over. So in my case, it was Google Gemini, but let's say the CRM, it'd be like your HubSpot credentials. And that way, every time it's just going to send over your API key or your credential details, so you don't have to put the header in every single time. And then we sent over a body that looks something like this. So this is the body. The role was user, so it's kind of like a user prompt because we're talking to an LLM here. And this was the text, so this was the prompt for the image that I want to generate. And then also some extra information I wanted to send over. And you don't have to understand exactly what's in this specific one, but this just gives you an idea of how these JSON bodies look. So we basically just have the name of the variable and then the value of that variable, and this is what we send over to the HTTP request. And we would have got back an image here, and then again we would have used another HTTP request, this time to OpenAI to generate a video. So the method was POST, this was the URL here, and then this time we didn't do the predefined credential type, we actually sent the headers just to show you the difference. So this time the header was authorization, and then my API key, of course, it's not actually in there because I want to show you my API key. But you would— that would have been my API key in there. And then content-type application/json, like I told you, would come up often. And then also down here, you can see the body that we're sending over looks a little bit different. So rather than a JSON body, it is FormData. And it is still actually a JSON body. It's just when we do it like this with FormData, this basically just makes it a little bit easier for us to actually input data into it. So when we do it this way, we can just define the name, and then this is basically the variable, so the value of that variable. So on the backend, this is still a JSON body. The same way that it's— it— this says prompt as the name, and then this is the value, is the exact same. If we come over to this one where this one says text as the name, and then this is the value, it's the exact same thing. Um, when we do it this way though with the formData, just makes it a little bit easier for us to input data into there. So you can see these are the different inputs we have things like the prompt and then the model we want to use, the size of the video, the number of seconds, and then also the image as well we're attaching from this step here. So essentially, when you use a HTTP request, it's just when you want to do things outside of NAN that aren't natively inside of NAN. So what I mean by that is, for example, if we go to OpenAI, you can see these are all the different things we can do. We can like message a model, analyze an image, generate an audio, um, create an assistant, this kind of thing. This is with OpenAI. But you can see there's no option here for us to generate a video. So in that case, we have to do an HTTP request to generate that video. And these, by the way, these are all actually just HTTP requests. It's just N8N puts a nice wrapper on it so it's easier for us, but they are all just HTTP requests. Okay, and then now moving on, we have triggers here, and these are kind of two— it looks like two, I'll show you what I mean in a second. Um, but these two triggers here, I'd say, are some of the most important in your workflows. So there's lots of different triggers but these are specifically going to be the triggers that automate your workflows when you're not there. So you don't have to input anything, it's just going to automatically trigger your workflows, which I think, um, is the best use for triggers, right? So the one I want to show you first is the webhook trigger because this is really similar to an HTTP request. Basically, an HTTP request is when we're sending over data to another platform to either put data in there or get data back from there. The webhook, on the other hand, is when an external source pings our webhook, so sends data over to us. So this might look like, for example, let's use a CRM, um, as example again. With the HTTP request, we're sending over data to create a new contact, right? But then we could say when a new contact is created, automatically ping us in NAN. This is what that webhook would do. So we'd set it up so that when a new contact is created, it triggers our workflow in NAN. So we could do any kind of like lead enrichment workflow or qualifying them, that kind of thing. That is essentially what this webhook does. It can just be pinged from external sources and send over any kind of data. Very, very similar to what we're doing with the HTTP request where we send over data to an external platform. The external platform is just sending data to us. And then here we have the Gmail trigger, and the Gmail trigger isn't specifically the one that you should be learning. What I mean when I say the Gmail trigger is just these in-app triggers. So if we come over here and we just have a look at the trigger, so go to trigger and then we go to on-app event. In here, these are all the different app events that can trigger us inside of NAN. So let's say we use Airtable, for example, on new Airtable event. That's probably not the best example. Uh, let me find a better one for you. So Cal.com or Calendly, we'll use Calendly actually because I feel like that's one that more people use. If we go to Calendly on event created, so when a new event is created, that could trigger us in NAN. The same thing with the webhook, it's just this again has a nice wrapper. So similar to like the HTTP thing, um, this is just a webhook on the backend, but it just has a nice wrapper for us. So with this, you can kind of see where this is going. You can pretty much trigger it from anything. So we could say a new event created in Calendly, or a new email inside of Gmail, or we could go to, let's say, um, Google Calendar. We could say when a new event is created in our Google Calendar, anything like this. These are absolutely vital to learn. Basically, when an event happens in a separate app, it could be new contact created in HubSpot, new event created on Google Calendar, a new email through Gmail, a new event created on our Calendly, anything like that, it's going to trigger our NAN workflow. This is one of the most vital triggers. And I know I said that this is sort of like 10 nodes. I guess this could be considered like 100 different nodes to learn, but just the concept of app events triggering your NAN workflows is super, super vital. And the reason I'm not going actually into these nodes too much is because the setup is really, really simple. If we look at the Gmail one, all you do is you set up your Gmail credentials, which you would probably already have. So you just put in your Gmail credentials, you say the poll time is every minute, and then the event is message received, and that's it. And then every time a new message is received, it's just going to ping us in NAN. And if we have a look at the webhook, it's a similar kind of thing. Basically, we get a URL here, and this URL is just our endpoint URL. So when we're putting in an endpoint URL here, this URL that we get from our webhook is our one. So we'd put this, say, in HubSpot, we'd put our endpoint URL and say when a new contact's created send it to this endpoint URL, and it will just do a HTTP request to us, if that makes sense. Okay, and then now we're moving on to the data manipulation nodes. And these nodes are— there's a lot more data manipulation nodes, but I would say these are probably the most crucial, and these are the ones that I use all of the time. So I want to show you these ones specifically. First of all, we have the switch node here, and this just allows you to basically route the data depending on certain variables. So if we have a look inside here, what we do is we basically put in a variable in here and then we say is equal to and then another value. But it's not limited to just is equal to, it can be anything. So for example, let's just say we're getting information for— this is an example I'm going to show you in a second— but let's say we're getting information from a spreadsheet that has lead data and we want to look at the countries that all of these leads are based in. So we could drag in the variables for countries and then we can say if it's equal to the United Kingdom, then it goes this way. If it's equal to the United States, it goes the other way. If it's equal to Canada it goes the other way. Or similarly, let's use that same lead list. Let's say we're looking at the employee count. So we're going to say— we're going to drag in the employee count variable here. And if we go to this and then we go to number, and then we can say is greater than. So if the employee count is greater than 10, it goes this way. If the employee count is greater than 100, it goes this way, right? And you can have as many different routing rules as you want. And you can see it just adds more prongs here, so you can just route them to different places. So I have a spreadsheet of leads that looks like this. We've got like the first name, last name, email, their LinkedIn, their title, the company, industry, employee count, country, key information, that kind of stuff. So if we come back over to N8N, got a node here that's just going to return that data. So if we run this through, see we've got 87 items. And if we look in here, it's just that exact same data that I just showed you. So now if we wire this up to the switch node, now we can start doing those things that I said about. So let's go with the country one first. So let's find country here, country, and then we can say if it is equal to United States, Then let's rename that output to United States. And just renaming it means the name just appears there, so it makes it a little bit easier for us. And then let's just copy this over here, paste that into there. And then let's just say is not equal to— so if it's anything other than United States, because we don't have a massive, massive data set here, um, we're just going to say if it isn't equal to United States. So we're just going to rename that one other. So now we have the country variables in here and say if it is equal to United States goes this way, if it's not equal it goes the other way. So you can see United States other. Then if we run this through, you can see 75 items went that way, 12 went that way. So 75 of those leads were based in the United States, and then 12 of them were based somewhere else outside of the United States. And then we can switch this up as well and do the other thing that I said. We could go to employee count, and you can see it's going to get an error here because this is a number. And what we need to do is we need to change this to number, and then we can say is greater than. So let's say if it's greater than 1, it goes this way. And then let's grab the employee count again and do the same thing. And then let's go to Number, um, is greater than, and then we'll just say like 10, for example. So let's rename these outputs 1 and 10. Okay, then if we run this through, you can see, um, okay, oh, this time all items went to the 1s. They're all just over 1 and they were all less than 10. So maybe not the best example, but here you can see basically what we can do with this switch node. And we can add way more inputs here. So just routing them to different ways in our workflow. So it's a very, very useful node. Use it all of the time. And then let's use this same example here with the getting rows in the Google Sheet. And then we're gonna look at the aggregate. And basically what this does is it just puts, well, you can see here we have 81 items and let's say we wanted to put all of those into one list. So we wanted it to just output one item with all 81 of those leads in there. And we want to maybe pass this to an AI agent so we could do a bulk analysis of all of them or something like that. That is when we would use this aggregate node. So if we link up this data here and raise this up so you can see it a little bit, see we have this data here and we have the option to do either individual fields. So we could aggregate all of the first names together, for example. So if we do that and then execute step, you can see we get all of the first names outputted as one item. So it's just one item with all of the first names here in there. Or if we want to do it all items into a single list, we do that. And you can see this time we got all of the items but in one list. So if we just go to data You can see it opens and closes all of them. But then of course we have data 0, data 1, data 2, all the way up to 81. And this time it just outputs one item. If we did it this way, it means we could just drag that data into, like, like I said, like an AI agent. It could do bulk analysis. If we tried to do that with it being split up already into 81 items, it would only do the first one, and then it would do the second one, and then it would do the third one. It wouldn't do them all together. And then kind of the counterpart or the twin to the aggregate node is the split out, and it does the exact opposite. It will take one item and it will split it up into multiple different items. So just the polar opposite of what the aggregate node does. And to best show this off, I can just link up the aggregate node here. So it's bunched up 81 items into one item. Now let's say we wanted to put that back into 81 items. Of course, this doesn't make sense because we already have it as 81 items here, but let's just say it started off with one item and we wanted to split it up into multiple different items. The field to split out is data. As you can see, it's data here. So if we execute this now, it's going to output again 81 items. So we've just bunched it all together, split it back out again. So this is something I use all the time to mess around with different item lengths. So if you want one item or multiple items, I use the aggregate and the split nodes all the time. And then we move on to the last section, which is data storage. And this is just how you're going to be sort of storing long-term or short-term data throughout your workflows. And there's lots of different ways to do this. One of the key ways you'll probably know or you might have heard of at least, is vector stores or RAG systems. And I do have a full video on that. I didn't want to get into that in this video because it is kind of like a whole thing in itself. So I just want to show you like the temporary or the slightly temporary way that I store data throughout my workflows in NAN. Um, it is mainly with these two nodes. We're going to start with the first one, which is just appending a node in a sheet. And now I use Google Sheets, but you could use just any kind of like spreadsheet software, so Excel, Airtable, anything like that. But I use Google Sheets if I need some kind of like persistent type memory in my workflow. So I would use this all the time when basically like I'm putting data in at one point in the system and then I need to take it out at another point in the system. I'm going to show you an example of that. So a key example of that is in this system that might look pretty confusing to you, but I actually built this in a video and it basically generates me content video ideas for YouTube. But to just give you a quick rundown of what's going on there, we basically research videos and get all their likes, their comments, reactions, everything like that. And then we just loop through them and analyze the thumbnail. So this step here is just analyzing the thumbnail. And then what we do is we just add that information into a Google Sheet. So just the thumbnail analysis, because we have 30 different items in this case that we're going through, to just kind of keep that memory saved and like that data stored, we just quickly add that to a Google Sheet. And then when it goes around, it finishes. We then get the end we then get all 30 items from that Google Sheet and pass that to our AI agent that does all the analysis and stuff. But this kind of gives you an example of how we do this kind of thing. So you can see it's just kind of this persistent memory throughout my workflow. I wanted this data here, I wanted these 30 different data items, but I wanted it stored, so I just put it into a Google Sheet quickly. And then when I needed it again, I just got it out of that Google Sheet and then passed it to the agent. So that is the Google Sheet. Now, as I'm sure you're all familiar with Google Sheets or that kind of thing. So you can kind of think of why you would use this or when you would use this. It's just when you need data later on in the workflow, you need data stored in a semi-kind of permanent way, you just put it into this spreadsheet. Then when you need it, you can simply just get it out using the Get Rows. And then lastly, we have the Edit Fields node, and this is something that I use mainly to store variable data, so data within variables, and sort of manipulate variables for later down the line. So a really good example of this is if we quickly execute this again get all the lead data from here and then connect this up. Uh, oh, I missed. If we connect this up, if we come inside here, this kind of looks familiar to the switch node a little bit. But basically what you do is you put the variable in here and you can simply just put in here what you want to rename that as. So it's as simple as that. So I want to show an example. Let's say the name of the variable, we're just going to call it names and emails. So this is the name of the variable, and then down here we're basically just creating what that variable actually is. Let's say we do name like that, and then we drag in the first name. And then we do email like that, and then we drag in the email. And if we execute this, what it's going to do, it's just going to give me 81 items because 81 were inputted. And then as one variable, it's going to give me the name and the email. As you can see, I'm kind of switching around here, but as you can see, the name as Robin and then the email as that email there. So now that's one variable that we can use later down the line for our AI agent steps or for whatever kind of steps. So we've just stored that variable, we've merged these together into just one variable like that. But this is just obviously the tip of the iceberg with this. There's so many different things you can do. You can simply do something like, as you can see here, we have first name and then last name. Let's just say we wanted just the name, right? So we can just go to name, then we just drag in first name, add a space, and do last name. And now we get a variable that's named with just their full name, right? Or the other use case is going to be if you want to rename a variable. So right now this one's called first name let's say we wanted to rename this to given name or something, for example, uh, we just paste, we just change the name of it, and then now it outputs it as given name. So there's so many different things you can do with this. This is mainly, like I said, it's data storage but for variables. It could also be considered as data manipulation, but I use it in a way to store variables a lot of the time. So let's say in a workflow I have, I get an output that looks like this, and I don't need any of these other variables. All I really need is, let's say, the, um, first name. I need, I need the last I need their LinkedIn, and I need their company website or something like that. And then I'll just name it, um, you can name it anything you like. But then if I execute step, now I just get just those variables that I actually need that I can use later down the line. I could group these all up into one variable. I could do the URLs as one variable, the names as one variable, anything like that. Just a way to kind of store and manipulate data.
More from Rory




Dynamic Workflows are crazy. This is how to actually use them (beginner's guide)






