Matt walks through a field technician's mobile app for a fixture install at customer Wilson Sant's location. You'll see how to sync the price book, create multiple estimate options, convert one to an invoice, collect signatures, record payment, and mark the job complete so the office knows you're done.
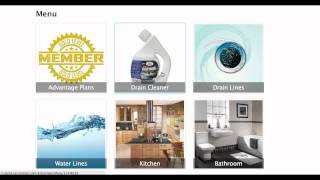
Alright, let's imagine I'm Matt the technician and I've just logged in. I can see here that I need to sync my price book to this device. So I'm going to click Sync menu then ok. And I'm going to wait now until the sync is complete. I also see that I've got one job that I've been dispatched to that's here. Fixture install. The customer's name is Wilson Sant. So I can click here to get some more information about this job. I've got the service location, I've got the bill to customer and I've got the job summary that was entered in by someone in the office. Now I'm also I can click into the service location or billing customer to get even more information such as what work was done there and what open estimates there are. I can click on a map button that will open up driving directions for my current location. I can add a note to the job, I can upload a picture to the job, but for now I'm going to mark myself as a ride. I just got to this service location. So when I press that arrive button it notifies the office that I'm there and now I'm with the customer. I can either go directly to the invoice which is currently empty, or if I head back to the job, I can start out by creating an estimate. So let's start with an estimate. I'm going to press the add item button to begin building this estimate and this brings me to my categories list. So from the categories I can click on one, I'm going to click bathroom and this will take me to the subcategories and I'm here to fix a toilet. So I'm going to go to the toilet section. Now the customer has indicated they're interested in a replacement toilet. So if I click on the basic toilet option we have here, I could add that one to the estimate. I can also see down below that there's a better and a best option related to this one. But let's for our first option, I'm going to add the basic estimate and we're also going to add the membership plan to it. So now we're looking at an estimate that's got a replacement toilet, the basic one, and a membership plan. I'm going to label this estimate by clicking the tax summary button. I'm going to call it option number one. I'm going to click back the view job button so I can see now a new section for estimates for the open estimates on this job and I see my option number one. Now, if I want to build a new estimate, I can either start out with this estimate and duplicate it. This will create a brand new estimate that looks exactly the same, it has the same contents. And now I can add or remove option. So let's say I'm going to build now a second option that's the same as the first without the membership plan. And I'm going to call this option number two. If I return now to the job, I'm going to see two open estimates. Now I'm going to build a third one. Create, estimate, add item, bathroom, toilet. And now I'm going to go with the ultimate toilet and add that one to the estimate along with our membership plan. And I'm going to call that option number three. Not one, not two, but three. And now if we go back to the job, we'll see three options here. So let's imagine the customer just wants to go with option number one. I'm going to click into it and I'm going to click Sold. Convert. This now takes me to the invoice view. The invoice was previously empty, but since I converted this estimate, it now has the same contents as that option one estimate. So I've got standard price, member price, and the customer here is getting the member price because the invoice now includes a membership plan. Now, if I wanted to make changes here, I could make changes by clicking on one of the tasks that's on the invoice and that'll take me to the edit screen so I can make adjustments to the price here or the description and then save them. Okay, so now it comes time to authorize the work to be done. So the customer will read this paragraph here and they may even have an additional terms and conditions document that they can click on. It'll pop open on a mobile device, on a desktop. Here it downloads and we can now have them sign to have you go ahead with the work. Once they accept that signature, you can go ahead and do the work and then have them sign after the work is done to acknowledge it's been done to their satisfaction. Keep in mind that if any changes are made to the invoice at this point after the signatures, they would need to sign for those changes. For example, if we were to make a pricing change here and attempt to save them, it's going to bring us to the change to invoice screen and the customer can initial to accept them and authorize the changes. See their initials are saved there. Now it's time to collect payment so we can click the pay button. Let's imagine that we're getting check, we're getting a check for the payment for the full amount and we're going to put in the check number here and save. So now we should have a zero dollar invoice, zero dollar balance rather we can see that here and maybe we want to email this to the customer a receipt. We can take a look at what that email is going to look like by clicking the print button. And here we see our invoice along with the signatures. I'm going to click back and I'm going to press the email button to send that to our customer. Now once I've sent the email it's going to take us back to the invoice screen and all that's left to do now is finish. When we click finish we're completing the job and our co workers at the office will be able to see that I'm done and send me a new job.