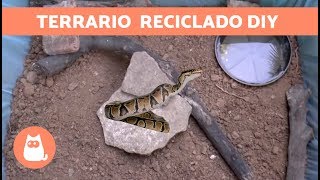
Two people show how to build a turtle terrarium from a cardboard box and garbage bags. It's cheap, waterproof, and works as a temporary home for small turtles during hibernation.
Welcome back to how to. In this video, I'm going to show you how to make a turtle terrarium in this case, with a cardboard box like this one.
Okay.
This terrarium will be for some small turtles that I'm going to leave here to keep them warm during the winter. We could use it for other types of animals.
Okay.
I don't know some animals that really can't climb up the wall of the box. What we're going to need is a box.
Okay.
Any size you want. In this case, I'm going to use this large box. You can do it with much smaller boxes. A couple of garbage bags like these, adhesive tape, a knife, a saw, whatever you want to be able to cut, and also some scissors. Let's get started. The first thing we're going to have to do is have a little idea of how we're going to place the box. In this case, what I want is for the box to be this size. Therefore, what I'm going to have to do is remove one of these parts. But the first thing I'm going to have to do is seal one of these walls. As you can see, these holes are here. So I'm not that interested in this one. I'm much more interested in this one here. So what I'm going to do is place it here like this and seal it here. Then I can remove this part here.
Okay.
This area here won't be useful since I already have this wall here. So what I'm going to have to do next is remove this entire part up here so that I have the hole. Then I'm going to secure it all a bit with the adhesive tape. We're going to have to do this carefully because if we make a mistake here, we can't fix it. So take a good look at your box and see where you want to do it. I already have this part open here, and what I'm going to do is gradually remove pieces of the box. We've already removed the top cover, and as you'll see, it's going to look like this. Now we're going to finish profiling the sides.
Okay.
We already have the top part of our box. What we're going to do now is close it up properly with the help of adhesive tape. In this case, duct tape, a very good tape. What I'm going to do is secure it here for now and then finish securing all the ends. So we're going to put tape on one side like this, and we're going to put it on the other, obviously. Now we could put sand in here and put our turtles here. The problem is that since it's cardboard, if it gets wet when the turtles relieve themselves, the cardboard won't last very long. Therefore, now we're going to use the paper garbage bags to line the entire interior and make it completely waterproof. To do this, what we're going to do is take the garbage bags and open them as wide as possible. So we open them like this, and we're going to cut along the seams little by little. Very good. I've now cut the garbage bags. In the end, I had to cut one more because my box is really big. And what we're going to do now is join them together with the adhesive tape in such a way that we have a large base. So we open them up properly. Since they are the same, it will be quite simple. And what we will do is tape all the garbage bags together. We are going to do this very carefully and make sure to grab both. Perfect. And we are going to do exactly the same with the one we are missing. Once we have gathered all the bags, we place them on top of the box, and carefully we will lower them so that the entire base is well covered. And then we can attach all the sides. So the first thing I am going to do is secure it here with a bit of adhesive tape to have a fixed point like this. And then I will gradually lower it to mark all the corners. Okay, now we have two points. And now we are going to finish securing all the bags here. When we place the sand, the entire garbage bag will be well seated. And now we have the box waterproofed. Now I repeat, we will put sand and see how we finish doing it. Now we are going to fill the sand box. So here we have the box. Let's clean it a bit. Remove the larger stones, and if you want to add a little more sand, you can put it here however you want. So here's what we could do. In this case, if it's an animal that needs water, we can put it in one of the corners. For example, we're going to put it in this one here. We make a little hole, and then we're going to put sand around it so that if the animal wants to get there, it can get there. We'll see here, depending on the animal, if it needs it, we'll put water here and it'll be able to get there without any problem. And now the last thing we'll need to do is adapt the terrarium a little bit to each animal. In this case, I'm going to put a few logs so that they have somewhere to hide. And also some rocks that they can climb up on here. I cover it so they can be put here underneath, here, behind, and also they can be put here underneath. And now all that's left is to finish filling this with water in case it's an animal that needs to drink so that it can get here and get water without any problems. Well, that's it for today's video. As you can see, it's very simple. The truth is that it is a very basic terrarium made with recycled materials that costs absolutely nothing and can be permanent if we change it, or temporary. In this case, for me, it will be quite temporary since I will only use it for hibernation. So I hope you liked it. If you liked it, please give it a like. And if you want to see other similar videos of animals, do not hesitate to visit our website. UNCO Animals. Thank you very much for everything. And until the next video.