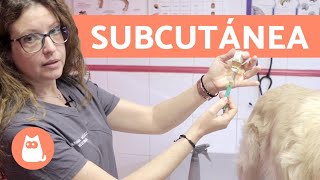
Veterinarian Susanna Gonzalez from San Jose Veterinary in Barcelona walks through how to give a dog a subcutaneous injection. The video covers preparing the syringe, handling the needle, choosing where to inject, and what to do after.
Hello, my name is Susanna Gonzalez. I am a veterinarian from San Jose Veterinary in Barcelona. Today we have the collaboration of ATVs from Vet Forma Formacion and we are going to talk to you about how to perform a subcutaneous injection. Things can happen throughout our animal's life. They can prevent illnesses that make it necessary for an owner to apply an injectable treatment to their animal at home. Given that it is common and that it is a simple procedure to apply a subcutaneous injection, we have recorded this video to teach you a correct and hygienic technique so that you can do it successfully. As I was saying, it is common for insulin, antibiotics and sometimes some anti inflammatory painkillers to have to be applied at home. Well, it is a very simple technique that we will explain below. Well, before starting it is very important to wash your hands. We are going to give our animal an injection and our hands must be very clean. We will usually have syringes wrapped in a blister pack. They open easily, they have a flap here and can be easily removed. It's good not to touch more things than necessary for the sake of hygiene. So we open the needle, the syringe. The needle also has a flap so we can remove the syringe and attach the needle firmly. So once you see that the needle has a cap so that we can't prick ourselves or hurt ourselves, the next step, if the vet hasn't provided us with preloaded syringes, which is an option, and we have to load it ourselves, the first thing we have to do is remove the cap from the needle. To do this, if we pull directly on the cap, we can dislodge the needle. So a little trick is to hold this little protrusion that the cone of the needle has with your fingernail and remove it. Okay. From now on, the puncture part is exposed, so handle it with care. Next, we'll take the vial that we're going to use to extract our liquid. And what we're going to do is turn it upside down, straight up, and I don't know if you can see it, but the needle has a bevel, that is, it has a longer part on one side and a shorter part on the other. What we're going to do is place the longer part, which is the first one that has to be inserted into the rubber band of the vial. So what we're going to do is look how I take the needle, index finger, thumb, and with my middle finger I pull, pull, pull, pull the plunger, do you see how it's full and I can use my middle finger to pull the plunger because at first I don't have enough hands. Right? It's all a matter of practice in life. So when we have the dose, let's imagine that the vet has told us to give him half a milliliter. Well, half a milliliter is too much. We have to go all the way to the O5 line, which is here. We have it ready. Make sure there are no air bubbles or anything inside our syringe. Foreign lets extract it. That injection would be ready to be applied. But let's imagine that it didn't come out the first time. Let's imagine that. Oh, I went overboard. I have air bubbles here. Injecting air bubbles in a subcutaneous injection wouldn't be too problematic, right? It's not like the movies that inject air into the veins and the animal can get something subcutaneously. Right. But anyway, let's be polished and we're going to do it. Right. How are we going to eliminate these air bubbles? Well, look, we're going to retract the plunger again so that all the liquid that's in the cone of the needle and the top part comes out here. As you can see, they look like little bubbles. We do it like this. Everyone remembers this, right? Then everyone sees it in the movies, right? So that it goes down and then we gently go back up again. Put the syringe straight. Because if I put it like that, there will be air left, right, straight. So that all the air comes out and oh, a little drop. It is not necessary to have a jet come out like in the movies, right? Not this, because we will lose half of the liquid. And sometimes injectables are very expensive, so we have to optimize resources. Once we have that tiny droplet coming out, it means that this injectable is ready to be used. So what we are going to do is put the cap on very carefully because we all prick ourselves at some point when putting the cap on a needle. Carefully we close it and get ready to give it to our dog. Now that we have the injectable ready, we are going to prepare our animal. The first thing we are going to do is take a piece of regular cotton wool from home and soak it well in alcohol, regular household alcohol too. And then we will look for the area here between the shoulders is a good area. Ah, why? Because the injection is subcutaneous, which means it goes between the skin and the rest of the dog. There's plenty of skin here, meaning there's plenty of room under this skin to put a minimal amount of liquid so the animal won't be bothered by anything other than simply going through the skin. The introduction of the liquid won't be painful. So what we have to do is take our cotton, clean the area well, move the hair aside. Ah, ah. Like a pinch. And what we're going to do is make a tent here. We do it here. You see, it can be done with three fingers, but. Okay, this way you'll see it clearer. I raise it, I make a little mound of skin. I do this with my little finger and that's where, look, I'm going to prick it with the needle. Ah, with the bevel pointing upwards. Let me introduce it. To make sure it's placed correctly and that you haven't accessed a blood vessel. We can aspirate a little bit and if a little air gets in and no blood gets in, it means that we haven't accessed any blood vessels. Well, it's not that easy for us. Right. But anyway, we'll stay quite a while. So we'll slowly squeeze the needle to introduce the liquid. Introducing the liquid slowly is important because it will bother the animal less. Okay, so what we'll do is remove the needle. So since we're not going to prick them and then we'll do a good massage. Why? To distribute this liquid. Well, to prevent a hardening here, a hard lump that will make the medication inaccessible and that could bother the animal. Uh, we do a good vigorous massage. Uh, and that's it. It's that simple. Our animal is now treated until the next injection. Okay, friends, we hope you found this video useful. And if you are passionate about animals and want to make a profession out of this love for them, we invite you to visit the website Deformation. Oh.