Smile for the Camera: Leverage the Power of Video
Catherine Sanders Reach shows how to build a video setup for under $100 using a ring light, webcam, and budget microphone, then walks through free and paid tools like Descript and DaVinci Resolve for editing and captioning. She recommends keeping videos to 5 minutes, covers YouTube, TikTok, and LinkedIn distribution, and explains how to add captions using Loom's auto-transcripts or YouTube's auto-captions.
Chapters
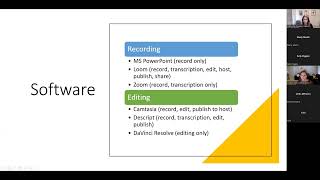
So welcome to today's learning objectives webinar. And what we're going to be talking about today is the magic of video for marketing, internal training, and other reasons you might want to create a video. And we're going to go through some basics, and then if anybody has any further questions, we can do another session that's a little bit more in-depth. Like, I'm not going to really show you how to do editing of the videos except to tell you a few of the things that you can do. So first thing is you have to have the right equipment set up to be able to produce videos. Now, yes, you can absolutely pay somebody to do beautiful, high-quality production videos with editing and bells and whistles and all that kind of stuff. But this is the kind of thing where you can for very little money actually do this yourself. And I guess the good thing is, because of the pandemic, a lot of us already have the equipment that we didn't necessarily have before. And so I've actually just taken pictures of what I call my rig, the rig that I actually have. So what I'm looking at right now is what you're looking at, which is I have a ring light. It was $35.99 on Amazon. It, it has multiple light settings. You can turn it up or turn it down. You'll see that it's behind my monitor, so it's actually coming down, um, and lighting up my face. Lighting is really important. And so in, in this particular office, I have a window to my right, and so I have the, the blinds drawn. I have blackout shades that I got at Home Depot for you know, $12 or something. So again, not a lot of money to be able to do this. I have an overhead light and then I have this ring light and that, that way I get, you know, as much full face lighting as humanly possible. I can also, with a webcam that I have, there's an arrow to my webcam. It's just the Logitech. It's a high definition webcam. It's a USB. It's clipped onto the back of my monitor. And there's a little piece of software that you can get that you can adjust the zoom. You can change the focus. I can make it black and white. I can, you know, mess around with the camera itself through a little piece of software, which didn't come with the actual device when I ordered it. I went and downloaded it, and it's actually for gaming. But, you know, I can kind of manipulate the video camera itself. Then other things that I have arrows pointing to— cup of coffee, very important. If you're a coffee drinker, which I am. A headset. So there's— I'm going to show you different ways to capture the sound. So one of the things that I find is even though the headset looks goofy, the high-quality headset with good noise canceling and all of that kind of stuff, especially because during the pandemic working at home, I have a lot of animals and people running around the house. So I want to keep my environment kind of as close to me as possible and not share it. But if you have a quiet room with the door shut, if you're going to record video, obviously, No, not having a headset looks better. I also have an arrow pointing to my little earbuds, the little Bluetooth microphone and speaker. Those look nice because you can't really see them. The only thing is I really feel like the microphone is not good enough for good sound quality. They're not really meant for recording. They're meant for talking on your phone and things like that. But, you know, in a pinch, if that's what you got, use that. These are some other rigs from some friends of mine. We were doing a presentation on video conferencing, and so John took a screenshot. So he has more sophisticated stuff. They do a lot of webinars, and so he has the, you know, better lighting and then the green screen. You can see on the back of his stand-up monitor he has the external webcam. And then they actually turned their living room into a studio. This is real dedication. So they've got the, again, the external camera. Now, one of the things they've added, you can see here, is this Yeti mic. You can use a Yeti mic. You can use a Shure, S-H-U-R-E. Those are very expensive. A boom mic. Yes, you can use those. So a good high-quality microphone is really important when you're recording video. Primarily because you're not— hopefully you're not picking up any background noise and you're not talking to somebody, you're just recording. So the best, best quality you can get there. But again, you know, the Yeti mic, I think it runs about $100. It's not too terribly expensive. Shure obviously gets a little bit spendier. And then I've seen, you know, the people who do the podcasting, they have those, the mics with the screen on it. So it keeps the pops to a minimum. Again, it really depends on what kind of quality you're looking for, but you don't have to spend a ton of money. And then John and Sharon added a green screen. This is just literally a green sheet, and I think they took a curtain rod and strung it from wall to wall, covered the couch, and so they can add any background that they want to, to, you know, they can look like they're in the Caribbean or whatever they want. But not everything works well with a green screen. But Zoom and most of the— if you want your background set, for instance, without— if I try to blur my background because I'm wearing a headset, these little kind of spaces between the headset and my head show up when you don't have a green screen. If you do have a green screen, that wouldn't show. So that's why they put that up there. So all of those are little, you know, again, fairly inexpensive. I think you could get this whole kit and caboodle for probably under $500, far less if you're me and you just do it kind of very DIY and on the, the down low. So the other thing is you can use your phone as a webcam. So if you don't want to go find— I remember sort of Mid-pandemic, you couldn't even find a high-quality webcam, external webcam, because they were sold out. Everybody was going to go buy one because they realized, oh, the camera built into your laptop is just really not sufficient. It's low quality, so you want to get something better. Again, I really like for all peripherals Logitech. But if you want to use your phone as the webcam, There's Epicam and there's Reincubate, and both of those are apps for your phone. Now, if I go back to my light, on my light, you can see there's a little place I can clip my phone into it. So if I wanted to use the, put the ring light, you know, around my webcam and use my phone as a webcam, I can do that as well. And then you can actually control the webcam from your computer. So that's what these two applications do. And of course, I'll send you the slide deck. So next step, you've got your gear. Now we're going to have to get some software to do the recording and editing, some of which you already have. So if you have Microsoft PowerPoint, the current version with— from Microsoft 365 subscription, then you have a recording tool built into PowerPoint. It only records. You can have a— it'll actually do a scrolling monitor so you can read your notes, but it doesn't do transcription. Loom is another tool that's been popularized for internal training purposes, but you can absolutely use the video wherever. You can actually also use Loom to record transcribe, edit the video, it'll host it for you, or you can publish and share to other platforms. Loom will do some minor editing. If you really want to get sophisticated with your editing, then you might want to get a different tool. Camtasia is the one that I've been using forever and ever and ever. It's— it will let you record video, your screen, edit it so I can create zooms, I can create cutouts, I can add arrows, I can, you know, overlay things onto the video, all that kind of stuff. And then from Camtasia, I would publish it to a host. It doesn't actually host, it's a piece of software that you install. It runs about $300, $350. And it's, it's not for the faint of heart. Editing video really, it requires a little bit of know-how and some patience. Then this other tool that I just started playing with called Descript is— there's a download element to it. There's an extension for your browser, and it will let you record video and your screen, transcribe it, edit it, and publish it to Descript. So you can use Descript as the publishing host, or you can push it to YouTube or Vimeo or wherever you want to put it. And then the last one, which is free, is called DaVinci Resolve. This only does editing, but if you have need for a high-quality video editing tool that has all the bells and whistles you could ever want, DaVinci Resolve is the one that everyone in Hollywood uses, but there's oddly a free version of it. I actually had an attorney who was creating some high-quality videos and did want to do some pretty significant editing, and he let me know that he I thought this was a great tool. So, you know, it's kind of two parts, getting the thing recorded and then getting it edited. And in a perfect world, you could do as much of it on one application as possible. So for that, I like Descript. It's free for limited use, and then of course you have to pay for it. Per user per month, I think it's something like $15. So not terribly expensive. So I think I'm going to show you what some of these things look like really quickly. So this is where I get ambitious because I'm going to attempt to show you PowerPoint. Okay, so hopefully you can see my PowerPoint screen. And Because we're already recording, you can't really see this, but there's a button here that says record. If I weren't already sharing my screen and using Zoom and I just wanted to open a PowerPoint and click on record, it will put it into a show mode and then let me record it and produce it. It does not create a transcript. It just creates a nice high-quality MP4. So you've already got— probably if you have the Microsoft Office suite, you've already got a tool that you can use to record video. Other things you can use— I'm not going to show you Camtasia. I think you have a pretty good sense of how to record your screen on Zoom itself. The other one I'll show you is Loom. So Loom has a download piece, it has a web-based piece, and then it has an extension. So at any time, if I wanted to create a video, I can just click on the browser extension, it loads it up. And I think it's kind of competing with Zoom right now for the camera, the camera's my video camera is kind of already in use, but you could put a photo, or if I weren't already commandeering my own video camera with this, I guess, hold on, let's see what happens here. All right, maybe since I've turned the camera off, nah, it still doesn't want to do that. Anyway, it'll, it'll show your video camera here. And then you can choose you want to record your full desktop or the current tab, which, which microphone, which camera you want to use. Now you'll note that the free Loom is screen recording for 5 minutes only. So you do have a limit unless you pay for it. And Okay, I figured it out. All right, there you go. So now you can see, and I can change a few things about this. I can make it larger or smaller or turn it off altogether. And then, and again, this one is a little bit more focused on internal training. So you've got your little head talking and then you You record it and then everything you record is stored in your library, which then you can go into your library and copy the link and share it with your team or share it with pretty much anybody you want to share it with. When you go into the video that you've created, it automatically creates a transcript. If I click Review Transcript, Then I can see the transcript here and I can go in and actually make edits to it. So I can click the little editing button, go in here and make edits to the transcript while I've got the video here to watch. This makes it easy to get your transcript not only looking good, but accurate, and then you can do the closed captions when people watch it. You can do trims, you can do call to actions, you can change your thumbnail. And then again, you can share this with people. So again, and if I click share, I can share with specific people, I can share it on social, I can embed it in my website. You can change your privacy settings, you can let people comment on it. So Loom got very, very popular during the beginning of the pandemic for people who wanted to create training videos and communication videos. So this is something easy to do. The other Tool that you can use is Descript. So this one is actually a download product. It is— it's not limited to the amount of time for the video, but it is limited to the amount of automatic transcription. So I think you get 3 hours of transcription. And so if you create a video it automatically creates a transcription. It's very easy to go through and edit it, watch the video, stop and start the video. Again, you can edit things, clip things out, add overlays. So you go into this little plus button. If I have an image or a sound effect or have another video clip that I want to put in here and all that. There's also Overdub. So if you've ever watched a video where it was obviously a computer talking, you just create your script and then it has text-to-speech. And so you can apply that Overdub. You can actually record your own voice doing it, or you can use a computer-generated voice to add the overdub. So if you prefer to record your script first and then do the video, I can't do that. I'm not that good. I have to do the whole thing all at once. The other thing is, if you've got some videos that you've created, which I did, that didn't have transcripts. So this is one I had created. Let me see if I can find one to— All right. So if I have a video that I do not have a transcript for, And I can actually pull in a video. Mm-hmm. From somewhere. Now I can't remember. I only started using this tool like 2 days ago. So anyway, you pull in a video and then you tell it to transcribe. Transcribe, and it'll transcribe the video, and then you'll end up with this lovely transcript. And then if you want to save it, you go ahead and push Publish. It doesn't publish it to— it publishes it to Descript, but it's not shared with anybody. And then you can Oh, and the other thing is with the transcripts, you can go and shorten word gaps, remove filter words like ums and ahs. So this is worth the money. If you can get a transcript that actually works, I think that's fantastic. Then you can look at it online and Play it, make sure everything looks the way you want to. And there's my transcript showing up as closed captions. And if you had it, if you shared it through here, they could actually see your script as well. And then you can go in here and download the video and download the transcripts, which I'll show you why that's important in a second. All right. So we looked at the transcript options and when you create it in Descript or in Loom. So other ways you can do this, you can type out your script and upload it as an SRT file or a VTT file. And all you have to do is paste it into Notepad and save the file with that particular text extension. Now, The reality is there's a couple of extra things that you need to do, which is why I much prefer to use a tool to do this. If, say, you wanted to just add transcripts to existing videos that you had, you can upload it to Amara or Subtitle Horse to get an automated service to create the transcription. Both of these are free products, or you can let YouTube or Loom auto-create the closed captions and you can edit them. So I'm going to show you how, how that works. Other things is, as you probably know, people have very short attention spans. So we want to think about how long these programs are going to be. If you're doing a CLE program, obviously it's going to be a long, a longer one. But for stuff that you're going to put on YouTube or Facebook or whatever, probably 5 minutes is the maximum you want to go. Um, shorter is better. This is why TikTok exists. Anybody do TikTok? Um, TikTok, you know, it's, it's— I think it's 2 or 3 minutes. They're very, very short, um, and they can be really cute. And I've seen lawyers— if you want to see a lawyer using TikTok, you can go look at Alex Su's TikTok videos. They are all for the most part funny. I've also seen the North Carolina or UNC Legal Student Legal Services use TikTok videos as a promotional piece to try to communicate with their primary clientele who are students. So there, there are ways you can leverage that with. But, you know, it's, it's hard to write out a script and know how long it's going to take. So there's a tool that I'll give you again the link to this. If you click on it, basically you copy and paste your script and you enter the script into here, and then it will tell you how long it takes to read. And you can, you can kind of change how long you typically, you know, if you talk longer or shorter or whatever. So you can get a sense of how long it takes and you can shorten it up. I actually use this. I was creating videos for the Illinois Attorney Registration Discipline Commission for some training, and they said, you have 7 minutes. But they had a whole lot of stuff they wanted me to cover. So I used this tool to basically cut down my script. The next piece of this is the teleprompter. And so in that particular situation, it was in a kind of higher quality setting. I was standing in front of a camera. I had a teleprompter next to the camera behind me. And I pasted the script into this teleprompter and it scrolled through. You can put this on your tablet, you can put it on your phone, you can put it on an external monitor. But if you need a teleprompter, there's free ones online that you can have access to as long as you scripted it out and timed it. Or you can use the PowerPoint teleprompter. Again, when you hit record in PowerPoint, it converts your slide deck into a teleprompter view. So you see the slide and you see your notes behind it. So all of that is, is important. So next thing is you've created your video, you're happy with it, you've done whatever editing, you've gotten your transcription, and the next thing you want to know is where do I get it out? How do I get people to see it? Again, if it's internal, you can host it on Descript or YouTube or wherever and send people a link. If it's your clients, you can send them a link. If you want to push it out to the world, then things like YouTube and Vimeo and social media like Facebook or LinkedIn or Twitter are where you want to put these things out. So at the beginning of the program, we were talking about where you might use these and why you might use these. And one of our attendees said he— if he's going to create these, these kind of client training videos, that he might want to sell them. Well, You can sell them on YouTube, but I actually did sell videos at one point in my career as training videos. And so I used the Vimeo platform because I— YouTube, the way, the way it monetizes is not what I was looking for. I was looking for selling a collection of videos through Vimeo. And so having explored the different options, that was the one that I found was the most conducive to just straight up sales. I could sell an individual video, I could sell entire channels of videos. So if that's, if that's your goal, that's the platform that I would recommend. And then of course you've got your social media, Facebook and all that. So I'm going to kind of show you what it looks like on Facebook if you have the video and your transcript. So If I go and I'm gonna share a video, which you can see that I already did this. Okay, so I want to share a video that I've created. So you click on Add to Your Post Photo and Video, and then you click on Add Photo and Video. Here's a little video I created and a script. Now, what if I wanna have the closed captioning included in this? I'm gonna click on Edit, and you can change the thumbnail. This obviously, and you can kind of flip through the video and choose which thumbnail you want, or you can upload an image for your thumbnail. And then the last one is upload captions. So when I created that video in Descript, I downloaded the SRT file, which is again, there's SRT, VTT, and a couple of other file descriptions that are the transcription file. But I'm going to actually open this in Notepad. Bleh. This worked before. Yes. Let me see if I can find another one. I don't know why it doesn't like this one, because it did yesterday. I would just go in and rename it, but I'm not going to do that now. But it will add those, the SRT file. If I open the SRT file in Notepad, I'll do just so you can see what it looks like. What it looks like in Notepad, you'll see that it actually has timings. So that's, that's what you want to get is those timings so it matches up with your video and you're not having to do that on your own. Alright, so that's how you add a video that you've created into Facebook, just as an example. Now, the one I'm going to focus on the most today is YouTube, and the reason that I'm going to focus on YouTube is because it's, it's the most popular one. And because it's free for the most part, unless you want to do ads. Yes, it will show other people's videos. That is what you— what happens if you don't pay for it. But it gets, it gets captured very easily by the search engines. It is in fact the second largest search engine in and of itself. You can create multiple channels and multiple playlists. If you share a YouTube video, you can share it on any platform anywhere. It also does auto-captioning. So if you haven't created a transcript file or you don't know how, or you don't have the right tools to create that transcript file, it'll actually auto-caption. You can do some minor editing and then you can use it for branding. So I'm going to show you all of that. But first, I kind of want to show you the power of YouTube itself. So let's look at what happens if I am going to do a search This is one I created a while back. So when I start typing create a transparent signature stamp, it actually, it's a common search. So you'll see that first you have the text version from the Acrobat blog, but the next set of results in Google, and that is how most people search, is video results from YouTube. Because YouTube is a Google property. And the first one that is here is from 2012. You'll note that it's from the Chicago Bar. It also has put, in the same way that a lot of text results will do for entire websites, it'll do multiple, like, let's see if I can find one that does it, but it'll put multiple parts of the website if it's a very popular website. This one does 4 key moments in the video. So that's kind of cool. Anyhow, if I click over to this, this is a video I created. Whoops. Now there's your ad. I'm gonna turn the sound off on this. And you'll see that the— so this is what you get with free is that it's going to play ads. They do the best they can to get the ads to be on point. All right. There we go. All right. So there's my video and it's got the transcript. This is very useful for people who, like me, pull the video and I don't want to share it with everybody in the room. So having, having the transcript is helpful. You will see that I have a description of what it is, when it was created. It has almost 1 million views. This is a very popular video. It has 200 comments, and you can sort the comments and see newest first. 4 days ago, somebody watched it. Thanks, you helped. You know, thank you, thank you, thank you, thank you, thank you. This video has been incredibly wildly popular and people have thanked me for the— for years, and it still works in the current tools, but it's just a video on how to use the tools that you already have on your desktop to create a transparent signature stamp. Nothing too sophisticated, it's a super short video, but people love it, and thus the power of YouTube. So when you go into YouTube, if you already have a Google account, you can just use your existing Google account. If you don't have a Google account associated with your work email, just create a Google account. So that's what I did. I created a Google account. You don't have to use a Gmail account. So my Google account is associated with my email address at the Bar Association. So I just created a new Google account with my ncba.org email and a login, and then created a channel. And so within the channel you'll see that I have no videos. That's not exactly accurate, and I'm going to show you why. So I don't have videos or playlists or channels. I do have About, um, and then you can put your email address in there. Somebody has to click through to see it. And then I have links to the website and the blog. If I go and click on Customize It takes me into the YouTube Studio. So now you can see up here in the upper left, um, the YouTube Studio. And so two things to get started with this, um, is getting your customization set up and getting your settings set up. So we'll first go into settings. And if you are going to use this, um, to sell things, pick your currency. And then for your channel that you're creating, you can add keywords. So you could do legal tech, tutorials, training, depositions, whatever you want. And then Click on advanced settings, and you can say automatically, yes, set this channel, set this channel as made for kids. Okay, so this is a bit tricky. If you set your channel as it's made for kids, which probably it isn't, it's not, it has nothing to do with whether the content is PG-13 or NC-17 or whatever. It's Really, you get more functionality if it's not set or not made for kids. So you could just apply that as the default setting. However, I'm just going to make that decision for each video. If you scroll down, if you have a Google Ads campaign, you can link to it. For the automatic captions, you know, you can turn off potentially inappropriate words, which you probably don't need to do. Remember when I showed you on that video how many people had, had seen it or how many people subscribed to it? You can turn off all that. You can disable, disable interest-based ads. That doesn't mean it disables ads. It disables certain ads. And then feature eligibility, make sure that you go in there and say that the standard features are enabled. That intermediate features are enabled. This one is especially important if your video is longer than 15 minutes. So if it is not enabled, then, and you have a video that's longer than 15 minutes, YouTube will reject it. So make sure this is, um, this is checked on and advanced features also enabled. And then you can go over into and you've gone through this whole list. So we're going to click save. Then you want to go into customization. So you're probably going to make this public. Mine's not public, and you'll see how you can do that. You can make some, some videos public and some not. So here, channel trailer for people who haven't subscribed. So if they go into my channel, they can actually see a trailer that I can create, um, if they haven't subscribed to get them to subscribe. So there's your marketing. Featured videos for returning, so you can highlight a video, the newest one or whatever, for the people who are subscribed to your channel. Then you can add features to it. You can go through and add your picture, you can add your firm logo, you can add a video watermark, um, so that you have a little your little firm logo on the video as a watermark that will automatically do. And then for your basic information, the channel name, a description. This is the link to your channel if you want to embed it in your website, um, and then you can put hyperlinks to your website and any other web properties you have. And then on the banner itself, how many links you want and your contact information. So go through all that, and create, you know, the settings and the customizations for your channel. And then you can go to your dashboard, and your dashboard just gives you an at-a-glance of what's going on with your channel. But the meat of the matter, um, is in this content button. And now you see that I actually have a lot of videos in my channel. However, because I work for the Bar Association and these webinars are for members only, the way that I don't publicize the videos but use YouTube to load them up and host them is I create unlisted. Anybody with the link can see it, so I can put it behind the firewall on the NCBA's website. So the videos are there, I can send you the link, which I usually do after the program, I send you all the direct link to it. And I can send anybody I need to, to the link, but they're not going to be able to see it in my channel. I can change this. To private or public. So, you know, I can go and change this at any time. And then you can do some bulk things, bulk editing, add specific videos to a playlist, download them, delete them, things like that, or just individuals. So once you get a lot of videos in there. So the way that you create a video or add it, YouTube does not have a video recording tool in it. So you are going to have to use something like PowerPoint or Descript or Zoom or Camtasia to actually create the video. But if you can't create the transcript, so say for instance you did it in PowerPoint, doesn't create a transcript, don't worry about that too much. So I'm going to click Create, which isn't actually create, it's really Upload videos. So I'm going to go in here and I'm going to pick one that I already created. It says videos will be private until, um, it's published. I will give it a better title. I can give a description. Then go have lunch, because what's going to happen is that it's going to, depending on the length of the video, it's going to take a minute or two to actually upload the video and give you the functionality that you want to add thumbnails, put it in a playlist, do all that stuff and create those. Remember, I don't have a transcript file here, so it's actually going to create a transcription for me, which I can go back and edit. So once it's loaded, also, if you're adding high-definition quality videos, it'll, it'll create the regular SD version and then come back later and you'll see that it's processing the HD. Because this one's a really short video, it's already doing that stuff. If I had an image that I want to associate it with this, I would just go and pick the image from there. But it also gives me, it's just grabbing some stills from the video that I can use for the thumbnail. And then if I had playlists, I could add it to a playlist or I can create a playlist from here. And then it's not made for kids. So, and it's not that it again, that it's got anything that is not kid-friendly. It's just that it's not created for children to watch. So the next thing— so I've picked that. Here's my link to share it with. Here's the file name. I've changed the title and description. You can put hyperlinks in this description. So if you have— like, what I do with these is I'll put a link to the PowerPoint, um, that I've loaded onto OneDrive or Google Drive or whatever. I'll put that in the description so people can access it and all that. So once you're, you're finished with this, the next thing you click on the Next button. And this is where you add subtitles. If I had a subtitle file for this already, I would just click on Add, click on Upload File with Timing. Absolutely. I showed you that SRT file. I'll see if I just grab an SRT file, see what happens. So obviously that is not the right file for this. Then I can go through, if I've added an SRT file, it's got all the timings in there. I can edit it or I can edit the timings. So if you do have that SRT file, Um, and then we'll save that as a draft. Add an end screen. So again, this is promotion to relate related content, so I can import from an existing video, or I can go and add it. I can add how I want it. Allow YouTube to select a video from your channel to best suit the viewer, but I can actually select a specific video myself. And it also says end screen elements won't display on the watch page for private videos. So if it's unlisted or private, this won't work. It has to be public. Or choose a specific video. So if you had a video that you thought was related And then you can go and change that and click on Save. Then the cards is to promote your own content, so other videos, other playlists, other channels. Again, this is all built within the YouTube Studio. And then you click Next. This is just checking that you're not using copyright content, someone else's content. So it actually, I guess you should feel good because it's not going to let someone use your copyrighted content, and you can't use someone else's copyrighted content, and it will block you if you try. And then you again decide whether you want to keep it private, unlisted, or public. You can schedule when to make it public. If you make it public, do kids appear in this? Is this overall, you know, meet their content standards? And then save. Once you click save, it'll say, do you want to share this? And it'll give you a whole lot of options. So you can basically promote it not only on your YouTube channel, but in social media as soon as you create it, or copy the link and put it wherever you want to. So for each one of these, you can go and see that I can make edits at any time. So say I want to go back and make some minor edits or changes to this. I'll click on the pencil icon, which is the universal sign for edit, and go through, change my thumbnail if I want to, add it to a playlist, add subtitles. Change the visibility. You can see that it's got the HD complete now, so it's going to look really good. If you do any screen captures whatsoever, you want to make sure that it's in HD, and that has to do with how you record it. It's obviously a bigger file, but absolutely worth it. And then you can go and if you want to check your subtitles— now this one actually was auto-generated by YouTube, so I can edit timings, I can listen to it, I can go through, I can do minor things like just because these are the closed captions. So if I want to, again, this is auto-generated, so I want to make it look nice so I can go through and change all that. And then if I want to do some other minor editing, I click on Editor. And I can trim portions of it, I can blur portions of it, I can add an audio track. And if I click on Audio Track, you'll note that there is a free audio library with all sorts of little quick snippets. So I could add a little intro music to the beginning of my video if I wanted to. I I quite frankly think that the intro music for most of these things sounds really horrible, so I avoid that. If you want to go straight to the subtitles, you can upload subtitles, you can edit them, all that kind of good stuff. So for each video, you can go back at any time and clean it up, make changes, add more description, that kind of stuff. Get shareable link, promote it, download it, delete it. So this is, you know, while it says this is your dashboard, to me this content is the dashboard. And then if I want to play this and see what it looks like in YouTube, you'll see that there's a couple of things, and I've got the sound on this so it won't, but here's my auto captions, which I have not edited, but it automatically captioned the video for me. It is in HD. And so it's automatically putting it in the highest quality. And then, and this is what the user sees. So if you've got the subtitles, they have to turn this on. Once they turn it on, it'll default to being on. So for people who are hard of hearing or have issues with hearing video, they can they'll, when they turn this on in their computer, it'll always turn on. Or there's a setting I think where you can make it automatically turn on. And then that's it. That's, you know, you probably know how to use YouTube, but you may never have explored creating a channel and uploading videos into YouTube. So the last thing really quickly is that you want to know how you're doing. So if you're using Vimeo, they have really good analytics. YouTube has really good Analytics. One of the things is though, you can— you saw that you can upload a video directly into Facebook, and I think you do get some analytics. But, um, for getting a sense of where people are coming from to watch your videos, what, what distribution platforms are working the best, because you can insert or embed a link from YouTube into practically any platform and it just plays and plays nicely. I tend to want to have everything coming from the primary platform of YouTube because you do get that, those analytics. So if you go back into your channel and I have everything bookmarked. Oops. Not very well, apparently. They made some changes. If it's been a while since you've seen this, they did make some changes. Go into your analytics. Because none of my videos are public, I don't get a lot of views, but I can see, you know, if, if you did make your, your videos public, then you can see all sorts of information. Overview for statistics, statistics for individual videos, what kind of reach, where I'm getting traffic external and internal, what keywords people are using. So because you get such rich analytics from this, and you can go into advanced mode and you get even more. So again, if your videos are public, you absolutely, I think YouTube is the best place to get a really good sense of how effective the videos are. So with that, oops. Now y'all have seen all the backend tricks. I am going to turn off the recording and then let y'all ask questions. So I appreciate your time today. And let me know what other types of programs like this you would like me to do, because I take requests.