How To ACTUALLY Light A Podcast Studio...
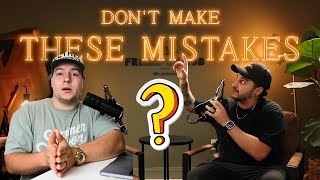
Speaker A and Anthony critique a podcast studio lighting tutorial, breaking down the fundamentals of key, fill, back, and hair lights. They explain why positioning lights behind your subject creates depth, share specific gear like Zhiyun and Molus lights, and offer practical solutions for small rooms using clamps and lightweight stands instead of tripods.
Chapters
What is up, you guys? Welcome back to another video. Today I'm gonna be reacting to a video titled How to Actually Light a Podcast Studio. Let's go ahead and get into it. I'm gonna give you guys my two cents. Let's get it.
I wanted to get this video for you guys so you can see how a podcast—
okay, first off, pretty aesthetic, pretty aesthetic. Like the colors he's got going on. Um, like the lighting, we have similar lighting. Um, we're more of like a brick vibe here in the Heidi Studio, but let's keep it actually supposed to be lit.
I see people with so many followers and have so much money and even professional.
Okay, so the first thing that I see here, it's going to be hard for the camera to separate the subject from the background. That's the first thing that I see starting off just from like a cinematography standpoint, you're not gonna get a lot of background blur or super cinematic looking shots, which is— it's fine if you're wanting to go that route.
Special videographers lighting podcast studios, and they just miss so many rules that are supposed to be done.
It's also off-center a little bit, but I mean, obviously they're not filming a podcast, so it's fine. So this is a pretty small space, so I really want to show that bar I'm actually wanting to put one of those here in the studio so I can leave my lights and things hung up. The only downfall with this is if you need to move a light— I have my lights on stands with wheels. A lot of the times we'll be moving to different angles of the room, different spots in the room, and it can be difficult if they're strapped onto a bar close to the ceiling. So I, I don't necessarily think that's always the best option. I think tripods— or not a tripod, but a light stand with caster wheels on it— is probably your best option. And they make ones that are pretty small and they're not ridiculously big.
So you guys, how we were able to take it from looking like this to this— honestly, this setup was a little bit more difficult because we had a smaller place.
Got the the backlight. So let's go back. So you can see, honestly, this is both of their faces are pretty well lit. There's a little bit of shadow on the hat, but it's going to happen. It looks, it looks nice. It looks contrasty. Uh, you have backlighting. You can obviously see some other backlighting behind them other than the lamps. And then you have a key light and a fill light in front of them. Hey y'all, I wanted to hop on here really quick and remind you guys about our 24-hour podcast setup services. So if you have a space in your office, in your church, at your house that you want to transform into something similar like this, we've perfected the technique. We've got the whole list of everything you need. We'll personally look at your space, we'll do some interior design work, set up all the cables, make a trip out to your location and set it all up for you and train you how to use it. So if you're interested, I'm leaving a link in the description for you to check out. Hope to work with you guys soon.
Setup was a little bit more difficult because we had a smaller—
hey, they have the same—
able to take it from looking like this microphone to this.
Let's go.
Honestly, this setup was a little bit more difficult because we had a smaller place to set up. But we managed to make it work. We had these lights up there. We really had to push them all the way back, get the right angle for the hair light and the key light. Let me know what you guys think in the comments of how it looks. So the rest of this video is going to be me walking you guys through how we were able to make this happen. And yeah, hope you guys enjoy. All right, so for this entire setup, we're actually going to be using some Zhiyun lights. We have super clamps Uh, so right here I have clamps.
Always get clamps. When in doubt, clamp it out.
Which, that's going to be for—
so the lighting, the— okay, let's just keep watching.
Let's see what lighting. Then we have some M20Cs that are going to be our creative lights. We might throw them on the backsplash, do other things. And then we have two Molus X100s that they're going to be our main key. They're going to have soft boxes attached. And then the main part of this entire setup, the bar, and the reason why this even works is because we have these poles. So we're not going to have huge light stands. I wanted this space to be able to be walkable, so you can walk around and you won't have to bump into stands or be— have to like worry about all that stuff. So these things are—
but once it's there, it's there forever. So remember that.
Incredible. We're just—
unless you get a ladder—
gonna hold them up by tension and use these super clamps to clamp these tiny lights. The reason why we went with June Lights, besides the fact that they provided all these lights, is because they're small. So even if they didn't provide them, I would have recommended them to buy them anyways, but they're so small that they can go on these things and I'm not going to be worrying about it. So yeah. Let's get into the setup. All right, for our key light, or key lights, we have these super clamps. I use them all the time in my personal YouTube setup. Super easy. We're just going to clamp them to the poles. Again, they're really small lights, so we're able to get away with minimal, like, weight.
I love the Cabela's hat, by the way. Shout out Cabela's. Love your hats. I don't own one, but—
a minimal setup, minimal everything. Oh, I got it so too high to where that hits that. Do we need to reset? Uh, we'll do it.
Yeah, I feel like that's okay.
So we'll work on angles and everything after, even positioning of the light. But these X100s are going to be our key, so they're going to be angled that way. And what these X100s do as a key light, especially— it's called cross lighting, but there's tons of ways to say it— it's going to light the person that's sitting right here, but it's also going to give this person a hair light. So it does two things when you do cross key lighting like this. So I just want to get this zip tied here.
See, that's hard whenever people are wearing hats. A lot of the time I have to— I put my lights in front in my hair lights. The lamps that we have, they're pretty bright. And so that causes the hair light.
But yeah, this method is used here so that it's not messing up with other things. But we'll probably get like a power strip like running down there or something. I don't know. We'll figure out a place. Thank you, Jin. But since they didn't send the right softbox, my mic was muted.
Yeah, it happens to the best of us, man. I recently did a wedding and I ended up losing a microphone. I have Rode Wireless Go II microphones. I ended up losing the one that had all of the officiant's recordings on it, and it's wireless, so it interfered with the one he was— with the lapel mic he was using for like the speakers. And so I turned it off, and I ended up losing the only copy I had. So I feel you, man. Struggles of a videographer.
The larger one. So we're gonna try to finesse this a little bit. So we might move the poles forward a little bit and then up some more just so this isn't in frame. I mean, if we have the key here, they're sitting here, it'll give about—
that's a small room too. Yeah, we'll just, uh, that's always one of the fun things that we get to figure out whenever we're setting up studios for people. A lot of the times they don't have a big space, and so we have to get very creative as far as like where the lighting goes, where we can put cables, how we can feed power to certain spots. So yeah, the bigger the space, obviously the better, but you can make smaller spaces work if you do it right.
Oh, okay.
Star Citizen, get out of here, bro.
All right, so I'm gonna cut into the video because our BTS camera died, but after this part that you're seeing, we spent a ton of time getting—
obviously he has some experience because there's these fake shadows right here, unless there is actually a window, which I highly doubt it because sunlight is very bright. So he has some fake shadows here, um, he's got his key light on him, he's got a backlight coming from somewhere. Probably the left side, it looks like. And then he's got this other light to put in some shadows in the background.
Getting these key lights right. And it took so long because we were trying to get the lights to be behind the subject as opposed to just lighting people dead on. And this is a mistake I see people make all the time when they're lighting talking heads, when they're lighting a podcast, talking whatever thing, they are lighting their subjects from the front and not making sure that they're shooting shadows. Shadow side. I have a whole video on my YouTube channel that I'll link right up here, but making sure that you are shooting shadow side is one of the most important rules that you can keep in mind to get a cinematic image, whether it's a podcast talk.
This is debatable because I have to— I don't, I don't use the same softboxes that he does. I use lanterns by Aputure, and it's pretty evenly lit. And what I do is basically point across from each other and it fills up everything and it just makes it look really nice. It's not necessarily as cinematic all the time, but it looks very clean, very professional. Again, all of this is— obviously there's some basics that you want to stay and make sure you get right, but there are a lot of things that are up to you and your preference.
Talking head, whatever shot you could possibly shoot, but specifically for podcasts, people neglect this rule all the time because it's not easy to do. It took us about an hour and a half to actually find the right positioning to get these lights behind our subject, not be in frame. It was a whole process, but it was worth the hassle. Our image was way more appealing because we had this contrast, we had this, this, this texture to the image, this hair light, all these other things that make an image good, specifically because we put our lights behind our subject, or at least a little bit behind our subject. I'm not saying to make your podcasts and images super moody by having tons of shadows. I'm just saying to have the—
you can have too much, by the way. You can have too dramatic of lighting. If your podcast is like a happy podcast about faith or something that's like uplifting, then don't make the lighting sad. Don't make it moody. Don't make it dark. Now, if you're filming something for like a movie or a film, that's when you're gonna want to do more of a moody thing. I usually only focus a lot on the contrast and how moody it is whenever I'm filming a bigger video project, like a mini documentary or interviews, that type of stuff.
Brightest part of your subject be opposite of where your camera's facing. Equivalent would be to shoot your talking heads in this direction so that the brightest part of the image is opposite of the camera. This isn't that pleasing of an image because we just didn't light it for this, but I'm sure you get the point. You need a boom light, either have a pole. You need to do all these different things to keep your lights out of frame, but it's worth it. That's enough of this little rant. Let's get back to the video. So this is what we have so far. So we are going to add a lantern softbox for the G200, and that's going to be our fill. It's going to give a little bit of light towards the background. But this is—
that's what we use. The lanterns are what we have right now.
Like, if I was talking to whomever, this is the kind of look that you'll get. We have our hair light and then we have our key light right there, and the same works for the second person. So John, if you want to maybe just, uh, do like an air squat. Yeah, but yeah, so with two people you could see how he has some light on his face from here, and then he has also—
shout out to this guy, his name is— I think his name is Anthony. It's the first time I'm seeing some of his videos. Um, shout out to you, man. Keep it up, keep up the podcasting and videos.
We'll finagle with it, but this is what we got so far with the setup that we've done.
I like it.
Here we have the G200, which is going to be our fill light, just to raise some levels in the room, splash a little bit of light on the background. And then we're going to create—
I don't know if you noticed, but he's wearing all black, and that is a big time like videographer filmmaker thing because we don't want to be in shadows. So that's just a fun fact. I personally don't always wear black. I probably should wear it more, but I don't always wear black. And there's— as long as your angles are right, you'll be fine. You won't have to worry about it.
Color contrast with our M20Cs. We don't have a ton. This is kind of a minimal lighting setup. Normally I would add maybe like some shapes in the background, just some umph. We'll add that probably in the future, but just for now we're trying to get it set for the new season of the podcast, which is called Friend of God.
I know a lot of this lighting looks kind of intimidating because there is a lot of moving parts, and this guy uses especially a lot of lights. Um, but I always like to tell people the best light is the one that you have, the best camera is the one that you have. You don't always have to go buy all of this equipment. Um, just start using what you have. And if you start getting the angles right and you start getting good at making videos and the content is good, then worry about upgrading your, your camera body and your lens. And all those things are important, but I think the actual meat and potatoes, the content, the value that you're giving is significantly more important than what your image looks like.
So, God, if you want to listen to it, it's a really interesting take on sensitive topics that I think need to be talked about way more than they are. So if you are interested, Friend of God, you can find it on YouTube. But yeah, you need to take a listen.
I'm gonna listen to it.
So after we need to buy the paid version, figured out where to position the key lights exactly to where they're not in the frame, they still gave us that nice contrast. We had to figure out the fill light, which that made it so that we didn't have tons of shadows. Then we were just playing around, we're tweaking things, making sure the set looked well. This is probably the second most neglected thing when people set up podcasts because they set up their space to look cute and they don't think like a videographer. So even if you aren't one and you're watching, try and think this way. You want to have a couple things within your image. You want to have symmetry, you want to have some color contrast, and then you want to have depth. So we created symmetry by putting depth.
Yes, you want to have depth, and that's something that I mentioned earlier. You want to have separation between the subject and the background. It makes it way more interesting. You can see here this blur behind him, that is called bokeh. Bokeh is the background blur to a normal eye, but it makes it look more cinematic, more professional, and you can usually only get this with the lens. He's probably shooting in f/1.4 to f/1.8. But yeah, that's bokeh. The further you are away from your background, the more blurry it's going to be.
So a wood slat on one side, we had a couple other things on the other side. We needed to keep this balance. We just spread it out so it would be somewhat symmetrical. Then we had color contrast by using practical lights.
I just noticed he has a Bass Pro Shops hat on this time.
That we already had, which are these nice beautiful amber Edison bulb kind of things. I thought they looked really good and light on the back, but it did create this contrast between the normal neutral key that was more towards the bluish side and then the amber lights in the background. So you have that visual interest there. And then the last thing that we did, which was a little bit more difficult, was we created depth by adding the plant. We actually spent more time than we wanted to on this, but we—
yeah, it took a while.
It sounds like fiddled with the fiddle.
So we have a service that's actually called 24 Hour Podcast Setup Service. We basically set up a whole podcast slash content studio in 24 hours, and that's from nothing. I mean, obviously we don't paint and everything, but like in one day we have everything set up, so it shouldn't really be taking that long. Just sounds like they're very particular, I guess.
It's a fiddly pig. We messed around with the plant and we put it in a position that was barely poking in a frame so that it created this depth. You don't really notice it too much, but if you look at it now, you, you'll probably feel it. I don't know. I thought it created some depth to the image. The light fell on it beautifully, and it gave this sense of dimension to the frame. And yes, so what you're about to see is the big reveal where we show Jenna her new and improved podcast. It's like MTB Cribs without the entire production team, just one camera. So enjoy it, and I'll see you guys back at that podcast studio.
Wow, look how cool that looks.
Nice. Oh, it looks so serious. But yeah, that was everything. I hope you—
wow, that was such a good reaction—
enjoyed this video. If you have any questions, because I know I didn't cover everything, I couldn't go into every like nook and cranny, every detail. Of how to make this happen, but I'm glad to answer your guys's questions. So feel—
anyways, thanks for watching today's video. I hope you learned something. Um, this is what we love to talk about here on the channel, and if you're interested in making better videos, this is the place for you to be. So thanks for watching. If you learned something today, if you like what you're watching, leave a comment. Let me know what you took away from the conversation today, from this video today. Make sure to like and subscribe. We hit 118 subscribers today, guys. Can you— I just want you to listen to this. We gained 12 subscribers in this last, like, week. That's a new record for us. So thank you if you're a subscriber. If you're not subscribed, make sure to hit the subscribe button, and we will see you guys in the next video.
More from Daron




Entitled Woman Tries Suing Man For LEAVING Her Mid Date, Instantly Regrets It

This Is Why More People REGRET Buying Their Electric Vehicle Than Ever Before