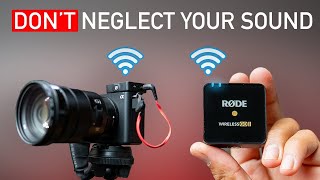
Setup guide for the Rode Wireless Go II with a Sony FX30 camera. Mount the receiver on the hot shoe, connect the aux cable to the mic input, set gain to –12 dB to cut noise, and monitor audio to avoid peaking. Record in stereo and convert to mono in post.
Chapters
Hey y'all, today we're going to be showing you how to connect the Rode Wireless Go II, some of my favorite microphones, directly to your camera. Today we're using a Sony FX30, but this can be used with any camera that has a little red circle that looks kind of like this. So I've been using these things for over 2 years now for weddings, for corporate work, for podcasts, all of the above, and it has done phenomenal. I like how they can record internally and to the transmitter so you don't have to match it up in post. So to get started, the first thing you're going to want to do is make sure you have the transmitter, which doesn't have a screen on it, and you're going to want your receiver, which has the screen on it. This is the one that goes on the camera. So whenever you're turning these on, all you got to do is hit these buttons right here in the middle on both of them, the little RØDE symbol. Just hold them down, you'll see this light turn on, and then you'll see the screen turn on for this one. So once you're on and good to go, you're going to be able to see a couple things to make sure you're connected. So the first thing is these two lights. If both of them are on, that means you're connected and you're good on your battery life. The second thing you can look at is whenever you're looking at the screen here and whenever I'm talking in the mic, you can tell there's a signal coming through one of the inputs. So once you have both of them on, you're going to want to take this little clip here and put it on the hot shoe so it's secured and on the camera. This is where your aux cable is going to come in handy. You're going to want to plug it in to the aux input. Open up wherever it is you're plugging it into with the red microphone input. So once you're plugged in there, turn on your camera, and then you'll be able to see where your volume is. You can see a visual of what you're getting from the microphone. The next thing you want to do is check the dB on the receiver itself. So right now it says -6 dB. We're going to want it at -12 to start off with. So how do you do that? There's a little dB button on the bottom, and as you click it, it goes through a cycle. Right now we're at 0, then it drops down to -30. Keep clicking it till you see -12 and you're in a good spot that has the least amount of noise possible whenever you're recording in noisy environments. So once you record your first video with it, you want to make sure to listen back or even better monitor the audio through your headphone jack of the camera if you have one. Some cameras don't have one, so you're going to have to rely on the camera speakers themselves, but make sure you're not peaking and it sounds okay through that method. So if this is the first time you're hearing of the word peaking, it's whenever these little bars that you can see, it's whenever they get very high and they're hitting the red mark. Let's turn it up higher. 1, 2, 1, 2, 1, 2. If it's hitting the red mark on the camera screen, I hope you can see that there, then that means you're peaking and it's too loud and you cannot recover too loud of an audio if it's getting too high. So make sure to check and double check that your volume settings are right on your recording level options. All right. And the last thing I wanted to note, this pack comes with 2 microphones. And this receiver receives from both of those microphones at the same time. Now you can be recording in mono and you can be recording in stereo depending on the situation. I would recommend to always record in stereo and then change it to mono in post. That way you have two separate audio tracks if one of them gets messed up. If you're wanting to change this, all you have to do is there's two buttons on the bottom. Of the receiver and you hold it down and it switches it to a mono feed. I'm not sure if you saw that, but now it looks like this. So if you're using a left and a right one, it's both going into one channel. And if you hold it down again and it switches, it'll switch and you can see two channels. The second one isn't on because I unfortunately lost my second one at a wedding that I did recently. But that's how you change it from mono to stereo. And that pretty much wraps up today's video. I tried to make it quick and simple so that you could get to filming as quickly as possible. If you like this video, make sure to comment, make sure to subscribe and like. Let me know what you guys wanna learn about next. Is there a certain camera? Is there a certain microphone? We're gonna start doing more of these reviews, so let me know in the comments. We'll see you in the next video.