How To EASILY Edit Real Estate Photos In Lightroom
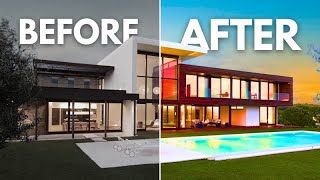
Flights and Sights Media walks through editing real estate photos in Lightroom and Photoshop, starting with HDR merging of three exposure brackets. The workflow covers geometry corrections, masking to brighten specific areas, lens correction, and using Photoshop's AI Magic Retouch tool to remove unwanted elements before final adjustments in Lightroom.
Chapters
What's up guys, today I'm going to be showing you how to actually edit real estate photos. So that's one of the big things we do here at Flights and Sights Media. So let's go ahead and get into it. As you can see on the screen, let's open up your files and, and what we're going to do is we're going to be taking these pictures at 3 different exposure levels, and I'll show you kind of what that looks like. I'll make another video on how to do that on a Sony camera, which is what we use. So you're going to open up your files here, you're going to open up your SD card, go in and go ahead and find— and make sure to categorize everything, like make sure your things aren't messy. So go ahead, this, this folder here says Vacant, Do These Today, which is assigned to me that I need to get these done today. So let's go ahead and open up these files. So you're going to actually go ahead and highlight all of them right-click, open with, and go into Lightroom. All right, so we're in Lightroom right now, and as you can see, there's a few of these that I've already edited, but here at the beginning of the photos, these are the unedited ones. So we're going to go ahead and get into it. Once you, once you open up Lightroom, you're going to see all the files. I mean, you want to import them into a folder with that person's name. That agent's name, just to keep everything organized. So we're going to start off with this first photo. So as you can see, these 3 photos are the same photo at different exposure levels. And so you're going to highlight these 3, you're going to right-click, click Photo Merge, HDR Merge right here. If you want a shortcut, you can do Shift+Ctrl+H on Mac. So I'm just going to go ahead and click it here, let it load up. And once you see the preview, it'll show you what it's going to kind of look like. And so let's go ahead and click Merge. So then you'll see it collapse into one picture and now it kind of looks a lot clearer than it did before. So now you have a merged HDR photo. So I go through and I do that on every single picture and there's usually about 25 to 35 photos on each property depending on the size. So let's go ahead and merge this next one. I'm going to do it the same way. Right-click, Photo Photo Merge, HDR Merge. And once it pulls up these settings, I'll kind of go through what these settings are all about. Now once your preview has appeared up here in the top right corner, you're going to get a few different options. It's going to be Auto Align, Auto Apply Auto Settings, which it just kind of balances things out on its own. This deghost amount, if there's trees blowing in the wind or something, because for HDR photos usually you're shooting at a slower shutter speed which causes more motion blur. So if there's trees or anything that are blowing in the wind, and whenever you merge them together, you'll get this like ghost effect where it leaves like a trail of leaves and branches, and it kind of looks gross. So if there's a lot of that going on, you can do high. If there's none of that going on, you can do low. I usually just leave it on medium to high. So let's go ahead and merge that again. Alright, so once again, it'll pull up the merged photo right here. I'm going to merge one more using this shortcut. Of Shift+Ctrl+H. This is a more of an inside shot, and it will automatically do it for you, and you don't have to do the ghost settings or anything. Alright, so once you go in and you have all of your pictures merged, you're ready to get editing. So the first thing that I do always on everything is go up here and click the auto straighten button in the geometry tab. That's going to make sure all your lines are even. Sometimes it's not 100% right, so you got to go in manually and shift it like this. Most of the time auto gets it right if you line up everything right in the shot. So once it's straightened, let's go ahead and up the exposure just a hair. We're going to bring down all the highlights, bring up the shadows, and I like to bring contrast up just a little bit. Boom, there we go. So now we're straight, we've done a basic color grade, make sure everything's even. Next thing we're going to do is go into the presets and then click on— I like this Blue Drama one. You can pick whichever one you want and it'll automatically detect the sky, and so that kind of looks ridiculous. So I'm going to go ahead and lower that just to kind of give it some depth and separate the house from the sky. So the next thing you want to do is go into the mask section, go click Add, and usually I just click Subject. It gets it right most of the time. There's a few different ways you can highlight the house. You can use the brush feature, you can use the object feature. All of that is in this Add section. What I like to do is do the subject. Most of the time it gets it right. So let's go ahead and up the exposure just a little bit. Let's brighten it up, bring up the shadows, bring down the highlights just like we did before, and up the contrast just a little bit. So we're just editing the house here. Alright, so that looks a little bit better. I'm gonna go ahead and make one more mask, and this is gonna be actually the brush feature. So If you see, this part of the house is pretty shaded. So let's go ahead and use the brush and just kind of fill in this shaded area. So once that is kind of shaded, you can up the shadows. Let's brighten it up. You want it to kind of look even with all of the other house where it's more lit up, the sun is hitting it directly. That way it just kind of makes everything look even. All right, so the next thing I like to do is you scroll all the way down on this right tab here, and there's this Optics tab. You're going to go ahead and click Enable Lens Correction. And if you're using a wide-angle lens like I do, like you should use if you're shooting real estate, there's going to be some vignetting on the outsides of the corners. So it'll darken the outside, and then once you click this checkbox it's going to actually lighten up. So here is before, here is after. It kind of makes it a little bit straighter because there's warping coming from— I use a 16mm lens, and so there's a little bit of warping in the lines. That fixes that. So we're almost finished here. I think actually I'm going to bring down the exposure just a hair. So we're almost finished here. Let's go ahead and focus on the colors now. So we're Let's go ahead and add a little bit of vibrance here. And I'm going to take out just a hair of yellow to get rid— if you turn the yellows all the way up, it kind of looks gross. So we don't want that much yellow. Nobody likes to look at super yellow stuff. So here we are, finished HDR photo of the front of the house. There's one more thing I'm going to do, and that is open it up in Photoshop. So right-click, Edit in Photoshop here. And the only reason I know how to do a lot of this stuff is of 2 and a half years of experience that I've had to trial and error, basically. So it's been super fun. So once this Photoshop opens, I like to use this Magic Retouch tool. So now we're completely out of Lightroom here. So you're going to click on this new— it's like an AI feature that they came out with recently. It's going to be Remove Tool. And this is anything that you don't want in the photo, and usually it does a pretty good job of cutting this out. So you're going to go in and outline every single piece that you don't want in, and then once you let go, it's going to do its thing, it's going to work its magic, and it's going to make it disappear. Sometimes you have to go in and correct. This one was easy because all of this is grass. And there was nothing that was different behind it. Sometimes it can be tricky, and sometimes you have to do it the old-fashioned way and go and cut things out and use the eraser and clone tool and all that. But since we figured it out with just that one click, we can go ahead and click save and go back into Lightroom. Alright, so once we open up Lightroom, it will automatically restack your photos, and so now you you can see we have 5 photos here stacked up, and that is the completed image. If you want to go in and brighten up some of these shadows up here where the sun was a little bit too high for this angle, there's some shadows up there, you can go in and do that as well. So let's go ahead and move on to the inside of the house. You're going to do that basically the same way on all of your outside photos. All right, so now we're on the of the house here, and you can see that there's the outside portion through the doors, and there's also the inside, and the inside looks a little bit darker than the outside. So let's go ahead, and the first thing I do is I open up my presets, and I've already pre-made this preset. So if you're wanting this for free, link in the description. So you can basically take your HDR photo and click this button, and you're dang near there. All you got to do is up the exposure just a hair, and just— every picture is a little bit different, so you're going to have to adjust accordingly. So the exposure, do whatever you got to do to make it look bright but not too blown out. If we go too high, then everything— you start to lose some contrast, and it just looks gross. So you want to find that good even spot where the outside is lit up enough to where you can see it but not too much. And you want to do the same thing with the inside where you're getting a lot of light in there. So once you have the exposure set right, we're going to go ahead and up the contrast just a little bit just to kind of define those shadows. We're going to bring the highlight bar all the way down, and as you can see, it brought the highlights down in the windows. We're going to bring shadows up, and then we're pretty dang close to being finished. So we're going to click on the Geometry tab and we're going to go ahead and auto-align it as well. So this one was pretty straight, so I didn't have to move it very much. So the last couple things we're going to do to this photo, we're going to go in, we're going to make a mask of objects, and we're going to just highlight on the inside of each window. And you want to be pretty precise because it it can look weird if you don't get it exactly right. So just go in, highlight each square or each window that has light coming in from outside because it is significantly brighter. Alright, so now once everything is highlighted in blue— some computers show up red, but mine's blue— so we're gonna go ahead and lower the highlights and bring down just the outside. And this is where shooting HDR photos comes in handy because if you shoot a regular photo, there's usually not enough data to capture all of what's outside and inside at the same time. So whenever you're shooting 3 exposure levels, you're shooting a really, really bright one, you're shooting a normal one, and you're shooting a super dark one to get the shadows. So the really bright one gets the highlights, the dark one gets the shadows, and then it basically averages all of them out. In post in Lightroom. So now we've darkened the outside, and so you can see clearly what is going on in the backyard through the doors. People like to see what is outside of the door sometimes, and so it's handy to have this. And also just looks more appealing. It looks more even, more balanced. It's more of a— it's more pleasing to the eye. So once we've made that mask and we've finished up doing the outdoor windows. We're gonna do one more mask, and this is the final touch that we'll make. And we're gonna go ahead and click a new mask. We're gonna do the brush. So all these little areas where there's shadows, I like to just lighten them up just a little bit. Usually it's on the ceilings, on these beams, and in corners like that back corner over there, in the far back corner by the table. Where the kitchen table would be. So let's go ahead and lighten that up. There's some shadows up here, shadow right there, shh, dark spot right there, and on the ground every now and then. And so once you have all the shadows above these cabinets too, let's go ahead and get that, and let's go ahead and just up the exposure just a hair, up the shadows just a hair, and then it kind of brings the whole picture to life, and it makes it look evenly lit, like there was lighting that you had there when the only lighting you had was these can lights and outdoor light. So that's basically how you edit the inside. If you want that preset, again, the link will be in the description, and you can download it there for free. It's been a tremendous time saver. Basically, I just go in, change up some of the coloring, eliminate some of the yellows, and it just makes my, my editing flow go way, way smoother and faster. So if you like these types of videos, guys, I'm planning on making some more. Next video I might do camera settings, and that'll be with a Sony camera. You can shoot real estate with any camera, but I like to shoot with Sony cameras because they can do video and photo, and we also do videography, so there's gonna be a video on that too. Anyways, there's heaps of information here. I know that it's kind of overwhelming at the beginning, but once you start practicing, once you get a machine that can run Lightroom and merge photos pretty quick, it's going to be smooth sailing, and it's going to be a skill that is very, very valuable in the future. Plus, you get to learn all the ins and outs of Lightroom when you're doing this. This and starting real estate photography at the beginning. If you like this video, go ahead and hit that subscribe button and comment down your favorite part of the video or any questions that you had while you're watching the video. I'll see you in the next one.
More from Daron







Entitled Woman Tries Suing Man For LEAVING Her Mid Date, Instantly Regrets It

This Is Why More People REGRET Buying Their Electric Vehicle Than Ever Before