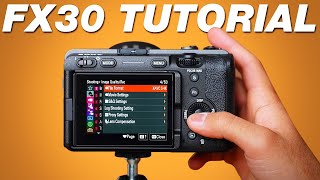
Setup guide for the Sony FX30 cinema camera covering battery installation, SD card insertion, and pixel mapping. Key settings: XAVC-S 4K at 10-bit 4:2:2 100 Mbps, Creative Look set to Neutral, autofocus with face/eye detection enabled, and exposure at 1/48-1/50 shutter speed with ISO 100 for 24 fps shooting.
Chapters
Hey y'all, today we're going to be showing you how to use the FX30 and how to set it up as quickly as possible to make sure you get the best shots that you can out of the box. All right, so the first thing you're going to want to do is make sure to put a battery inside of the camera down here at the bottom in the slot, and then you're going to have to load it up with an SD card right after that. Try and make sure to get a higher speed SD card, and you're going to want to put it in slot 1 right here. I don't have one for this video, but that's where you do it. How to open it: you hit this little switch, you pull down, push out. It took me surprisingly long to figure that out when I first got it, so make sure to open it like that so you don't break it on accident. So whenever you first turn it on for the first time, it's going to pop up a few questions that it wants you to answer, and one of those things is language, the date and time, and you want to make sure to answer all those very accurately because that's how it's going to pull up whenever you're looking at it on your computer, whenever you're pulling files over to Premiere Pro or whatever software you're working in. I'm also going to put the links down in the description to the SD cards that we like using. They're SanDisk, they're high speed, they've never failed us, so make sure to check that out below. It's also going to ask you whenever you first turn it on, alongside the language and alongside the date, it's going to ask you if you want to do a pixel mapping. And you want to say yes for the very first time just to make sure it's correctly setup, and you're going to want to make sure you cover up the sensor or the lens so it can do the right thing. Let's take a look at the screen itself. So whenever you hit this menu button here, this is going to pop up. Okay, the first thing that you're going to want to do is go over here to this red camera on the left. Okay, you're going to want to go to image quality and format, file format. Make sure it's set on XAVC-S 4K. That's going to be your highest quality output, and it be— you want to make sure to change this because whenever you open it up for the first time, it's going to be set to HD 60 frames per second. So change it to this XAVC-S 4K for the best results there. You're going to scroll down to moving movie settings, and you're going to go to record setting, and this is where you get to change it from 8-bit color to 10-bit color. Make sure if you want the highest quality you can, 100M 4:2:2 10-bit is going to be the right option for you. All right, so the next thing you're going to want to check off the list is you're going to want to go down to the second page of this RED camera, and you're going to want to click Shooting Display. You're going to make sure the grid line is on, so that way whenever you look, there's grid lines and it can help you line up the, the left thirds right thirds, lower thirds, and upper thirds whenever you're filming, because it's very important to make sure all your shots are lined up in the right framing. So let's go back to the RED camera. Um, the next main setting you want to go to is in the, the pink box, which is going to be your exposure, etc. We're going to scroll down to white balance. You can hit white balance and go either to auto. If you want to get a little bit more dialed in, you can go to this C temp slash filter setting and you can directly choose the Kelvin that you want. And this is going to change and it's going to vary based upon the lighting and situation that you're filming in. I usually keep mine around 4500 to 5500. If you go outside, it's going to be different. If you're inside, it's going to be extremely different. So keep that in mind. I'll keep mine in auto whenever I'm not doing anything too crazy. So the next thing you're going to do, go to Color Tone, okay? And this is going to be to get the best results out of camera, uh, you're going to want to go to Creative Look. Whenever it comes out of the box, it's going to be at the standard Creative Look, so we don't want that. We want to go down to the Neutral, okay? We're going to click Neutral, uh, go to the right. The contrast is going to be plus 4. The highlights are going to be -9. Keep the shadows there, fade there. Saturation, we're going to do +5. And those are going to give you the best results possible, um, whenever you first open up your camera. All right, we're almost to the end. One of the few last things that we're going to do is go to this AF/MF purple box. You're going to go into the first setting here, focus mode. You want to make sure it's on continuous autofocus unless you're specifically only wanting manual focus. Uh, the transition speed, let's go ahead and turn that down to 3. That way it's not so jerky and it's not abrupt whenever you're changing subjects. Um, it's not super quick. It looks a little bit more smooth. Focus area, you can turn this on to wide. I usually keep mine on the center fix option. We'll just leave it wide for now. Go back to the main menu for the autofocus, the face and eye autofocus tab. You're going to want to open it up. Make sure to put on the face and eye frame display. This is the box that circles around the eyes whenever it lets you know that it's in focus. So you're going to want to make sure that's on so you can see whenever it's focusing on the eyes, when, when it's focusing on the face. Once all of these settings are dialed in, you're ready to get your shutter speed set up, your ISO, your white balance, and your aperture all set up for your first video. All right, in order to fix your shutter speed, whenever you're shooting on 24 frames per second, which is what I'm shooting in right now, it's gonna be majority talking head videos. A lot of the YouTube videos that you see and the movies in the theaters, it's all shot in 24 frames per second. So the rule of thumb is to make sure it's at least 1/50. This specific camera can do 1/48 because it's a cinema camera. That's the closest thing that you can get. To double the frame rate. So either 1/48 or 1/50 is going to be perfect. The next thing you're going to want to adjust is the iris. Um, obviously the lower you go, the more depth of field you're going to have, the more light it's going to let into the sensor. It doesn't mean you always need to just default to the lowest iris, but make sure to play with it. Usually around that 5 or 6 gives you the sharpest image. Whenever you're Setting up for your first video, you're going to want to look at this meter section of the camera. You want it to say +0.3 or +0.7. I usually try to keep it around +0.0 just to kind of underexpose it slightly. So what we're going to do, the ISO is a little bit high right now. We're going to go ahead and change that ISO. We're going to drop it down to 100, and it's going to be at that +0.0. If it's +0.3, like I said, or +0.7, it's going to be totally fine. If there's a window in the background, you're going to want to under exposed slightly and bring in light from another source on your subject. But if you need the screen brighter or lower at this point, you're going to want to change the ISO alone. If you start changing the shutter too slow, you're going to get a lot of motion blur. If you start putting it too fast, like 1/125 plus, it's going to look real jittery and the picture is not going to look smooth or natural looking. That's going to wrap up our FX30 quick setup tutorial video. I hope it helped you guys out, um, and I hope you can get the best picture quality that you possibly can out of this thing using these settings. If you have any questions, let me know in the comments down below and what you would like to learn next. Make sure to hit the subscribe button if you haven't already, and we'll see you guys in the next one.