Drew Bridewell walks through InVision Studio to build a tiled graphic and animate it with state transitions, timers, and fade effects. He shows how to preview with Command+P and export using screen capture, then points to envisionapp.com/studio.
Chapters
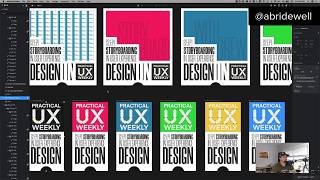
Hey, everybody. Drew Bridewell here. And today I had a little bit of time on this Friday afternoon to show you a little tip on Envision Studio. So earlier this week I released an episode on my weekly series on Lynda.com and LinkedIn learning it was all about storyboarding and user experience design. If you haven't checked it out, then make sure you do it. But if you haven't yet checked out Studio, it's coming along really, really quick. So what I'm going to do is I'm going to show you a kind of a graphic that I made and a little animation I for my weekly post. So I posted this on multiple social platforms. But essentially you can do this inside of a tool like Studio and it's really cool and it's really easy. So the first thing that I did was I kind of put together this little graphic art and I made this, you know, pretty, pretty like at least 800 pixels wide because I was gonna end up using it for potentially like dribble posts. But what I did was I'm using this new font that I found that I prefer. Really like, it's a Morganite and it just has some nice weights to it, like light, extra thin book. Anyway, I really like the kind of the graphic style of it. It's nice. And then I just made a little mask or little vector shape and then I was able to paste this image into it and then just tile it. So if I resize this up, you can see this is a storyboarding worksheet that I actually have in a handout in the class. So let me just put that back down to 8% because wanted to have this like kind of random effect here. And I have my logo for practicing UX Weekly. And then I have my season two episode one here. So let me show you what this looks like. So if I hit command P, which is essentially the preview, I can just loop this, these videos in this animation. So it just goes from one state to another state. And then right now Studio doesn't have video export capabilities, but it's super easy just to use like Camtasia or screen capture tool just to crop the part that you want to have in the video and just record it. It's pretty freaking easy. All right, so in here I can also change, you know, the different, like border appearance and different things if I want to even change that background, which is kind of cool. Let me just make, I can make it white if I wanted to, but I'll just stick to black for now. So there we Go have that. Let me show you how that works. So essentially you just select the artboard and then I have a timer that's set up over here on the right, and it's a set to 0.8 milliseconds. And then it's going to go to storyboarding page two. I could set this to go like slide up or slide down, but I'm just having it a quick instant change. And I could also have it do some motion effects if I'm changing from state to state. So that's also pretty cool. But you just kind of go through and hit C on the keyboard and just select the next state, Go through, do it again, Go on, keep going, get going, keep going. And then you got what you need. So let me zoom out. You can see that effect. The same thing happens for. Ooh, looks at this. This one kind of got out of order here. Let me just move it back up. So the same thing here for these Instagram stories, you can like these little card designs, little invitations to come hang out with me on Practical UX Weekly, but essentially you can do the exact same thing. So I select it and I haven't set up an animations here, so let's just do that together. So I'm going to set up eight point and because it does remember the last state and, you know, this time let's just see what happens if I do some fades. And let's see if we like that. So I'm gonna hit C again. Hit C again. If I can select that. There we go. This one has it. This one has it. Now, I could copy this interaction, but the problem if I copy this interaction from one state to another state, let me show you what happens. I'm going to paste it. I'm still going to have to relink to tell it where to go. And I would just prefer just to do it manually because I know exactly that it's set up in the right way. So here we go. It's going 11, 12 is going to go to 13. And I'm telling you, it. It does get easier once you just learn these kind of new techniques. But Studio is a lot of fun to design it. So here we go. And then I'm going to have this one kind of wrap back to my first state and it's going to be set. There we go. Let's preview this. So command P again. So it's just doing these like quick fades, but I definitely don't like the fade. So let me just change that to instant. And I'm Going to test that again. All right, let's just change these all back to Fae or to instant. Instant. So there is some, you know, you're watching me do work in progress here. But, you know, the idea is just for me to share some of this to show you how easy it is to actually get in there and get after it, do some work. All right, See, fade in. Incent cool. And instance cool. Let me preview this again. So I hit preview, but I'm not actually selecting this is my home set to my home. So that's why it's there. If you want to change where it's set to home, you just right click and set our port as home. And I'm just going to select that. Hit command P again, and I'm going to see it transition from all the different colors that I have set up there. I could do other things with the text, having it come up and down, but I don't need to. And there we go. Have that design. So it's pretty cool. I'm gonna do something like this, you know, for each episode this year, and I want to make these little cards. So let's see what maybe what I do for the next week. I hope you enjoyed this little hangout session with me on checking out Envision Studio. And if you haven't yet downloaded, go to envisionapp.com studio and just download. Download it and go start designing something and trying to animate something and have some fun with it. All right, Have a great weekend, and I'll see you all next time. All right, bye.