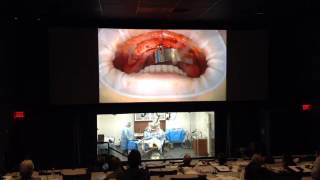
Operative demonstration (All-on-4) by Dr. Sanda Moldovan focusing on implant placement strategy for a full-arch rehabilitation. Key procedural points in this segment: preferred implant system (NobelActive), recommended implant diameters/lengths for posterior and anterior positions (examples: 4.3 x 15 mm and 4.3 x 11.5 mm), angulation guidance (45° for first premolar positions to increase cantilever; 30° adequate if implant is placed as far posterior as second premolar/first molar), considerations for atrophied maxillae (13 mm sometimes all that's available; cases with ~11.5 mm are used), surgical cautions (check drill/insert speed — avoid inserting at 1200 rpm; use torque wrench and hand final seating), and practical intra-op measures (use of guides/markers, packing gauze to prevent aspiration, local anesthetic mix of lidocaine and marcaine). Mentions long-term evidence for All-on-4 (research by Dr. Malo, Portugal).
Questions this video answers
Examples given: 4.3 × 15 mm and 4.3 × 11.5 mm.
First premolar position: up to 45°; if implant can be placed to second premolar/first molar, 30° is sufficient.
Speakers reference cases with 13 mm available and mention implants around 11.5 mm in very atrophied ridges.
Do not insert the implant at 1200 rpm (check speed and hand-seat/torque as needed).
NobelActive (referred to as "Noble Active"/"Novoactive" in the transcript).
Chapters
That give me a little baby small bite block for her. For the back. Yeah. So essentially, if the. I could. If the implant, let's say, would be in the first premolar position, you could do 45 degrees just to gain more cantilever. But if I can bring the implant all the way to the second premolar, first molar, 30 degrees is sufficient. We don't need more than that. So we can open a 4.3 by 15. You can put a cantilever on this? Absolutely. Not on the immediate prosthesis, but you can definitely put a cantilever. And there's cantilever rules. Basically twice the AP spread. Really, that we can do cantilevers.
The second question is, what is the minimum length of implant that can you use an example posterior area angul.
Repeat that again. A minimum.
What will be the minimum length of implant that you permit on the posterior angulated?
Again, it depends how atrophied the max maxilla is. But sometimes if we have really atrophied maxilla and 13 millimeters is all we have, that's all we put. So. But I like to get it obviously as long as possible. Those posterior implants are really good anchors. So 15 millimeter is a good length to. For. For Anna Maria.
I'm asking about the minimum length that you can do.
Again, it depends on the bone. Yes. So if you have only 11 and a half. We have patients with really atrophied ridge. There's no evidence in the literature that says if you put only 11 and a half, it's going to fail. If that's what your question is. There's no evidence of that. Mm probe. So let's measure. These are the long drill. So I want to make sure. Always double check. So we're going here to second line. Okay, perfect. So she has really dense bone. So I'm going to call that moderate bone. We're going to go to number five. Of course, my choice here is noble Active. There's people who like just different types of implants. Just my choice is novoactive. Okay, so we're ready to place the implant. 4.3 by 15. Go ahead and open it. Perfect. Thank you very much. Okay, so here we're ready to place the implant. 15 millimeter implant. Always check the speed before we insert it. We don't want to insert this implant at 1200rpms.actually had a patient, a colleague of ours, called me the other day. She actually had that happen to her. And the implant was way apical. She couldn't undo it. So, you know, these Things do happen more often than we think. Okay. Always when I place the implant, I also look again. I keep the guide in to help me because it's easy to lose track here. Okay. I'm at 50 right now and from this point I think I like to go by hand. I have a couple millimeters left to go. Torque wrench, please. Again, the science ON all on four has been. We have research now for the last 20 years. So this procedure is successful on four implants. With the angled one. A lot of that research is done by Dr. Malo in Portugal. I actually went to his center, spent a week with him. Okay, perfect. So we have our first implant in always the distal part will be deeper. Okay, so what I have to do is take a roger and clean out the bone to ensure that we can seat the multi unit abutment. Okay, good. So we can finalize the anterior. We can move over to the anterior implant on the right side. I'm going to go back to the precision drill. Looking at the CT scan earlier, this is going to be probably an 11 a half millimeter implant. Yes, 4.3. But let's check here. And of course she has plenty of bones. So I'm going to place the first marker to check with the other guy because the position of the anterior implant is very important to make sure that it doesn't come out through the front. Okay, we're going to take out the all on four guide and we're going to try the other guide with the little marker I'm actually going to use. Okay, so when we seat the denture, you see it's seated in the front. I could tell that this marker is coming out about 3 millimeters lingual to the buccal part of the plant to the occlusal there. Okay, this is about what we want it here. Great. So it looks like we're going to get straight abutments. Okay, let's have the On4guide back on. Okay, so I could feel here. I'm drilling to 11 and a half and I'm definitely feeling the base of the nose there. So we're gonna stop right there. Her bone is dense, so I don't need to anchor that cortical plate at all. If her bone was porous, I definitely would. Okay. Because the bone is dense. Again, I'm going to another drill here. Great. 4.3 by 11 and a half looks to be the implant of choice. Small driver. Okay, see I checked my speed here. Let's go to 50. Her bone is pretty dense. Open a little bit. Awesome. And again, when we insert the implants, we do not need water. Can you. Let's move this up again. Her bonus. Pretty dust. Let's do this by hand. So self threading implant. One of the reasons I like Noble Active. It anchors very well so I can actually shape the osteotomy as I'm driving the implant down. And of course, I always loosen it. Right. The bone has this amazing effect of being elastic, so it's forgiving. So you see here on my torque wrench, this is the maximum I could take my implant in. So I need to make the osteotomy a little bit wider here. So I'm going to back it out again. And great. Excellent. Nice, solid implant. We have two of them on the right side. Moving on to the other side. Left. Another way to keep the implant symmetrical if we have plenty of bone, is by having this guide in. I can actually tell one of the implants is on the last line. So I'm going to do the same with the other side just for the symmetry effect. But again, it's not really necessary. Depends a lot of times on how much bone we have. Okay, thank you. You're doing great. Everything going well. Go back to this side. Make sure the guide's in place. Okay. A little bit of water. I think my entrance here is a little bit too lingual. So I am going to go back to the precision drill and create myself a better point of entry. Very, very hard bone back here. I believe she did have some grafting at the time of extractions. Okay. Pumping motion. Very important when we place implants. I need to move this a little bit. Again, I want to go to 15. Okay, a little more to go here. Running a little bit into the tuberosity back here. Good. Okay, next round, let me check with the implant probe. Good. Solid all the way around. I like to feel the walls to make sure the palatal is fine. No problem. Drill number five. Okay, we're ready for an implant. 4.3 by 15 again. Yes. Thank you very much. Okay, here we are. I'm always trying to speed before I start. So you could see the threads of the implant. So these threads really anchor into the jawbone. So even if we have softer bone, we can get really good stability. Sometimes I deal with patients that have type 4 bone all the way throughout the maxilla, yet we're still able to anchor normal active implants. Okay, again, the all on four guide in place to make sure we're angling this implant properly. Good. I have to go a little bit more Here. So I'm going to self tap this deeper. Take that out, please. Held her. A little bit of pressure there. We're going to back it up again. If I would feel like this is really difficult to advance, I would take it out and drill to make the osteotomy wider, but it's really not necessary. In the mandible, perhaps, but the maxilla is more elastic, and we can certainly expand this bone at the time, at this time to seep the implant. Remember, you want to have good stability with this because you're, you know, you're getting immediate function, really. I mean, we always, of course, tell patients soft diet, but I think what we think is soft and what they think is soft are two different things oftentimes. Okay, so here we go. We have one more implant to place here in the anterior. I like to place always a little bit of a marker in the front to see where we're at. So instead of keeping the all on four guide, at this point, I'm going to remove it. And we're going to put a 4x4 guise as a throat pack to make sure we don't drop any small pieces back there. Perfect. Just a little gauze. Don't push too far back. Perfect. Just make sure you're not swallowing any pieces. Okay, let me have the smaller driver, regular platform. It's in the torque wrench. Okay, so I see here's my first guy, and then we're going to try here for the second. And the reason is I want to keep these implants parallel. So let's see. We're going to go probably an equidistant here, right at this spot. Yep. Okay. Starting with the precision drill. Going to number two drill again. I'm feeling the base of the nose here. Okay. So we're gonna go to also 11 and a half. 4.3 by 11 and a half. So at this point, what we can do is I just want to double check one last time here, the position of the implants. I'm going to take this out. Put this marker here. Actually, I'm going to take this one. Put it here. Let me have the surgical guide, please. Surgical guide. Okay, let me push this guard a little bit out of the way. Okay, good. So you see here, both of my implants are coming out in a good position there on the ridge. 3 millimeters lingual to the buccal flange. Awesome. Greg is happy. It's very important. All right, thank you very much. All right, I'm going to go a little more here. Here is the 11 and a half. You okay? Starting to feel a little pain. Yeah. Okay, I'll get you numb here. Let's have a little nummy. Some lidocaine. So typically, the anesthetic that I use is lidocaine and marcane just for long term, because, you know, as Greg is fabricating the prosthesis, I want to make sure that she's comfortable. Okay, that's fine. All right, last drill here. Yay. Patient smiling section. A little bit bracing. Okay, let's place the last implant. I have the short. Let me have the long driver for this one and the implant. Okay, here's the last implant. 11 and a half. 4.3. Okay, I have it lifted. Perfect. I'm still keeping always the adjacent marker in place on the neighboring implant. With Noble Active, you can definitely change angulation even at this point. So it's. I try to be as precise as possible, and you see it's already the bone being as dense as it is. Torque wrench, please. It's not allowing me to fully seat it with a hand base, so I'm going to just enlarge this. Gently back the implant a little bit. Mirror. A little bit of pressure there. Almost there. Backing it up one more time.