TranslateLive walks through setting up the ISLA Pro device: power on both halves, connect to Wi-Fi through Settings, launch the AILA app, and start a session by selecting language, scanning a QR code, or entering a room code at 123island.com. Learn in-session controls like press-and-hold microphone, text-to-speech toggle, and microphone sensitivity settings.
Questions this video answers
Settings → Connections → Wi‑Fi.
123island.com (enter your room code).
Over 95%.
Chapters
Welcome to the ISLA Pro Setup and Basic Functionality Training. During this training we will cover how to set up and begin using your Isla Pro as well as how to start a session and complete an interaction.
Once powered on, you will want to connect both sides of the Isla Pro to the Internet via your Wi FI network. To do this, tap on the settings icon.
From there select Connections.
And then WI Fi.
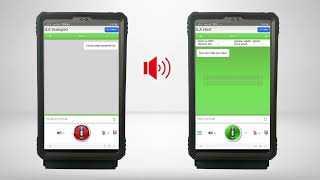
Here you will see a list of all the WI FI networks the device can detect. Select your network and input your WI FI password if required. Once you have connected with one side of the device, repeat the same steps on the other side as both parts of the Isla Pro will need to be connected to the Internet in order to function properly. Now that you are connected to the Internet, tap the AILA icon on the home screen to launch the AILA app. You will want to do this on both the Host and the Guest screens. Once the app loads, you will see the host screen on its main page awaiting for a guest to connect to it and the guest side will show the language selection tiles.
There are several ways to start a session. The easiest way is to simply select a language and an accent on the guest side of the aila. The accent selection is very important as it helps the AILA use proper conjugation and terms as well as it helps the AYLA understand what it is hearing more accurately. Also, please take note of the icon shown here. This icon means that this particular language does not support speech to text. The reason for this is that the language AI engines simply do not exist yet for that selected language. The Isla Pro supports speech to text and Text to speech for over 95% of the foreign languages spoken in the US. But for some of the less commonly spoken languages we try to offer translation even if Speech to Text or Text to Speech is not yet supported. We are constantly adding support for these and other less commonly spoken languages as the technology develops, all of which will be included in future updates for your hila.
Once you select both the language and the accent, the guest will automatically connect to the host with the selected language and then begin the interaction.
You can also join via QR code and Direct web link which are found by tapping the QR code icon at the bottom of the host or at the top of the guest, or by going to123island.com and entering your room code.
Once in a session, the host side can see what language was selected as well. If Speech to Text and Text to Speech are supported for the selected language.
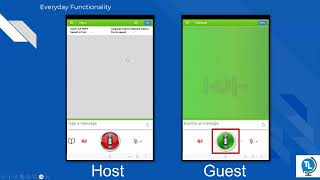
Above this is the status bar. This is where you can Find the settings which include things like the font size and colors for the displayed text, as well as the options to turn on and off text to speech. Once a session has started, simply press and hold the microphone icon located at the bottom of the app. As you speak, the Isla will capture your words and begin translating them. Once you release the button, it will translate what was said to the other side of the device and even speak the translated text out loud if text to Speech is enabled and the selected language supports this feature. Now let's talk about the buttons down by the microphone button. These buttons function the same on both the host and the guest sides of the device.
To the left of the microphone button, we have the speaker button that can toggle on and off text to speech. Next to this button is a small arrow that will open up our text to speech settings when pressed. Here you can adjust both the volume of the text to speech and the speed that the ISLA will speak the text out loud.
To the right of the microphone, we have a smaller microphone icon.
This will toggle on and off the keep pressed feature so that you will not have to hold the microphone icon down to speak through the isa.
The small arrow next to this button will allow you to change the microphone sensitivity.
Lastly, this icon will show or hide the Type A message section.
There are a few best practices to keep in mind when using the aila.
First and foremost, the translation engine is very context driven, so the more you say, the more accurate the translation will be. For example, if you give a one word answer, the ISLA doesn't have enough information to be accurate if that word has multiple meanings. Let's say a guest is asking where a specific building is and you respond with building 17. The is doesn't know if you mean building number 17 or that you're constructing 17 of something and it has to guess where. If you were to answer with it is in building number 17, the IS will fully understand the context and translate properly.
In addition to this, the AILA works best with clear pronunciation spoken at a good volume. If you follow these best practices, the ISLA will not only understand you clearly, but but it will also be very accurate and quick with its translation. Now that we know how to join a session and also know the best practices, you can go back and forth as you would during a normal conversation. Just be mindful to hold the microphone icon down when speaking.
Once your conversation is over, simply tap on end to stop the interaction. Both the host and the guest side of the ISLA will return to their main menus until another session is initiated.
You are now ready to set up and use your ISLA Pro. For more information on the advanced settings and features, please refer to the ISLA Pro Advanced Features and Settings Training. For more information.