This content was created by TranslateLive ILA. This content was uploaded by TranslateLive ILA. This is a YouTube video titled "ILA Pro Training" created on December 7, 2025. It features a detailed training session conducted by TranslateLive ILA, covering the everyday functionality and advanced features of the ILA Pro device, including setup, language selection, and conversation management.
Chapters
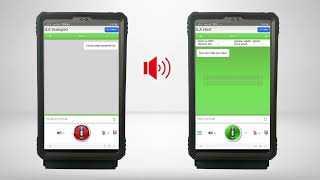
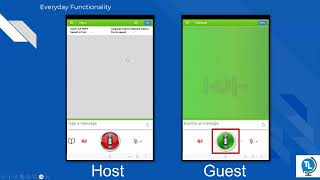
Welcome to the ISA Pro training. In today's training, we will cover both the everyday functionality of the Isla Pro as well as its advanced features and settings. Beginning with our everyday functionality, let's cover how to turn on and set up your IS Pro. When you pull the Isla Pro out of the box for the first time, you will notice it has two tablets that sit on a special stand that connect each tablet to one another. Step number one is to power on each tablet. To do this, on the right hand side of the tablet, you will notice three buttons. The two buttons right next to each other are your volume up and volume down buttons, where the button at the very top by itself is the power button. You will press and hold this button to power on the device. Once you've powered on one side of the Isla, please power on the second side of the Isla as each tablet does function independently of one another. Once they power up, they will come to home screens that look like so. Your second step would be to connect both sides to WI Fi. You do this by tapping on the settings icon, going to Connections, then WI Fi, select your appropriate WI FI network and then put in any appropriate credentials you need to to connect to that network. Just like powering on the device, both sides do need to be separately connected to the Internet as the tablets are independent of one another. Once both sides are powered on and connected to the Internet, your next step is to launch the ILUS software itself. And we do this by double tapping on our ISA icons on both our host and our guest side of our device. Once you do so, you will be greeted with the Isla Pro home screens with the two sides of the device. This is where you will begin to notice that they are different. The one side is the host side which is the side that will face you during the conversation. The other side is the guest side which will face the person you're speaking with. First thing I'd like to do is to point out some of the things we see here so we know what we're looking at. And we're going to start by focusing on the host side of the device. On our host, the big thing to notice here is the section labeled one on one room. There are two important things to see here. The first one is your room code. The room code is an identification number for your specific device. Each and every ILA has its own room code, so this is an easy way to tell the devices apart. Additionally, you'll notice that we have this message here that it says that it's waiting for a guest to join Your room. Despite this being the host side of the device, it is the guest that starts the conversation by connecting to the host and selecting a language. Speaking of which, on our guest side, the biggest thing to notice are the language selection tiles. Now, there are a lot of these tiles, as we currently support 134 languages plus a number of different dialects. To get to the additional languages, you simply scroll down on the tablet, just like you would if you were surfing the web on your own smartphone or tablet at home. Now, I do want to point out a specific icon that you will see on some of these languages, and that's going to be these two icons here. The microphone with a line through it means that the language does not support speech to text. The icon of the person with the line through it means that the language does not support text to speech. So with that, if it has the microphone with the line through it, that means your guest cannot just speak to the ISLA and have it understand their language and do the text for them where the other icon means that the ISLA cannot speak their language out loud. Now, with that being said, we do support both speech to text and text to speech for over 95% of the foreign languages spoken in the U.S. but for those less commonly spoken languages, we still like to provide at least text translation, even if we can't provide all of the features. Additionally, the only reason that every language does not support every feature is simply because not all languages have a complete AI language model released for them yet. As those models are developed and released, we analyze them for accuracy, and once they meet our accuracy standards, they are added to the software and that is pushed out in future updates. Now that we know our geography on things, let's talk about how we start a conversation. And as previously mentioned, this is started by our guest when they select the language in our example here, we will go ahead and use Spanish as our example language, and we'll go ahead and tap on the Spanish tile to select that language. Once your guest selects their primary language, the next screen that will come up will be our accent or dialect screen. And this is a very important step because languages, especially very widespread ones like Spanish, can be spoken very differently in the different regions of the world they're spoken in. So it is imperative that your guest picks the appropriate accent for themselves, because this will enable the ISLA to understand them better as it listens for the nuances of that accent. Additionally, when the ISLA goes to translate from the host back to the guest, it will take those same nuances into account with its translation. So this makes it better going in and better coming out. When speaking through the Isla, once your guest selects their accent, the two sides will automatically connect to each other and put you into a session or a room. And this is where we actually have our conversation with the Isla. Again, our host site is on the left here and our guest is on the right. And just like before, I do want to point out some important things we see here. The first thing I want you to notice is on the host side of the device, towards the top, we have a banner. Across the top I called our room information banner, and this is a very helpful banner. This is a quick snapshot of helpful information, but that both you and your that you would want to know about your guest whenever you start a session. So for example, the first line here is where it says guest is where it's telling me who is connected to me. If it starts with Ila, that tells me it's my guest ila. But if it's somebody who has done a remote connection into me, there's a place where they would put their name in and I would be able to see their name here. We'll talk more about remote connections here in just a little bit. Next, it tells me what language my guest selected. That's something that's just helpful to know in general, but also if it's something you need to document, you can get that information there. But the most important thing this banner is going to tell you is it's going to tell you the language your guest selected. Does that language support speech to text, and does it support text to speech? So can your guest talk to the ILA and get the Ilotalk back to them in their selected language? And that's super important to know because if the selected language is missing one or both of those features, that will have a huge impact on how the guest uses the device to communicate and vice versa. The next thing to notice is across the top of both our host and our guest, we have these green bars across the top. And inside of those green bars in the upper left hand corner, you're going to see these three horizontal lines. This is our icon for settings. So this is where both the host and the guest can access their respective settings menus and make any adjustments or changes that they need to. Additionally, you'll notice on the host side, in the upper right hand corner, there's a second settings menu. What this is is this is a collection of settings that you can change for the guest from the host side of the device. So for example, if you're speaking to somebody, they're having trouble reading the text that comes up because it's too small. You can hit this button and change the font size for them rather than trying to walk somebody through how to change something like a font size on a device they've never touched before through a language barrier. All that being said, the whole point of that is to get to the conversation as quickly as possible. So let's talk about how we actually talk to each other through the ilep. And the good news is, is that it's very, very easy. We notice on both the host and the guest, we have these large red microphone buttons. And the way this works is whenever you're ready to speak, you will simply press and hold your button, say whatever it is you want to say, and then release the button and the islet will finalize what it's heard, translate it, and send it to the other side. And we're going to start this, and I'm going to kind of walk you through this. And I'm going to start on the guest side of my device. So on my guest, Ila here, I'm going to press and hold my button. You'll notice both my button and my background turn this bright green to give me a strong visual indicator that the microphone is active. As I speak, these little bars go up and down to show me that the Isla is hearing my voice. And then lastly, as the Isla hears my words and converts them to text, that text will propagate across the top here. So again, my guest side is set to Spanish and, and my Spanish is not exactly robust. So I went real simple and I said, como estas? The Isla heard me just fine. So I'm going to release my button. When I do, it finalizes what it's heard, translates it, and sends it over to my host. And at this point, if I have text to speech turned on, on my host, it would out loud in English say, how are you? To return that greeting from the host, I'm going to follow the exact same process. I'm going to press and hold my button. I'm going to say, I'm good. How are you? The ISA hears me just fine, so I'm going to let go of my button. When I do, it finalizes what it's heard, translates it, and sends it back to my guest. And once again, if I have text to speech enabled on my guest side of my device, and my guest has selected a language that supports text to speech, it will out loud in their language say that translated phrase. So I Can see my guest selected Spanish. I can see text to speech is supported by that, by this little check mark next to it on my room information banner. So in this situation, my guest Ida, would out loud say, astoy bien como estas? And honestly, that's most of using the Isla. It really is as simple as press and hold your button, then your guest presses and holds their button, and you just go back and forth having your conversation. Now, there are some best practices and things to be mindful of. Number one, the Isla microphone is not picky. It will listen to anybody it can hear. So with that, number one, you do need to be very mindful about speaking over your guest. Otherwise the isla will pick up part of what you're saying, part of what they're saying, and kind of come out as a jumbled mess there. And you don't want that. Number two, it does have a tendency to listen to whoever's loudest. So you do want to speak with a good amount of volume. So it isolates your voice versus other background conversations and things like that. The third big tip when it comes to speaking through the islet is that it does work best with clear enunciation. So please focus on enunciation. Maybe slow down a little bit if it's having trouble catching what you're saying. And between that and speaking loudly and clearly, it should come through just fine. Next, I do want to focus on some of the other buttons here at the bottom, so we'll know what they do. And the first couple ones we're going to look at do the same thing on the host and the guest. They just do them for their respective side of the device. So the first one is this speaker icon. The speaker, red speaker with the line through it. This icon is a quick toggle for text to speech. You can turn text to speech on or off at any time by tapping this button. If it's red with a line through it, text to speech is off. If it's green, text to speech is on. And you can tap this button at any time to turn it on or off at your leisure. To the right of our big red microphone, we have a smaller microphone button, and this one also activates the microphone, but it functions differently. The way this button works is if you tap this icon one time, it will turn on the microphone and the microphone will stay on until you tap it a second time. So this is helpful in situations where you either can't physically press and hold the button, or if you're going to be speaking for a long amount of time, but the One big caveat with this button is that you do need to make sure that you remember to tap the button the second time to turn off your microphone before your guest begins to speak. Otherwise your host is will hear what they're saying. It will try to find English words that match up to whatever sounds they're making for their language. And those words aren't going to make any sense, and then it's going to translate them, which will probably make even less sense. So be very mindful to make sure you turn the microphone back off before your guest begins to speak. The last button that does the same thing on both sides is this little bitty up arrow that's next to the microphone. When you tap this icon, it will bring up our microphone sensitivity settings. This is where you can manually adjust the sensitivity of the microphone on either the host or the guest as you see fit. The last button we're going to talk about is only on the host side of the device, and it's this icon that's all the way over here on the left, and that's this book icon. And what this is, is this is how you will access what we call your common phrases menu. And what common phrases are is you can take any comments, questions, phrases, statements you guys have to make on a regular basis. You can save them to the device so that whenever you need to use them, rather than physically saying them out loud, you can just tap a button and send them through. Now, the example I'm going to show you comes from one of our schools in Kentucky. And what they did is they actually took their entire enrollment process, broke it down into categories, and then took those categories and broke them down into the questions they would ask a parent to help them fill out their enrollment paperwork. So for a moment, let's all pretend that we're in elementary school in Kentucky and we're helping a parent enroll a student in school. All we would have to do is tap on this icon, and the first thing it's going to do is bring up my various enrollment categories. Then when I want to go through my enrollment questions, all I have to do is tap on the blue triangle to the right of it and it will drop down and it will have every question I need to ask in the exact order I need to ask it and the exact way I need to ask it. And in order to send that through to the other side, all I have to do is tap this button to do so I don't actually have to physically say it out loud. So this is a fantastic tool for Any of that repetitious, formulaic things, you have to go through different disclaimers, you have to give people different paperwork, you have to walk people through. And this is a very customizable tool. Additionally, in order to get your pre spoken phrases saved to the device, there's two ways to do it. Number one, if it is something that's short and sweet and you only need it on one device, there's a place in the settings where you can save it yourself, which I'll show you in just. But number two, if it is something that's longer, more complicated, or something you want to push to more than one device, you will want to reach out to our support team@supportranslatelive.com help and we will be more than happy to help you with that. So again that supportranslatelive.com or translate live.com help to exit this menu, we're going to hit the back arrow here, which will take us back to our normal conversation window. And the last portion of this I want to show you is the text bars. So let's talk about why these exist. So for the guest, there's kind of an obvious reason, right? If your guest selects one of those languages that doesn't support speech to text, they're going to have to type in what they want to say, right here is where they will tap. It will pop up a keyboard and you can type and they can type in what they want to say and then they'll hit a button to send it through to the host. For the host, there's also a good reason for it to be here. And that's pretty simply put, the Isla is very good at what it does, but it is still a computer, it's still an AI, which means it can make mistakes. So if you're trying to say something to the island, it's either misunderstanding you or misspelling something. This is where you can tap to bring up a keyboard to type in what you want to say and then push it through. Additionally, if you do have a word, a phrase, a name or something like that that you say on the regular basis that the ILA does not understand properly, please reach out again to the supportranslatelive.com email address with that information. And we have tools we can use to customize your Isla and how it hears you. So please engage us and let us help your Isla get even better for you. That's everything for our everyday functionality, but I do want to address some of our advanced features and settings so we know what all of our other buttons and switches do. So in order to get to this screen, just hit the end button on your ILEP Pro and it will take you back to the home screens. And this is our home screen for the host. First I want to look at, in the upper left hand corner here we have this question mark icon. This is our get help button. When you tap this button, it will take you to our help website, which does have our Basics training video as well as our full user guide, which breaks down every screen you could see on an island, whatever single button on that screen does, as well as our most popular questions. So when in doubt, if you need a refresher, you can either refer back to this video or you can hit this question mark icon and head to here. The next thing I want to talk about is the QR code. So the QR code is a very helpful tool that can be utilized in a lot of different ways. So you do have the QR code that is on your home screen. You can also tap the QR code and it will give you a larger version of itself as well as your direct web link. What this is for is anybody can take their device and scan your QR code and it will turn their cell phone into the guest side of your ila. It pops up a website where they don't have to log in or download or sign up or do anything like that. And all they have to do is literally select their language, select their accent, put their name in and hit connect and it will connect to your host side of your device. This also works from anywhere in the world they are as long as they're on the Internet. So we talked a little bit about remote connections earlier. This is how you do remote connections. So you can send your QR code to anybody who needs to connect to you remotely. They scan it and again, it works just like the guest. It pops up. They pick their language, pick their accent, put their name in and hit join room. They don't have to download anything, they don't have to install anything, they don't have to sign up, register, login, nothing. It's literally pick language, put your name in, hit join, and then it will ring on your host side. You accept their call and it puts you into a room just like your normal one on one room session. Additionally, you do have a web link here. What that is for is, let's say you're doing a remote connection with somebody who's connecting on a laptop or a desktop. They can't exactly scan a QR code with those devices, so you can send them a web link and it does the exact same thing as scanning the QR code. Additionally, if you do want a prettier version of the QR code to make it easier to share or print, you can hit the Generate PDF button. This will open up one of our support websites where you can put in your name and your email address, it'll automatically pull in your room code, and we will send you a a QR code that looks like this with that's tied to your room. So an easier to print, easier to share version that also looks better. The last section here is the Live interpreter room. What this feature is for is if you run into a situation where somebody comes in and they're speaking a language that the ISLA does not support, or maybe they're speaking one of the languages that doesn't do speech to text or text to speech, but that person also can't read. In those situations, you actually need a live interpreter. So if you already have a service that you contact for language assistance, we can set this button up to dial directly to that service. Additionally, this is a service that we do offer with our own language interpreters. So if you have purchased that feature, this is how you launch that feature to get to our language interpreters. Additionally, if we also offer the service of American Sign Language interpretation through a secure video connection that is also launched through this button. So if you've signed up for any of those services, you would hit this button and it will connect you straight to the interpreter or give you the options to select what kind of interpreter you would like. In our upper right hand corner we have our settings button. So let's go ahead and tap this gear icon to go into settings. When we do so, the first page it takes us to is our support page. This is just a helpful page for whenever we're doing any type of technical support with you. So the first button here is a first tab, like I mentioned is support. And the first button we see here is our feedback button. This is just a quick, simple place to leave short, simple feedback. The language, this language translated well. This word didn't translate right in this language, things like that. The next button is a shortcut to your network settings. We put this here simply because most of the time if your is having an issue, it's because of one or both of the sides are not properly connected to the Internet. So we made a shortcut for that and then the last one here simply closes the Isla app and restarts it. So to refresh it to Pull any updates and things like that. The next tab we see here is our host tab. And what this is, when you tap on this tab, it'll bring up these options and this is where you can set the default settings for your host device. So think of it like, when I start a session, how do I want my host to behave without me hitting any buttons? So, for example, the very first option is text to speech. Do I want text to speech to be on, or do I want it to be off when I start a session again? Remember, you do have the quick toggle button you can hit at any time to turn it on or off. But this is how you can set how it behaves right when you start a session. The next button is also a very important one. This is the language for the host side. Your host doesn't have to be set to English, it can be set to any of our supported languages. So if you do have somebody who's more comfortable speaking a language other than English through the host side, go ahead and change that here, and then they can speak whatever language they would like as long as it's supported. The next section here is all about the text. So as you saw in our examples and as you've seen when you played with your Ilers yourself, when you talk back by, when you talk back and forth through the Isla, it kind of looks like a running text message chain. Well, you can change everything about those, those text bubbles. You can change how big the text is, what color the text is, what color the bubbles are, which color color the incoming and outgoing messages are. All of that is fully customizable. And this is where you customize the default settings for those for the host. So this is where you can set that. The last option here is your room code. You can actually change your room code. It does not have to be the random numbers we assigned you. The rules around that are is it can be any combination of letters and, or numbers, but no special characters. And the only other caveat is that it cannot be something somebody else has already picked. So if you try to select something that somebody else always has, like my room code you see there, it will not allow you. It does have to be a unique code of some sort. Additionally, the only other thing to be mindful of with your room code is to know that your QR codes that we just looked at and your direct web links, those are based on your room codes. So they do not change unless you change your room code. So if you change your room code, you will need to update anywhere that you printed off or sent out your QR code or your web link, because they will be different. Our Next tab here is our Guest tab. This is where we access the exact same settings just for the guest side. So again, for your guest, one of the most common settings I see people change is they do want text to speech to be on by default. If you check mark this box that will do that. Additionally, this is where you can change all the text options, default text options for the guest side of the device. Our next Next tab here is the Language tab. On the Language tab, this is where you can actually change the order that the languages show up on the guest side of your Isla. So there's two different ways to move the languages around here. The first one is you can press and hold on the two horizontal lines and then drag the language to where you want it to be. Or you can hit the three ellipses next to the language. It'll pop up a window where you can type in the number on the list you want it to be and it'll move it to there. So again, think of your most popular languages. Move them to the top so people don't have to scroll so far to get to them.
Our last tab here is our Phrases tab. I mentioned there was a place where you could save phrases yourself when we looked at our common Phrases menu. This is where you can do so. So again, if it's something that's real short and sweet and you only need to save it on one device, you can do so here. But if it is something that's longer, more complicated, or something we want to push to more than one device, please reach out to supportranslatelive.com and we will be happy to get you taken care of with that.
Next, I do want to go back into a session. So if you're following along, go ahead and select a language and an accent on the guest side of your device. And I mentioned these settings menus before, but we didn't actually look at them and I wanted to come back and show you a couple things there. So first I want to look on our host side. If we go to our upper left hand corner of our host and hit these three horizontal lines, these are the settings we can change for the host while we're in a session. And the good news is is that we know what most of these buttons do. They do the exact same thing in a session that they do out of a session. But there is one new button here and that's going to be our clear conversation button. This one's pretty straightforward. This simply wipes all the text off the host and the guest side of the devices at the same time. So let's say you're talking to somebody, they're giving sensitive information to you, like name, address, date of birth, those sorts of things. And you've got a busy group around you and you're worried about somebody looking over their shoulder and seeing that information. You can hit this button and it simply wipes all the text off of both screens. Additionally, this is the best place for me to bring this up. The ILAS do not record your conversations. They are not saved on the device, they're not saved in our cloud, and they're not even exposed to our AI for learning purposes. So with that, just keep in mind, when you do hit this end button, your conversations are gone and they cannot be retrieved. So if you do need to document any part of your conversation that you have through the isa, document it the same way you would a verbal conversation, because you will not be able to pull it from anywhere. Additionally, let's go ahead and look at the settings you can change for the guest from the host side. So when I tap this button, it's going to drop this menu down. And again, just like before, we know what most of these do because they do the same thing in and out of a session, but we have two new buttons I want to point out. The first one is the Show Guest Language Selector button. What this is for is if your guest picks the wrong language and you do not know what language they speak, you can hit this button and it'll simply provide them with a smaller version of the language selection tile so they can try again. The other major change here that we can do is this button here, the Control Guest Speak button. What this is for is if you're in a situation where for whatever reason, your guests cannot physically press and hold their button, you can actually take control of the button and press and hold it for them. So you do this by check marking this box, and when you do, it'll actually take the microphone off the guest side and move it to the host. When you press and hold the left microphone, it will activate the microphone for the host side, just like normal. When you press and hold the right microphone, it will activate the guest side just like normal. And one of the neat things about that though, is that everything on the guest still functions just like they were pressing and holding the button. Their screen will still turn green, the bars still go up and down to show them the mic is picking them up, their words still come up across the top so they can proofread it functionally. It's the exact same as if they were pressing the button. You're just doing it for them. Lastly, it's rare that a guest will go up and hit their settings button, but if they do, it brings up this menu and I want you to notice that we even translate the settings menu for your guest to their selected language. It's again, that's an ease of use feature. This is what those languages are in English and we know what all of these do by now, but I wanted to point that out for you. Lastly, just a couple of quick best practices with your Isla. Most of our clients do keep the devices on and plugged in when they're not in use. When they just sit there for a little bit, their screens will go dark and you just have to double tap them to wake them up. This allows them to receive any updates to both the the tablet software as well as the ILA software itself. Additionally, if your islet is having an issue, we do recommend double checking to make sure that both sides are connected to the WI Fi and then restarting the tablets by pressing and holding the power button and counting to three. It'll pop up and give you the option to restart them. So restart your host, restart your guest, make sure they're connected to the WI Fi and then relaunch the app. Install any updates it prompts you to and at that point, if it is still having an issue, you can by all means reach out to us@supportranslatelive.com or go to translatelive.com help. This has been the ILA Pro basic features as well as advanced features and settings training. If you need any further assistance or have any other questions, please reach out. But other than that, thank you very much and you have a great day.