Step-by-step guide to installing the Data Self Analytics Web Server. You'll need admin read access to your ERP database, write access to the Data Self ETL database, and port 80 available. Choose your authentication mode (Active Directory recommended) during setup, as you cannot change it later.
Chapters
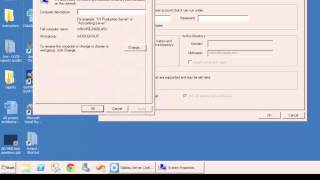
Data Self Analytics Web Server Installation Please pause the video to read this page in detail before you continue the video. I assume you have already downloaded the installation file for the DSA web server. Be sure it is complete. Once you do that, double click to start the installation. Enter the extract password available from the packing list and click ok. You should see User Account Control prompt. Click yes. Once you see the splash screen, click Next. You may change the installation folder if you wish to. Click Next here. The Installer Verified if your system matches the system minimum requirements if you're installing for a production server, be sure that your system specifications match or exceed these minimum system requirements. If you're installing for a proof of concept or demo, you can be more flexible here. Select Next. We recommend keeping the same folder as is. Click Next and click Install. Wait for the next step. Once you see this blank page, click Next. This is the activation page. We highly recommend that you activate the product right away. The license key should be in the packing list. It's much easier to do that now than later. We also recommend that you register your product now to help dataself provide you with more prompt and proper support. DSA Web Server Configuration Page if you're just using this for a demo or proof of concept, then uncheck the bottom box about adding data and click ok. But if this is a production server, there are many more things you have to do yet. One is be sure that the user that will run the web server in the Admin user account has a reading rights to the data warehouse as well as read write access to the Data Self ETL database. Be sure to enter the full domain and admin username and password there. It's important to decide how user authentication will be set up because it is permanent and unchangeable without a complete reinstall. All users can be defined here with Local web Server Security or using Active Directory. Using Active Directory is the option we recommend. Here's how to find the fully qualified domain name and nickname to determine the fully qualified domain name, which Microsoft has an acronym FQDN Go to the Start menu. Find the Run command. If you're using Windows 8, this will be more difficult to find. Type in sysdm cpl when you hit enter it will show up above and you can see that it is a Control panel icon. When I looked on my Control panel, even when I searched for it I couldn't find it. So this is the easiest way or the only way I know of to get to this information. This is the system domain Control Panel Properties it shows up as the system properties. In here you will see the full computer name on a different server or in a different system other than the one I have, you might see the FQDN or the fully qualified domain name. I don't have a domain on this box. This is the in this case, this is my nickname for my box. Be sure to enter the fully qualified domain name and any nickname in the appropriate box. The user and password above should be an admin user with read writes to the Source ERP database on SQL Server as well as read write access to the dataself ETL data warehouse database inside SQL Server. Be sure to set the port to 80. If you cannot, try uninstalling Internet Information Server first or also uninstall Ms. SQL Reporting Services. Make sure to uncheck the bottom box so you do not add sample data. Go ahead and click ok. Once it confirms settings have been saved, click OK and wait for the next step. In the end of the installation, the DSA web server will pop up with a different browser window. If you chose Active Directory Authentication then you will see a different page than this. This page is used to add the first administration account to the local server. If you use Active Directory, be sure to add an Active Directory user with appropriate proper permissions. They will be the main administrator as starting point for for this web server. If you don't use the Active Directory authentication, enter here manually any name and password for the administrator user and click Add user. You'll see a mostly blank page. Minimize this page to continue here you can launch the Data Self Analytic Server monitor. Leave this checkbox checked to launch the monitor. Unless this is for proof of testing, then please uncheck it. Click Finish. You're done. You did it. That's the installation of DSA Web Server. Thanks for watching this video.